First, collect the four white edge stickers around the yellow center. This temporary pattern is called the white daisy. You’ll then move those edges to the bottom to build a correctly matched white cross.
1. Make the White Cross
Find Your White Edge: Three Common Cases
Case 1: The White Edge Is in the Middle Layer
A quarter-turn can bring this edge to the top. Hold your cube as shown, then turn the right face.
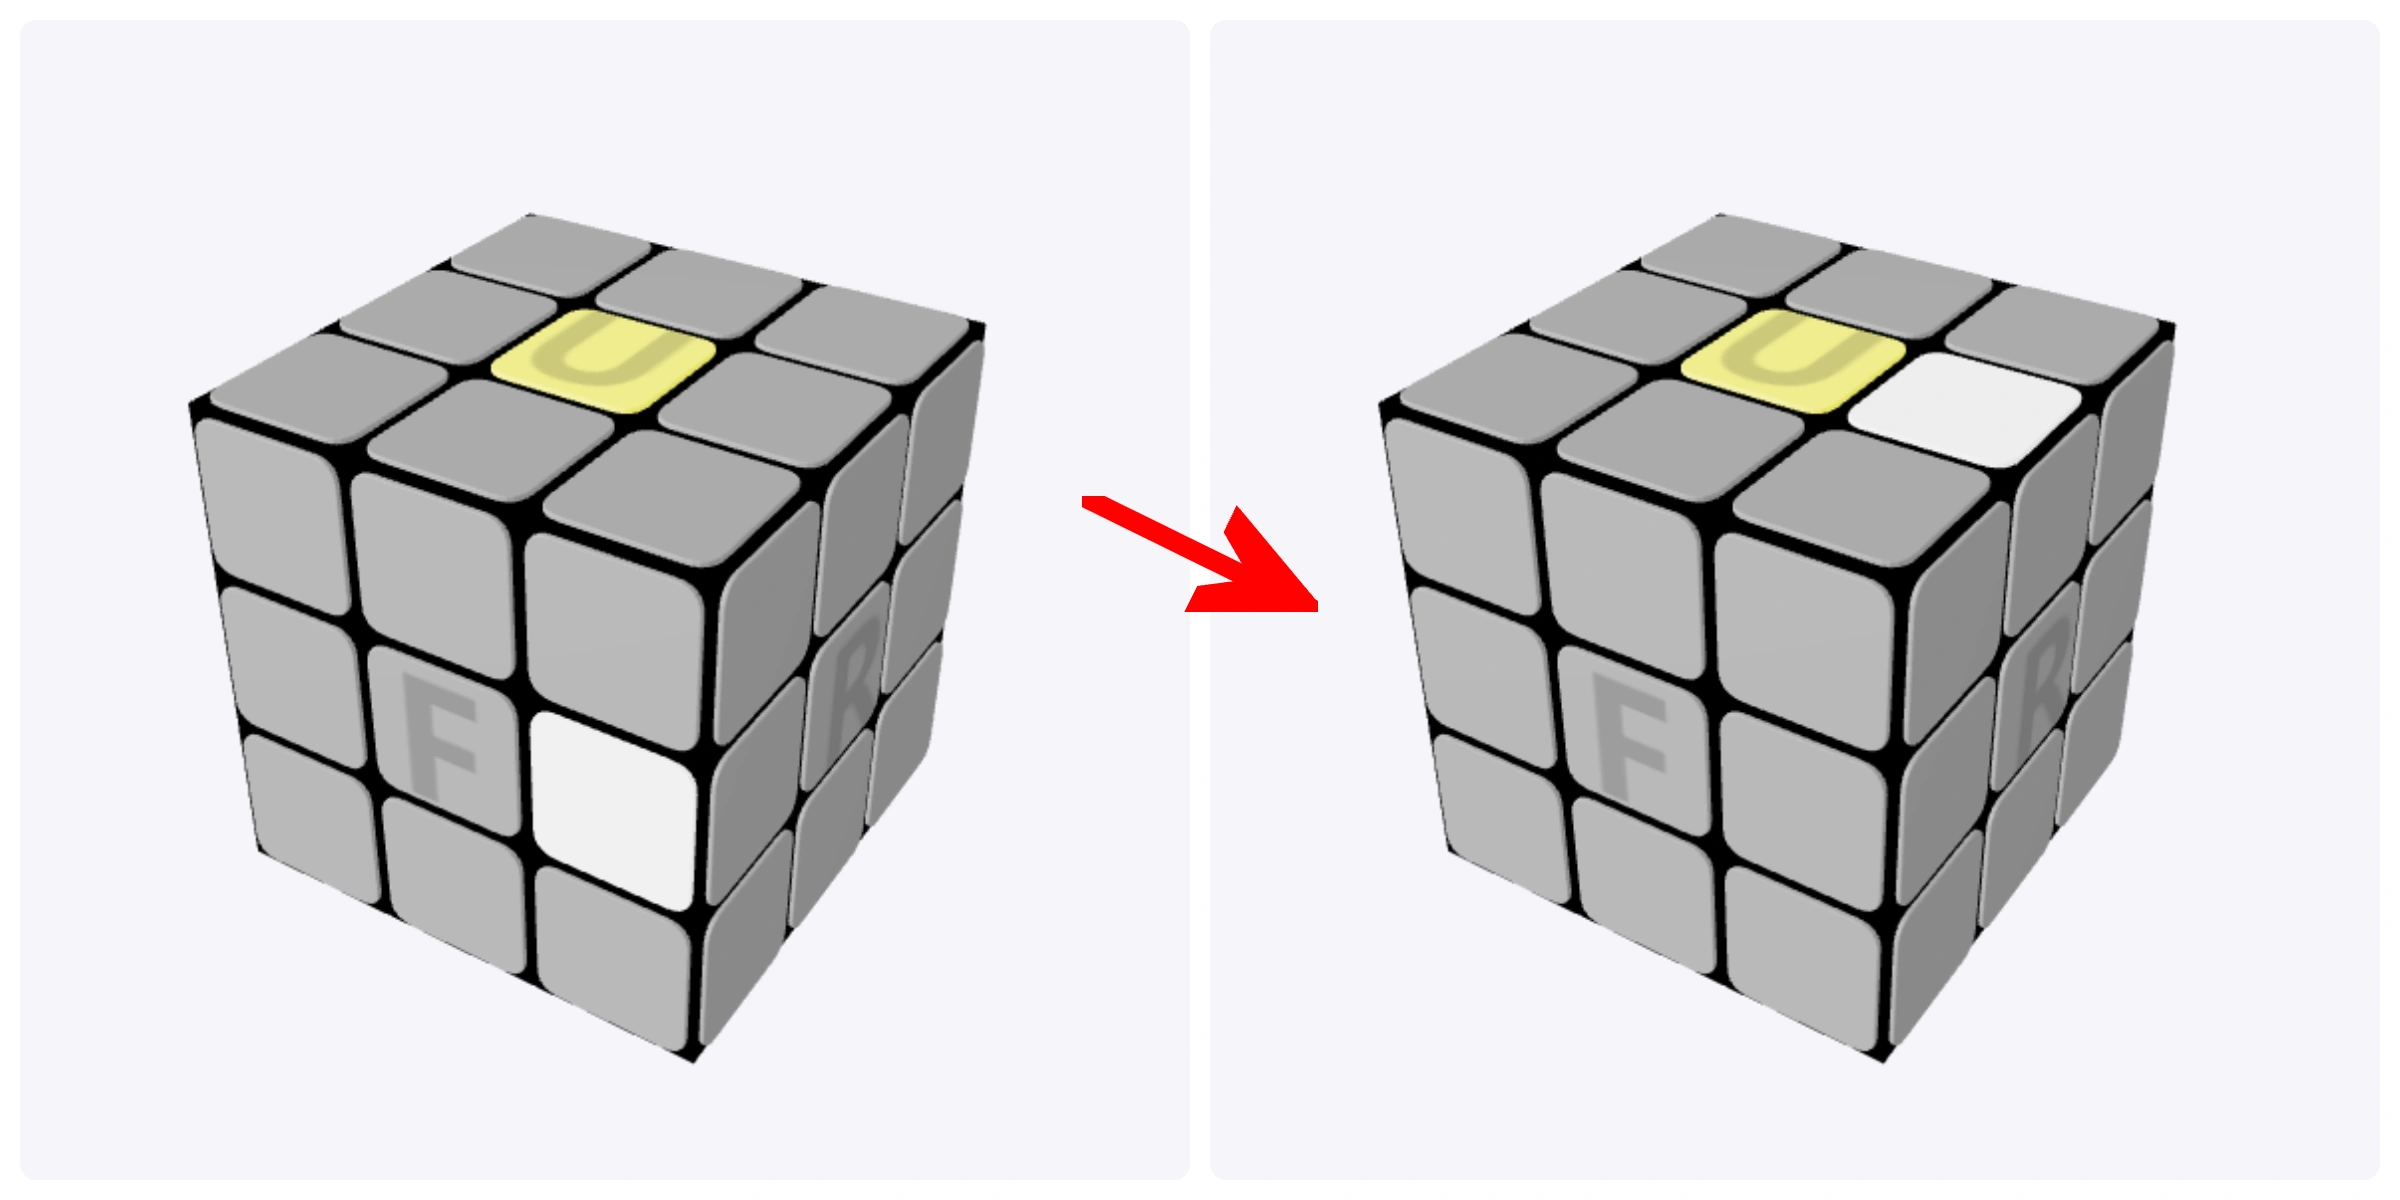
Bring the white sticker onto the top face.
R

Middle-Layer Edge on the Other Side
If the edge is on the left instead, use the mirrored move shown here.
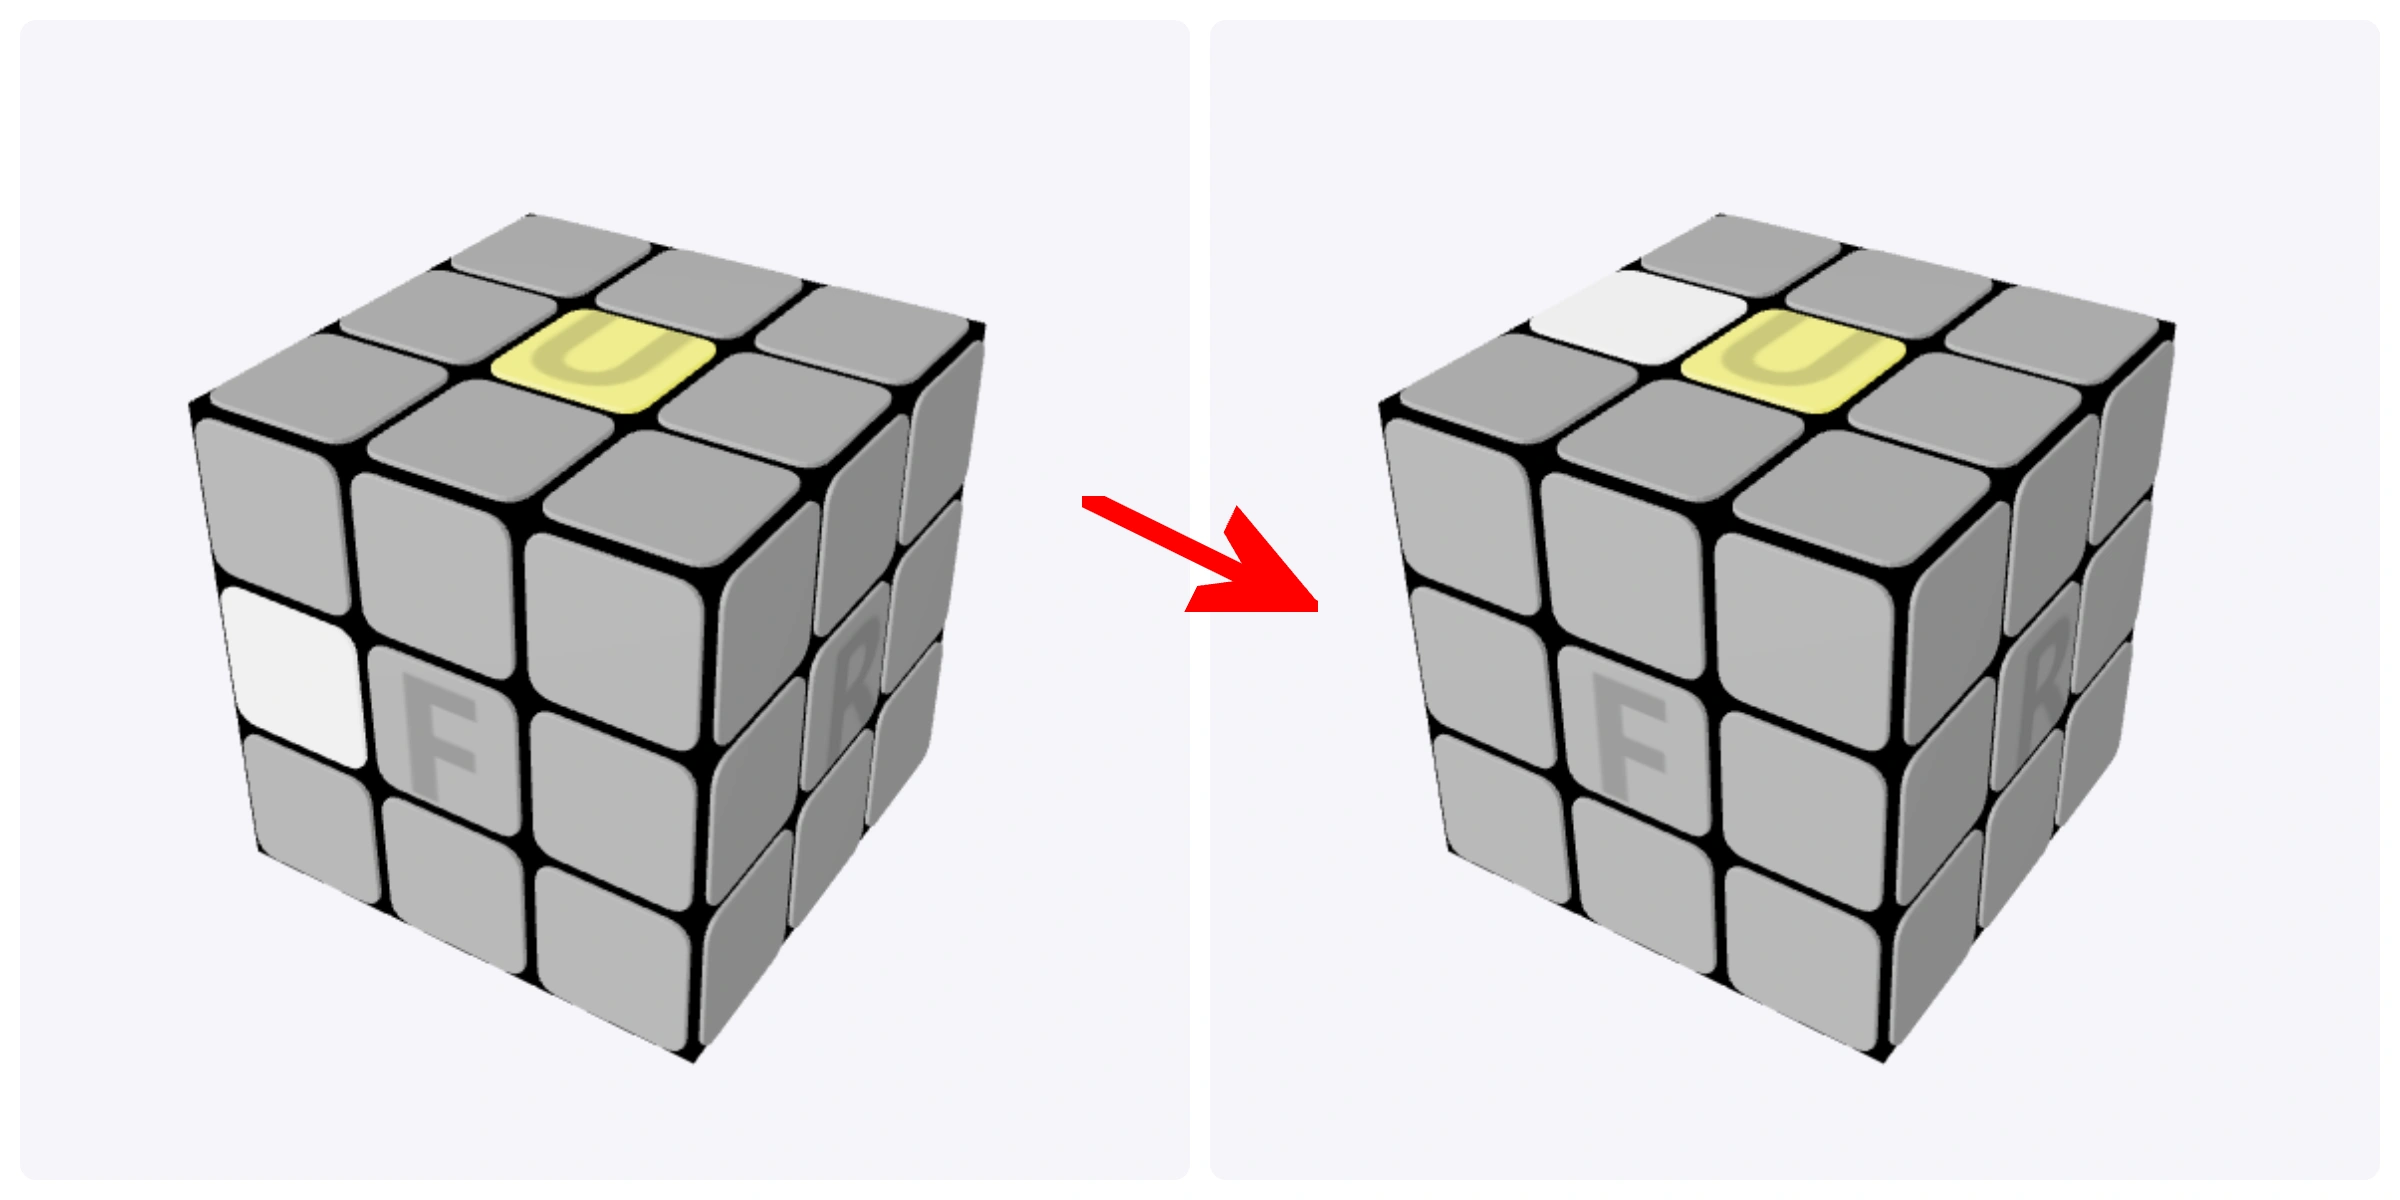
L'

Case 2: The White Sticker Faces Down
Put the edge at the front of the bottom layer. Turn the front face halfway to bring the white sticker to the top.
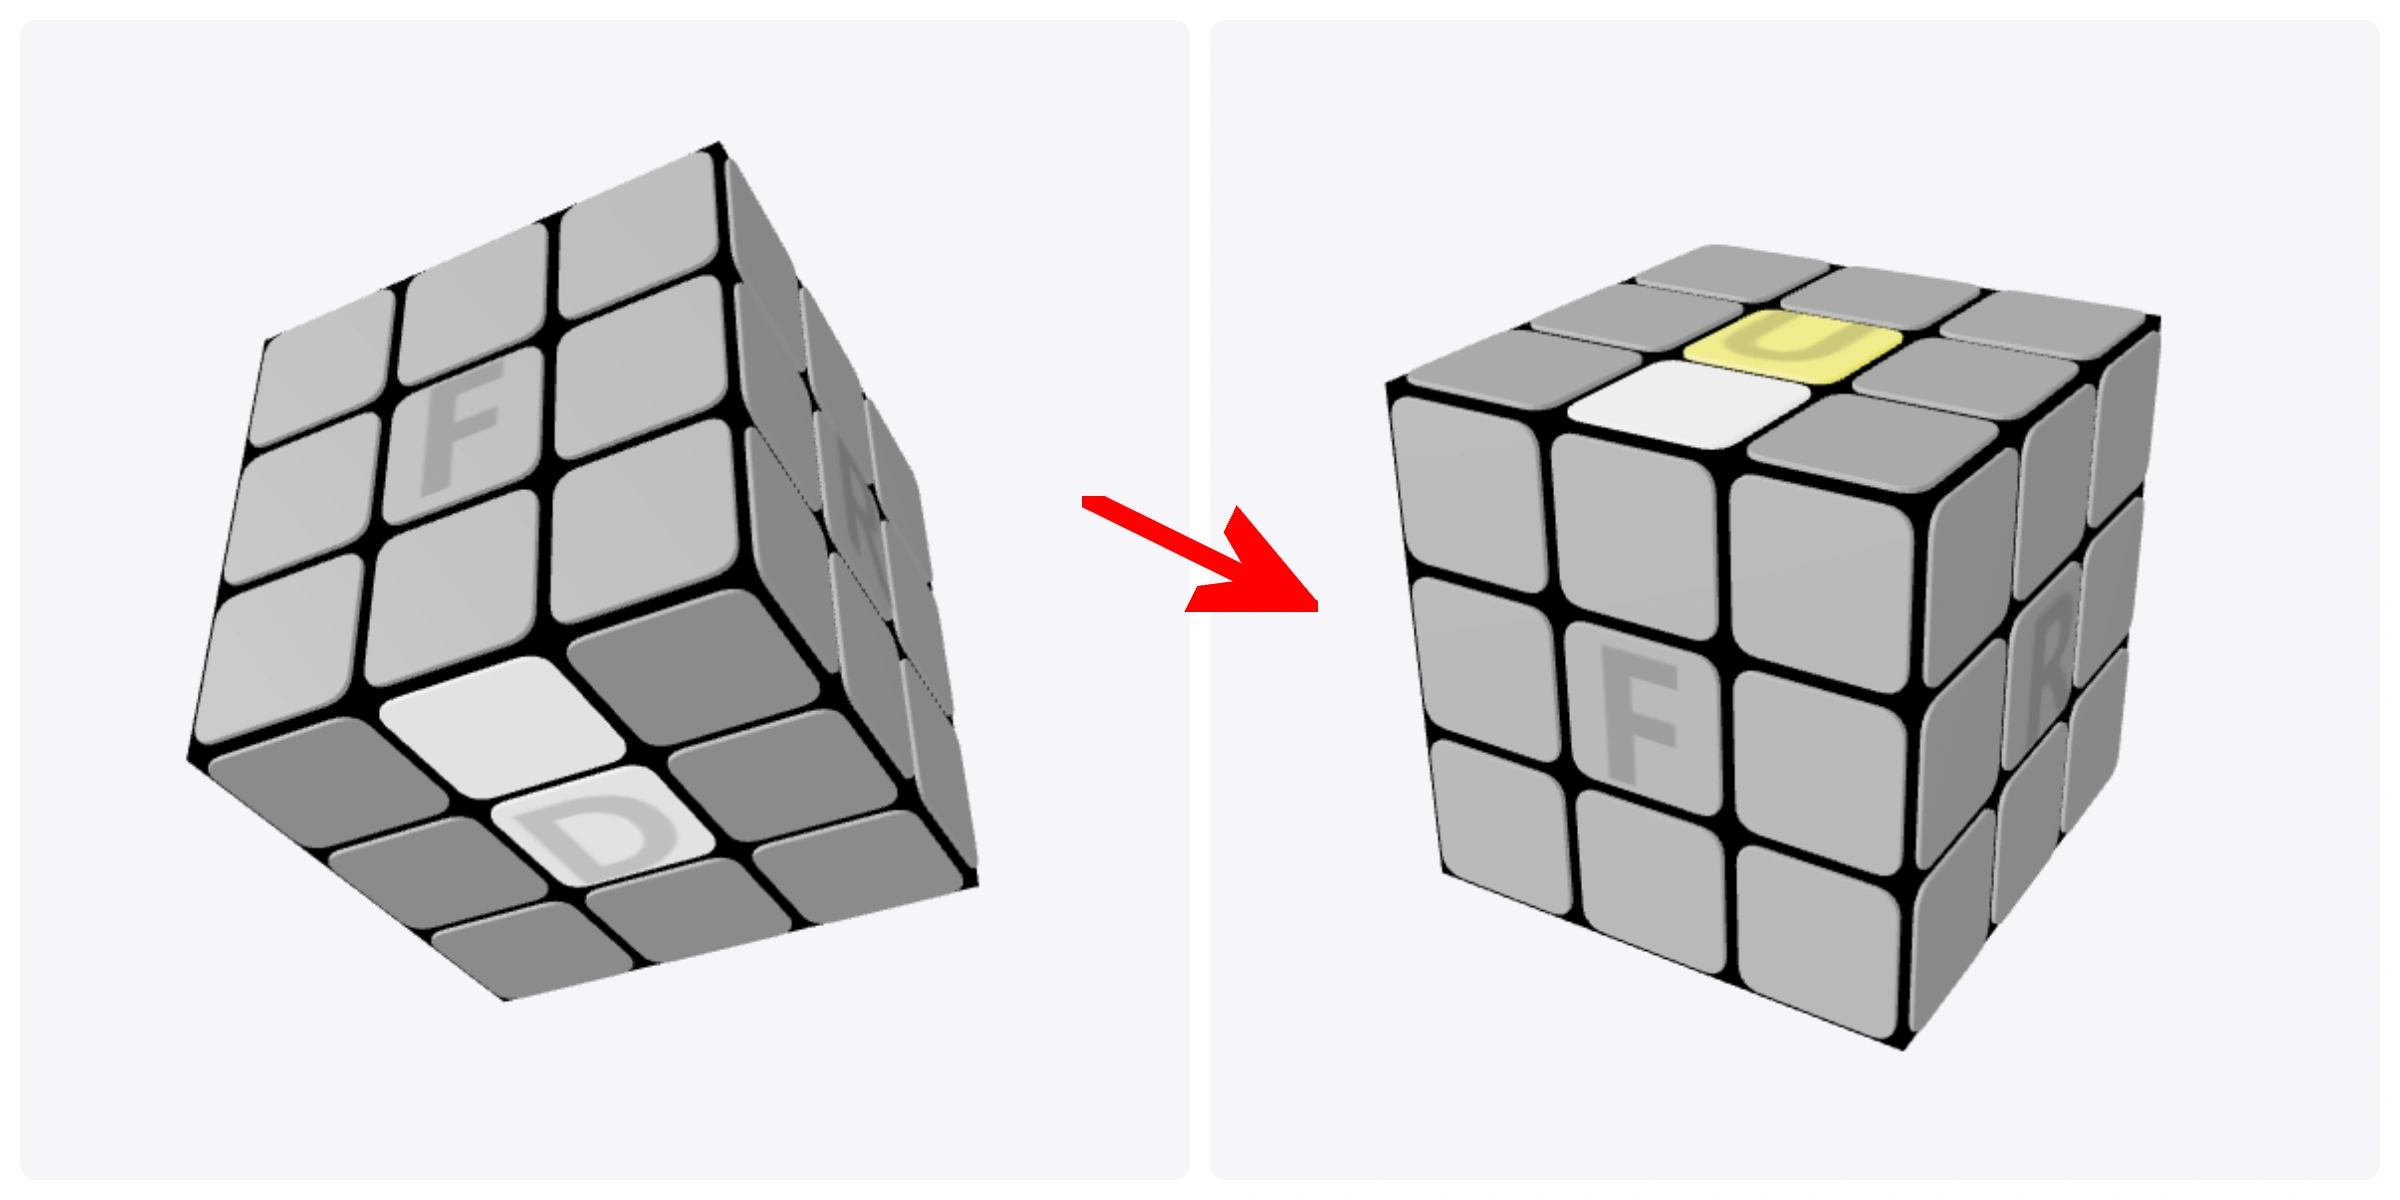
F2

Case 3: The White Sticker Faces Outward
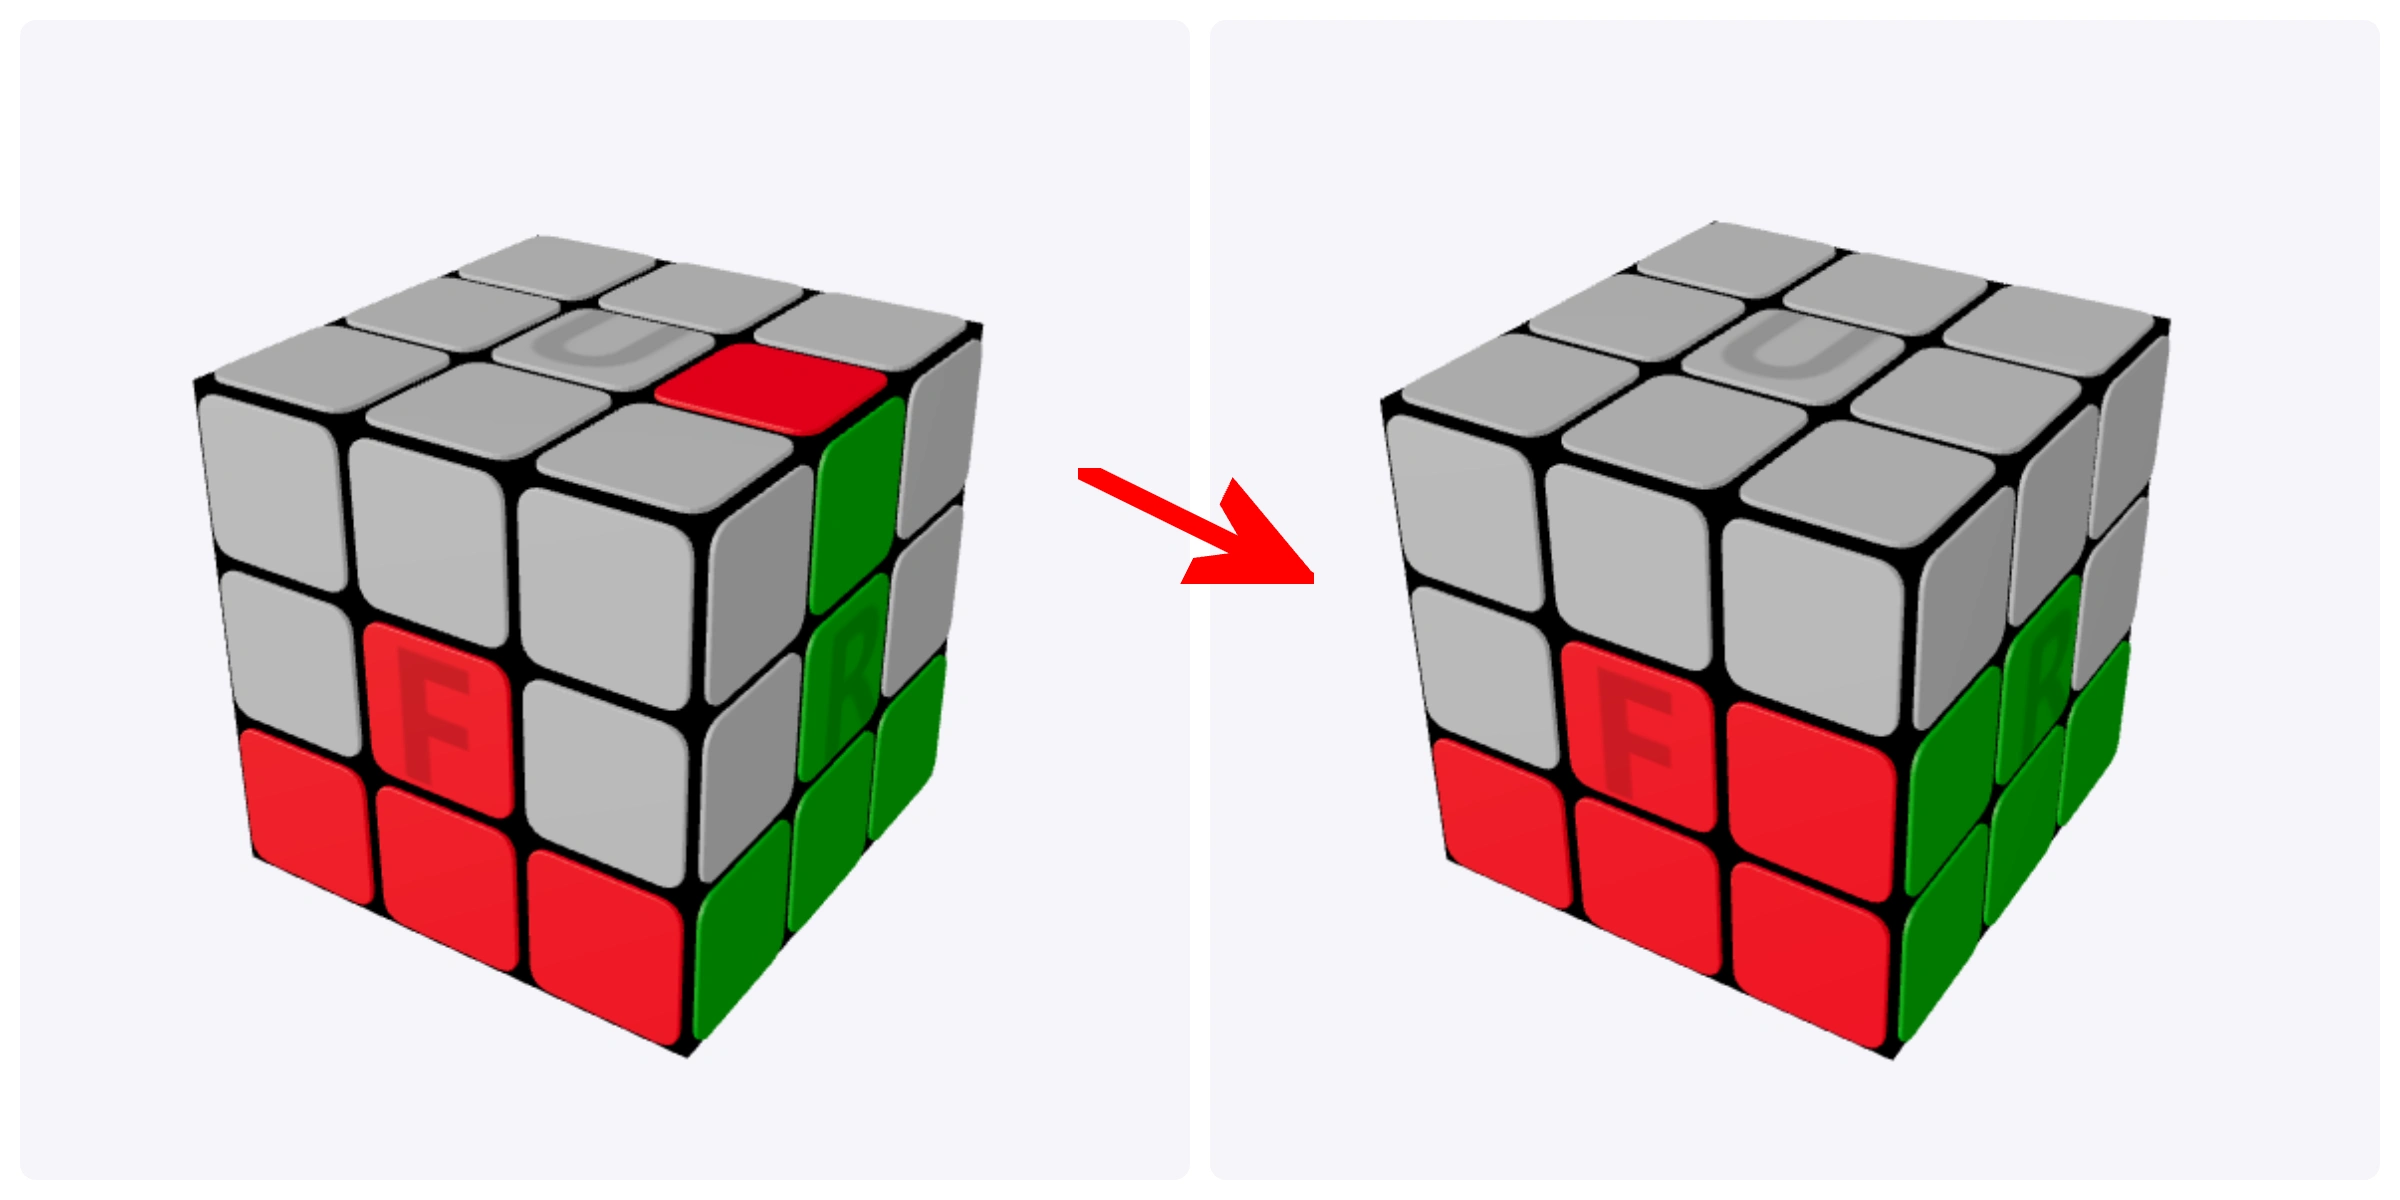
An edge can be in the top or bottom layer without its white sticker facing up or down. Hold that sticker toward you, move the edge into the middle layer, then lift it to the top.
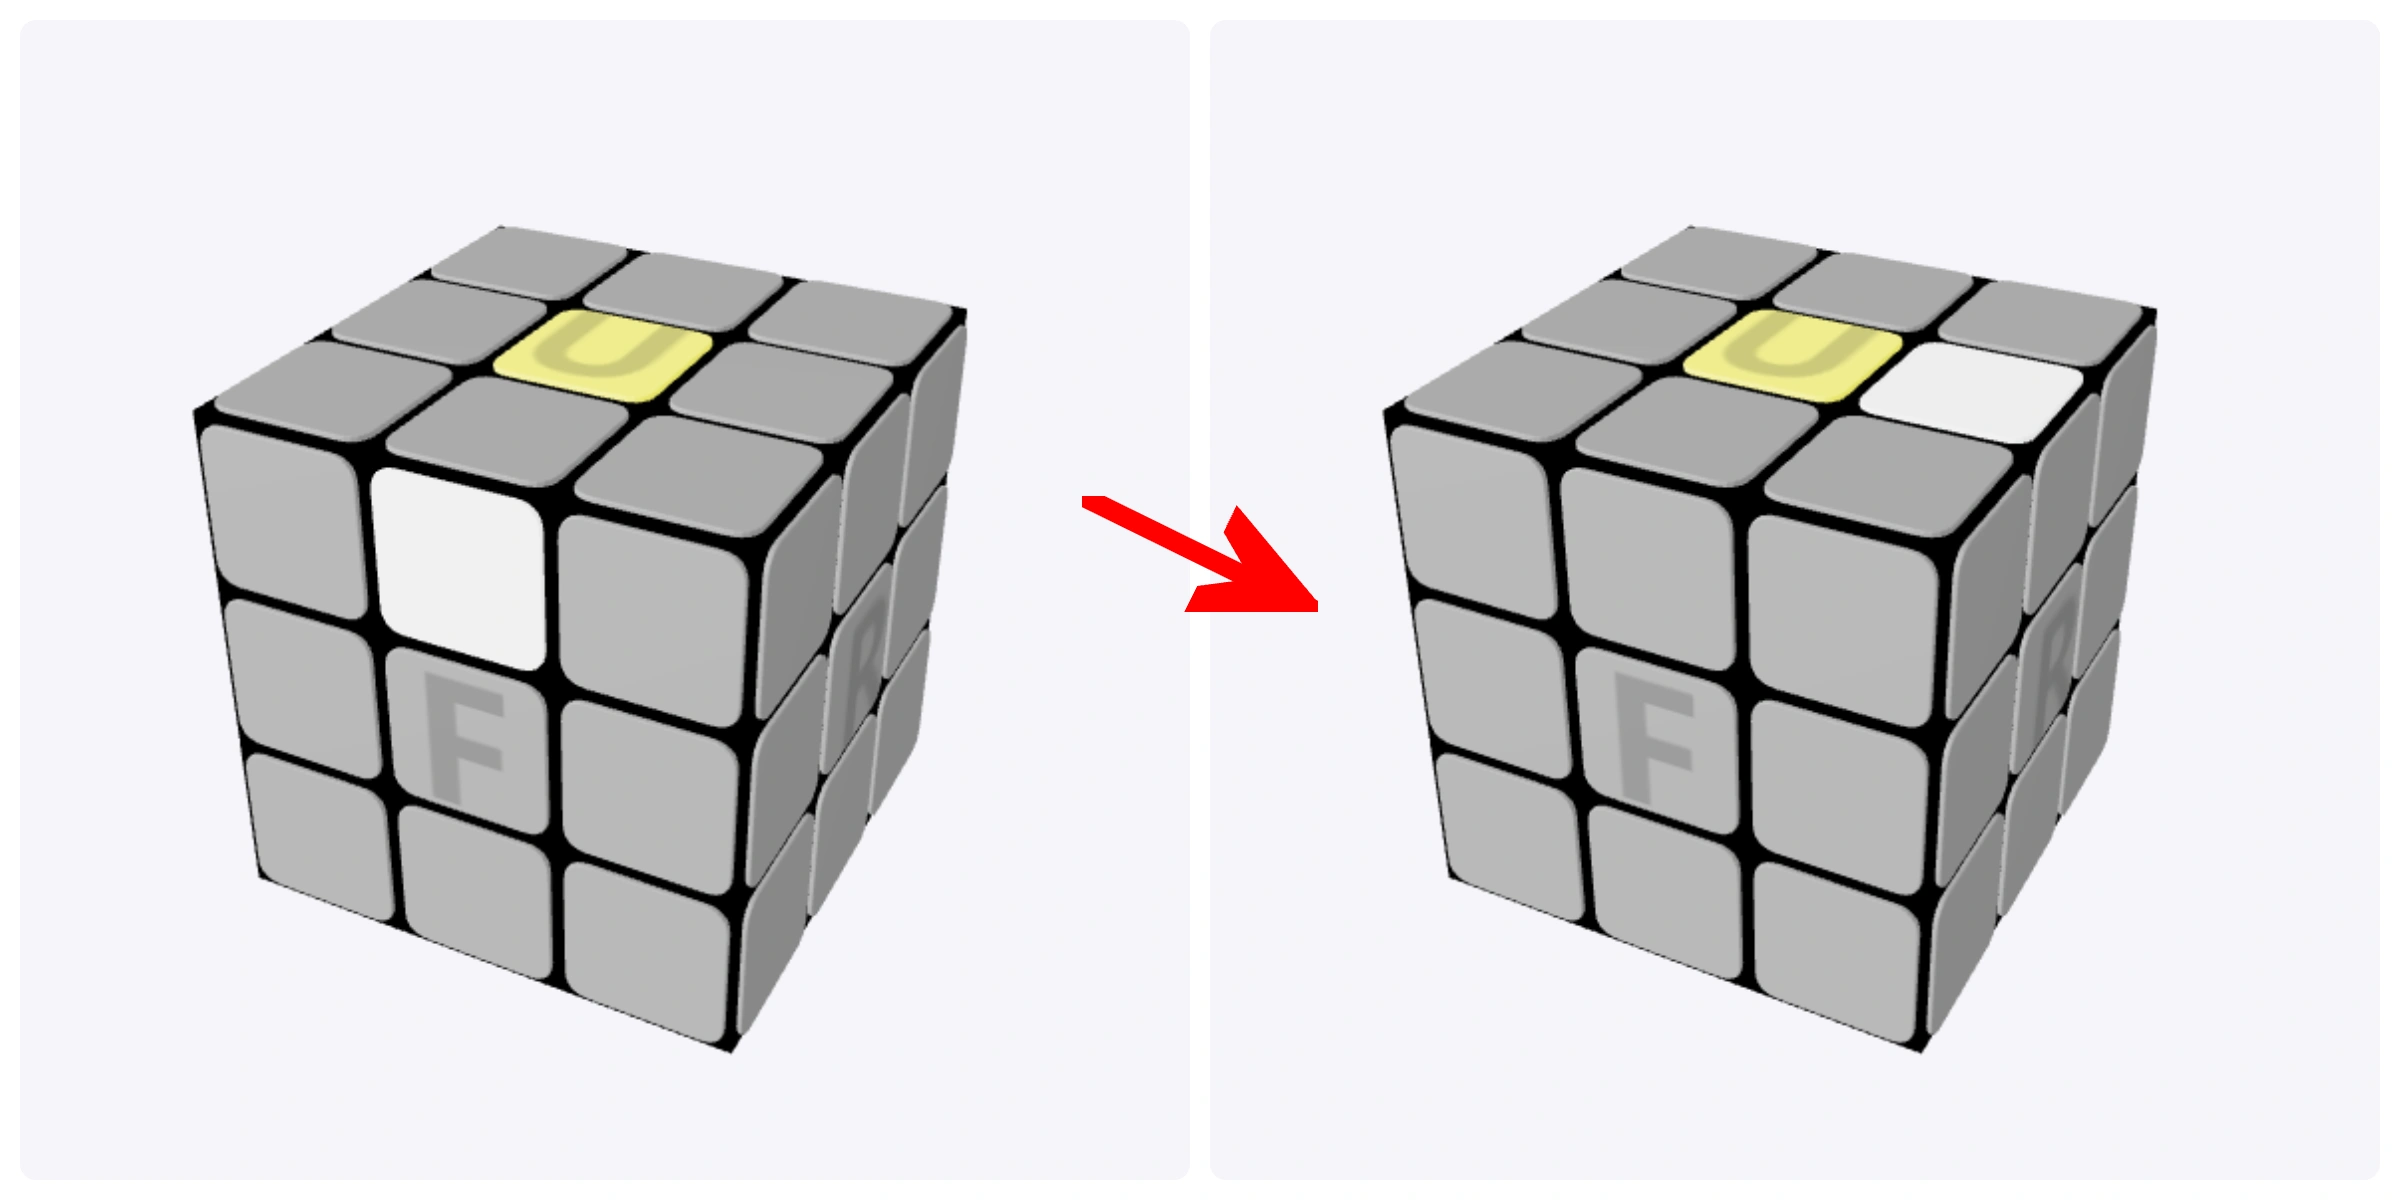
For the top-layer setup shown:
F R

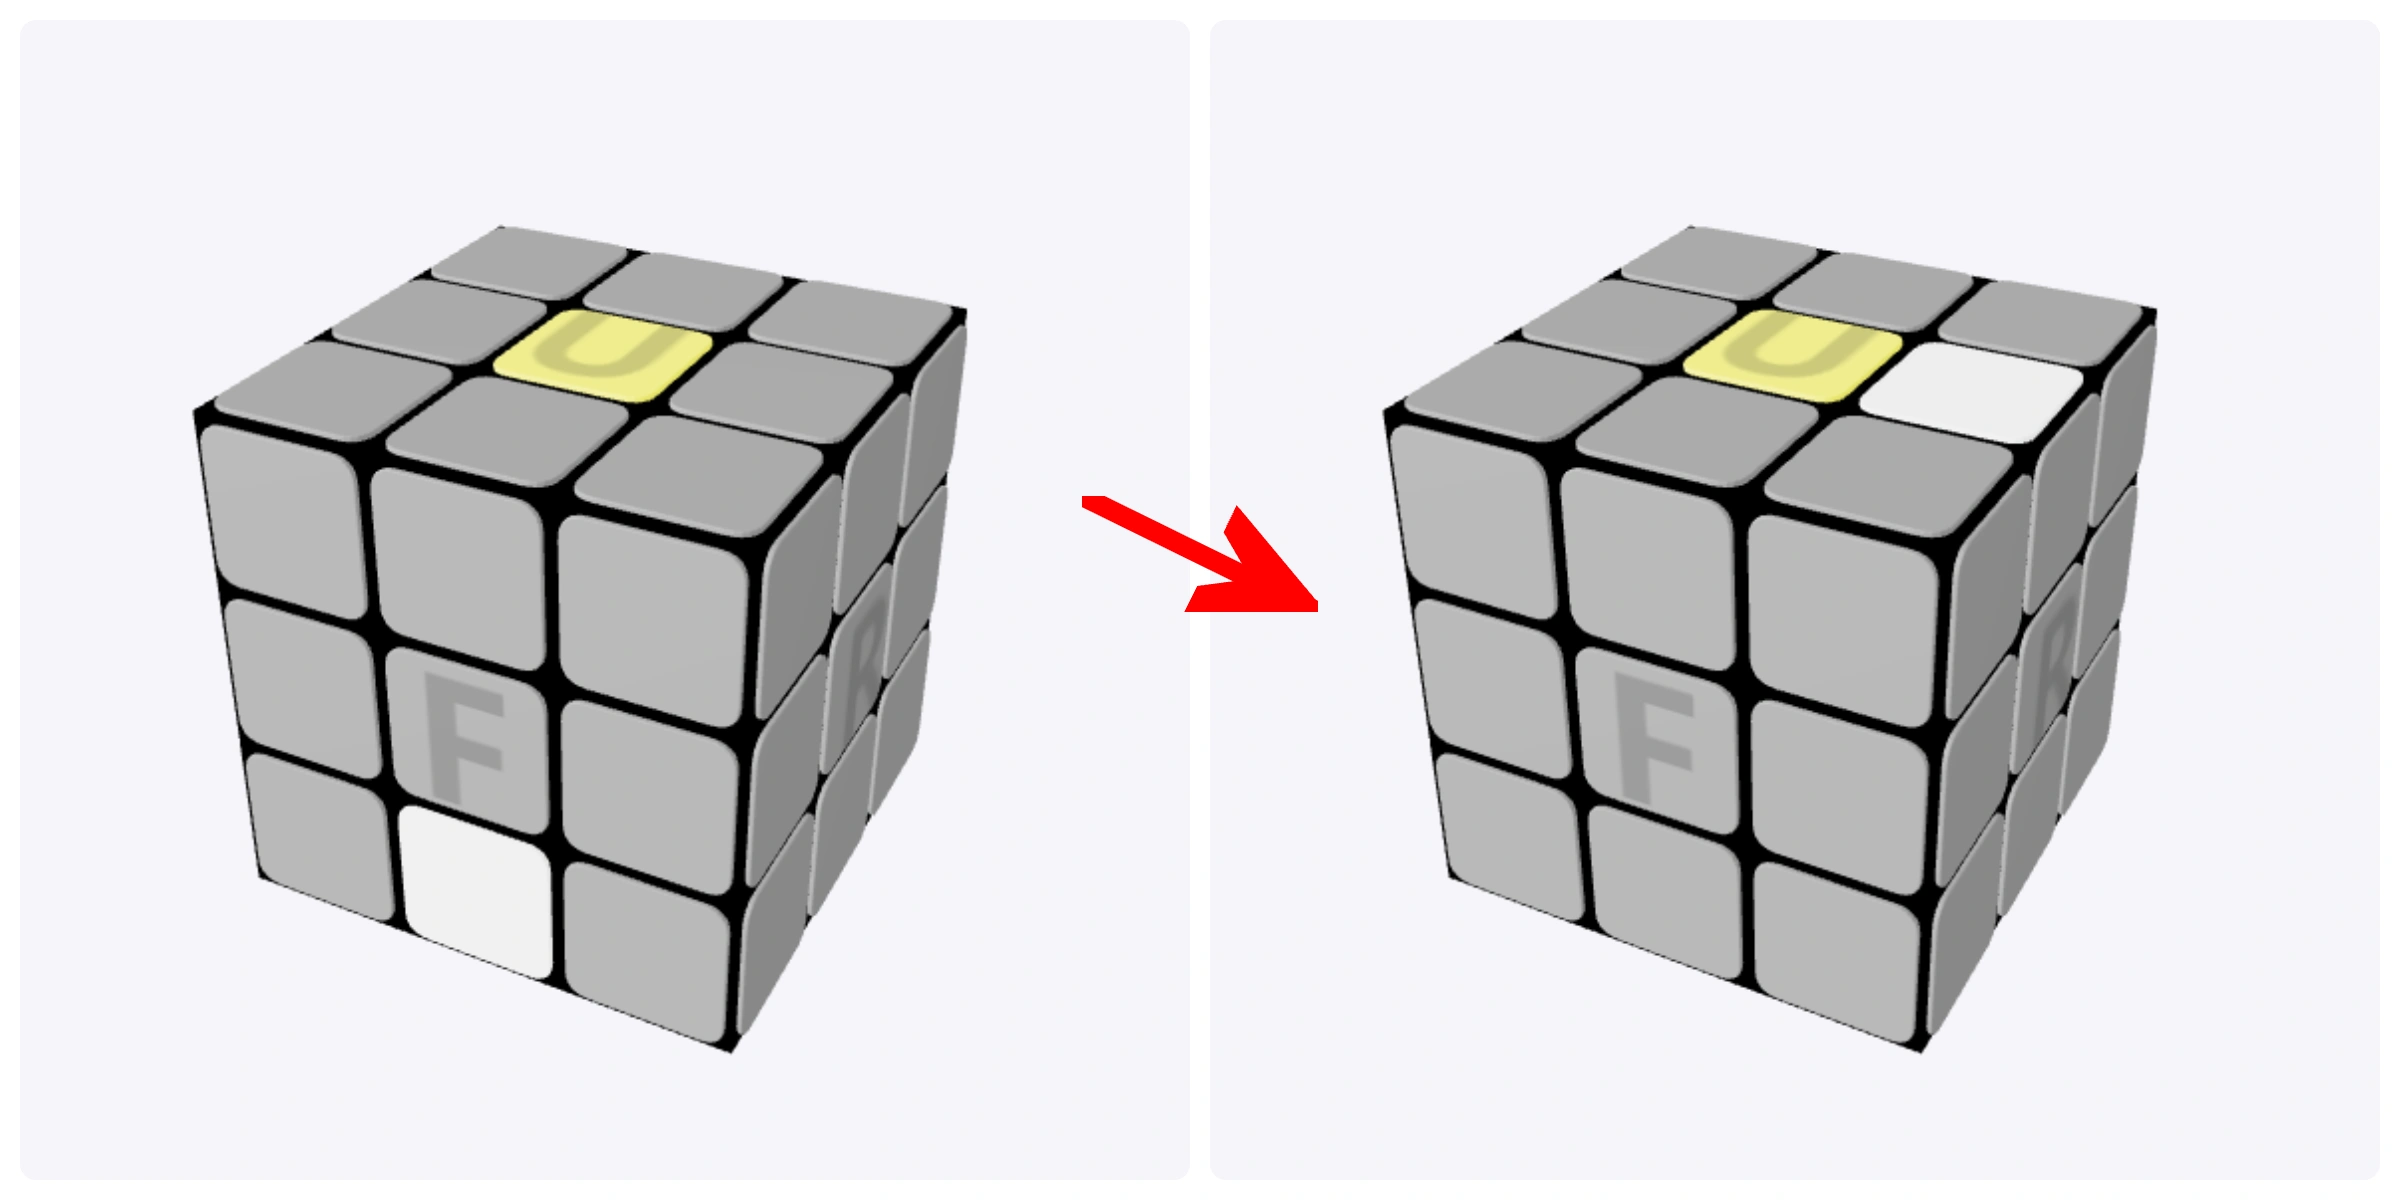
For the bottom-layer setup shown:
F' R

Keep the White Edges You’ve Already Collected
Before lifting another edge, check its landing spot. If a white edge is already there, turn the top layer to make room.
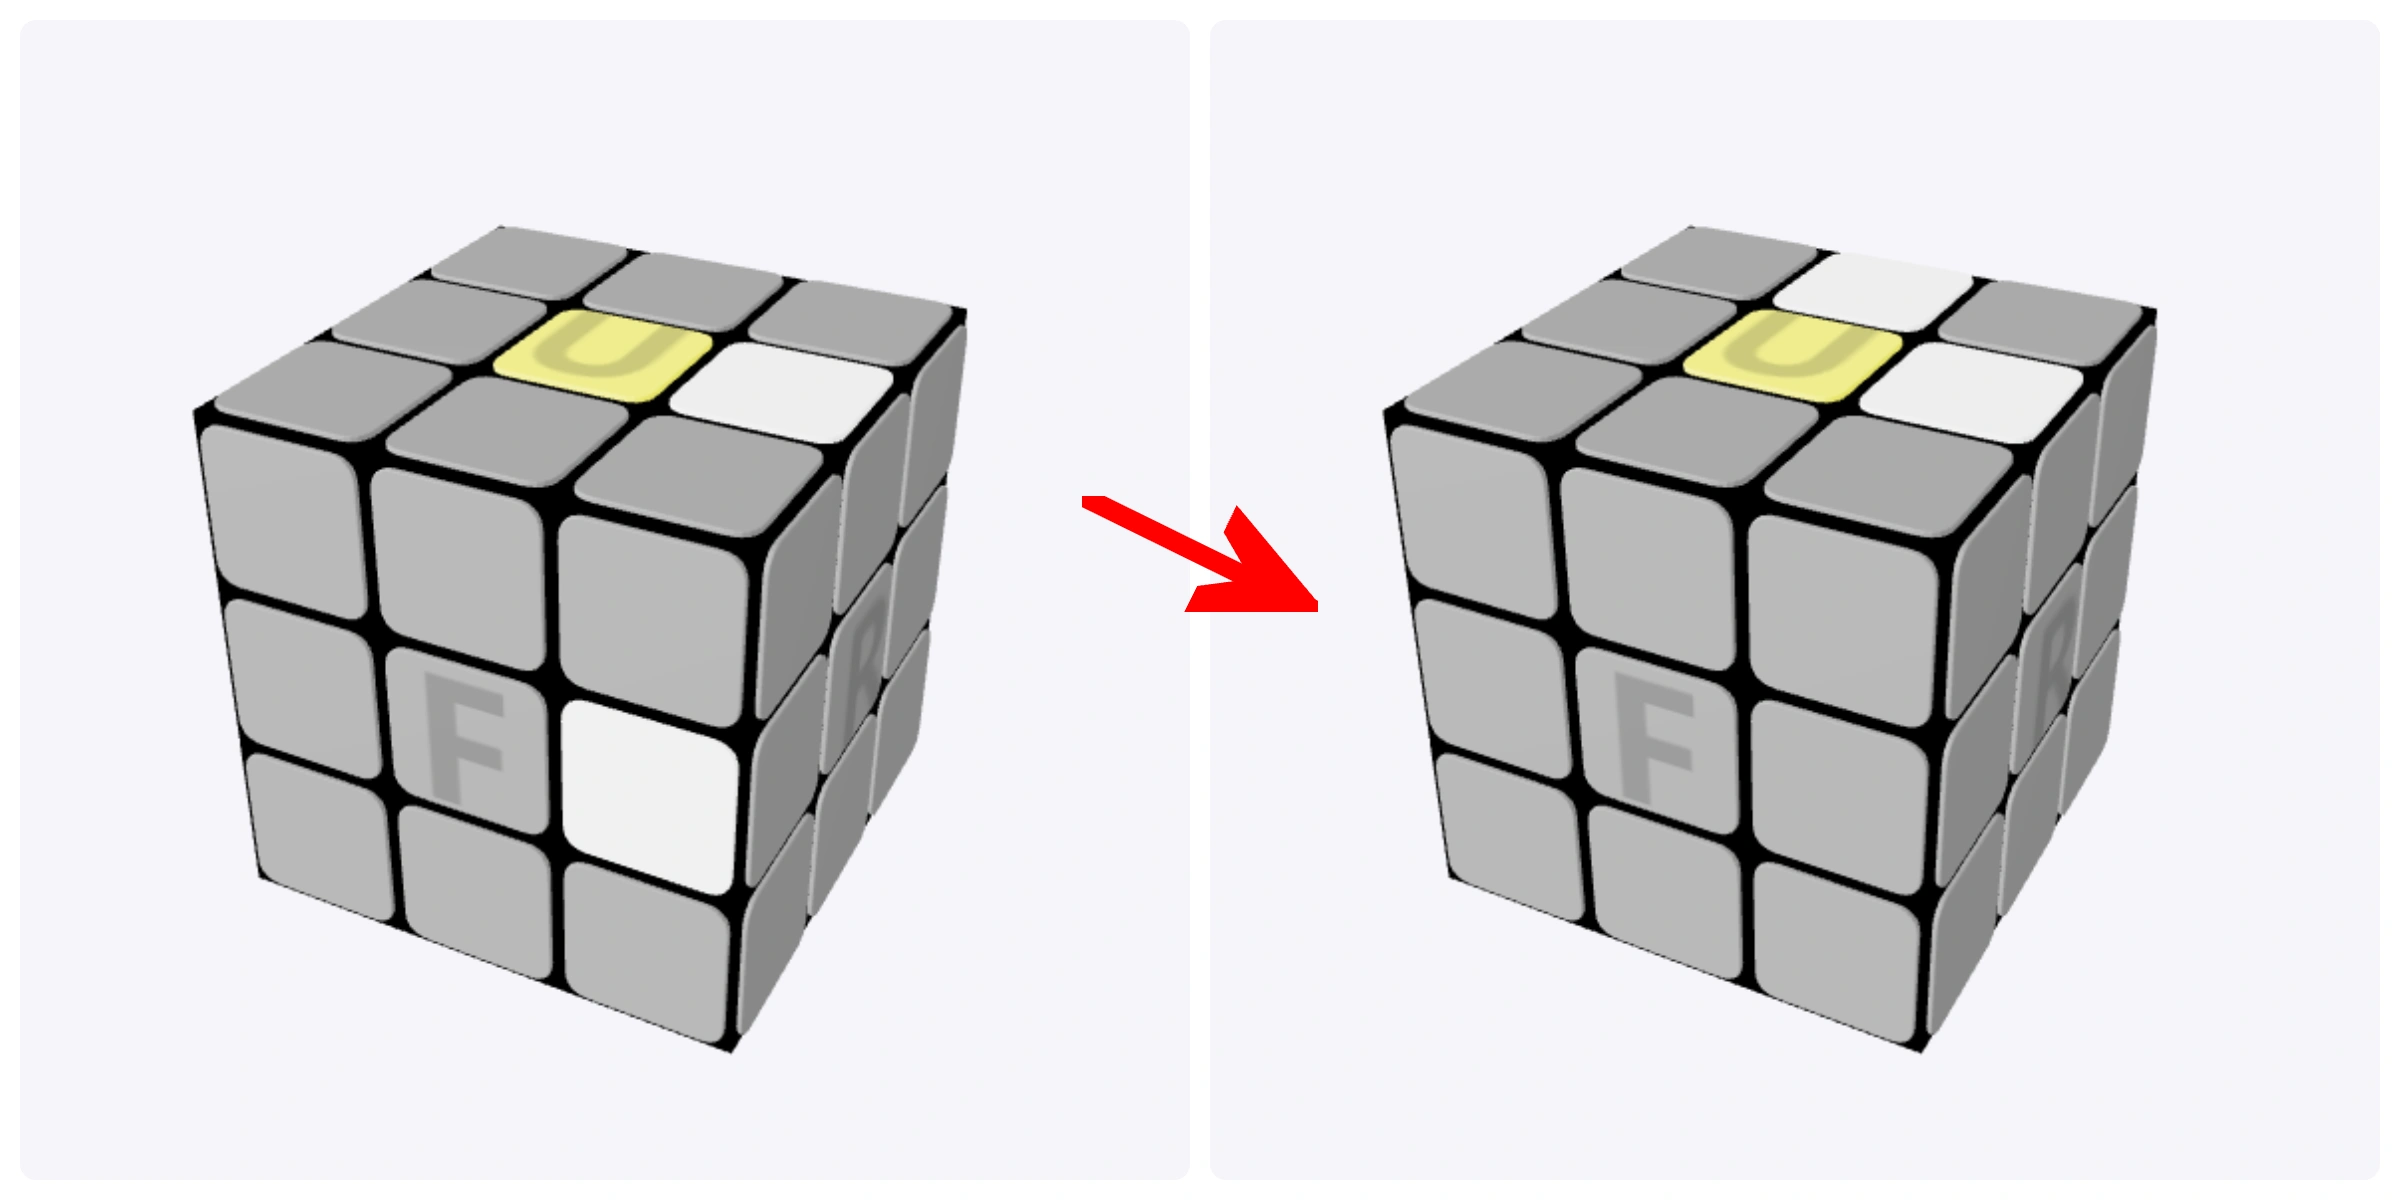
U' R

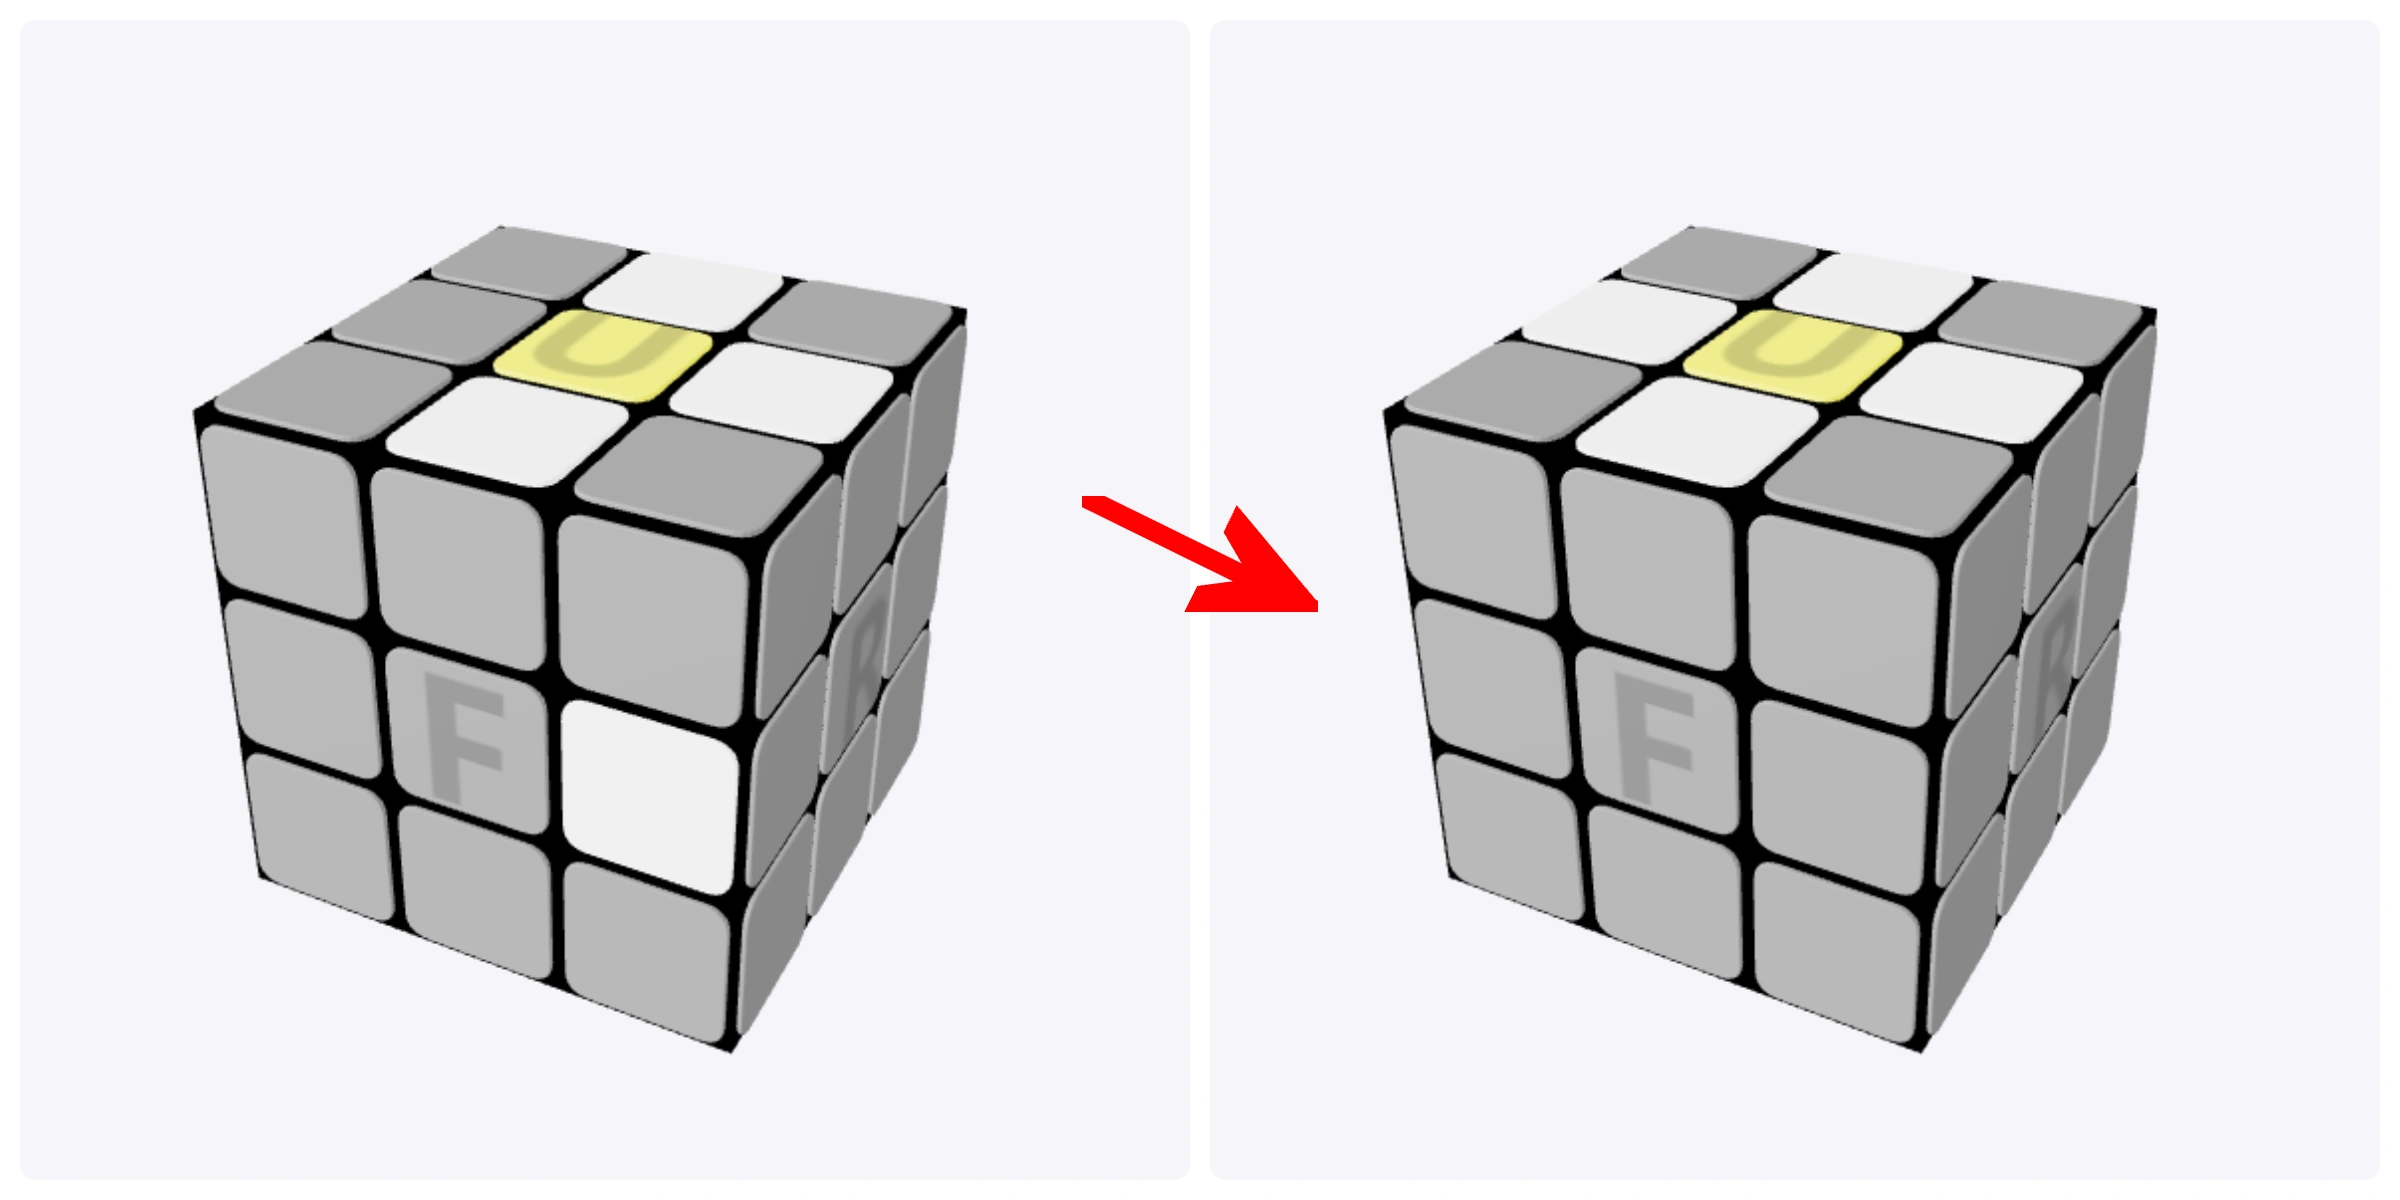
U2 R

Turn the Daisy into a Matched White Cross
Turn the top layer until a white edge’s other color matches the center directly below it. Hold that matching center at the front, then turn the front face halfway.
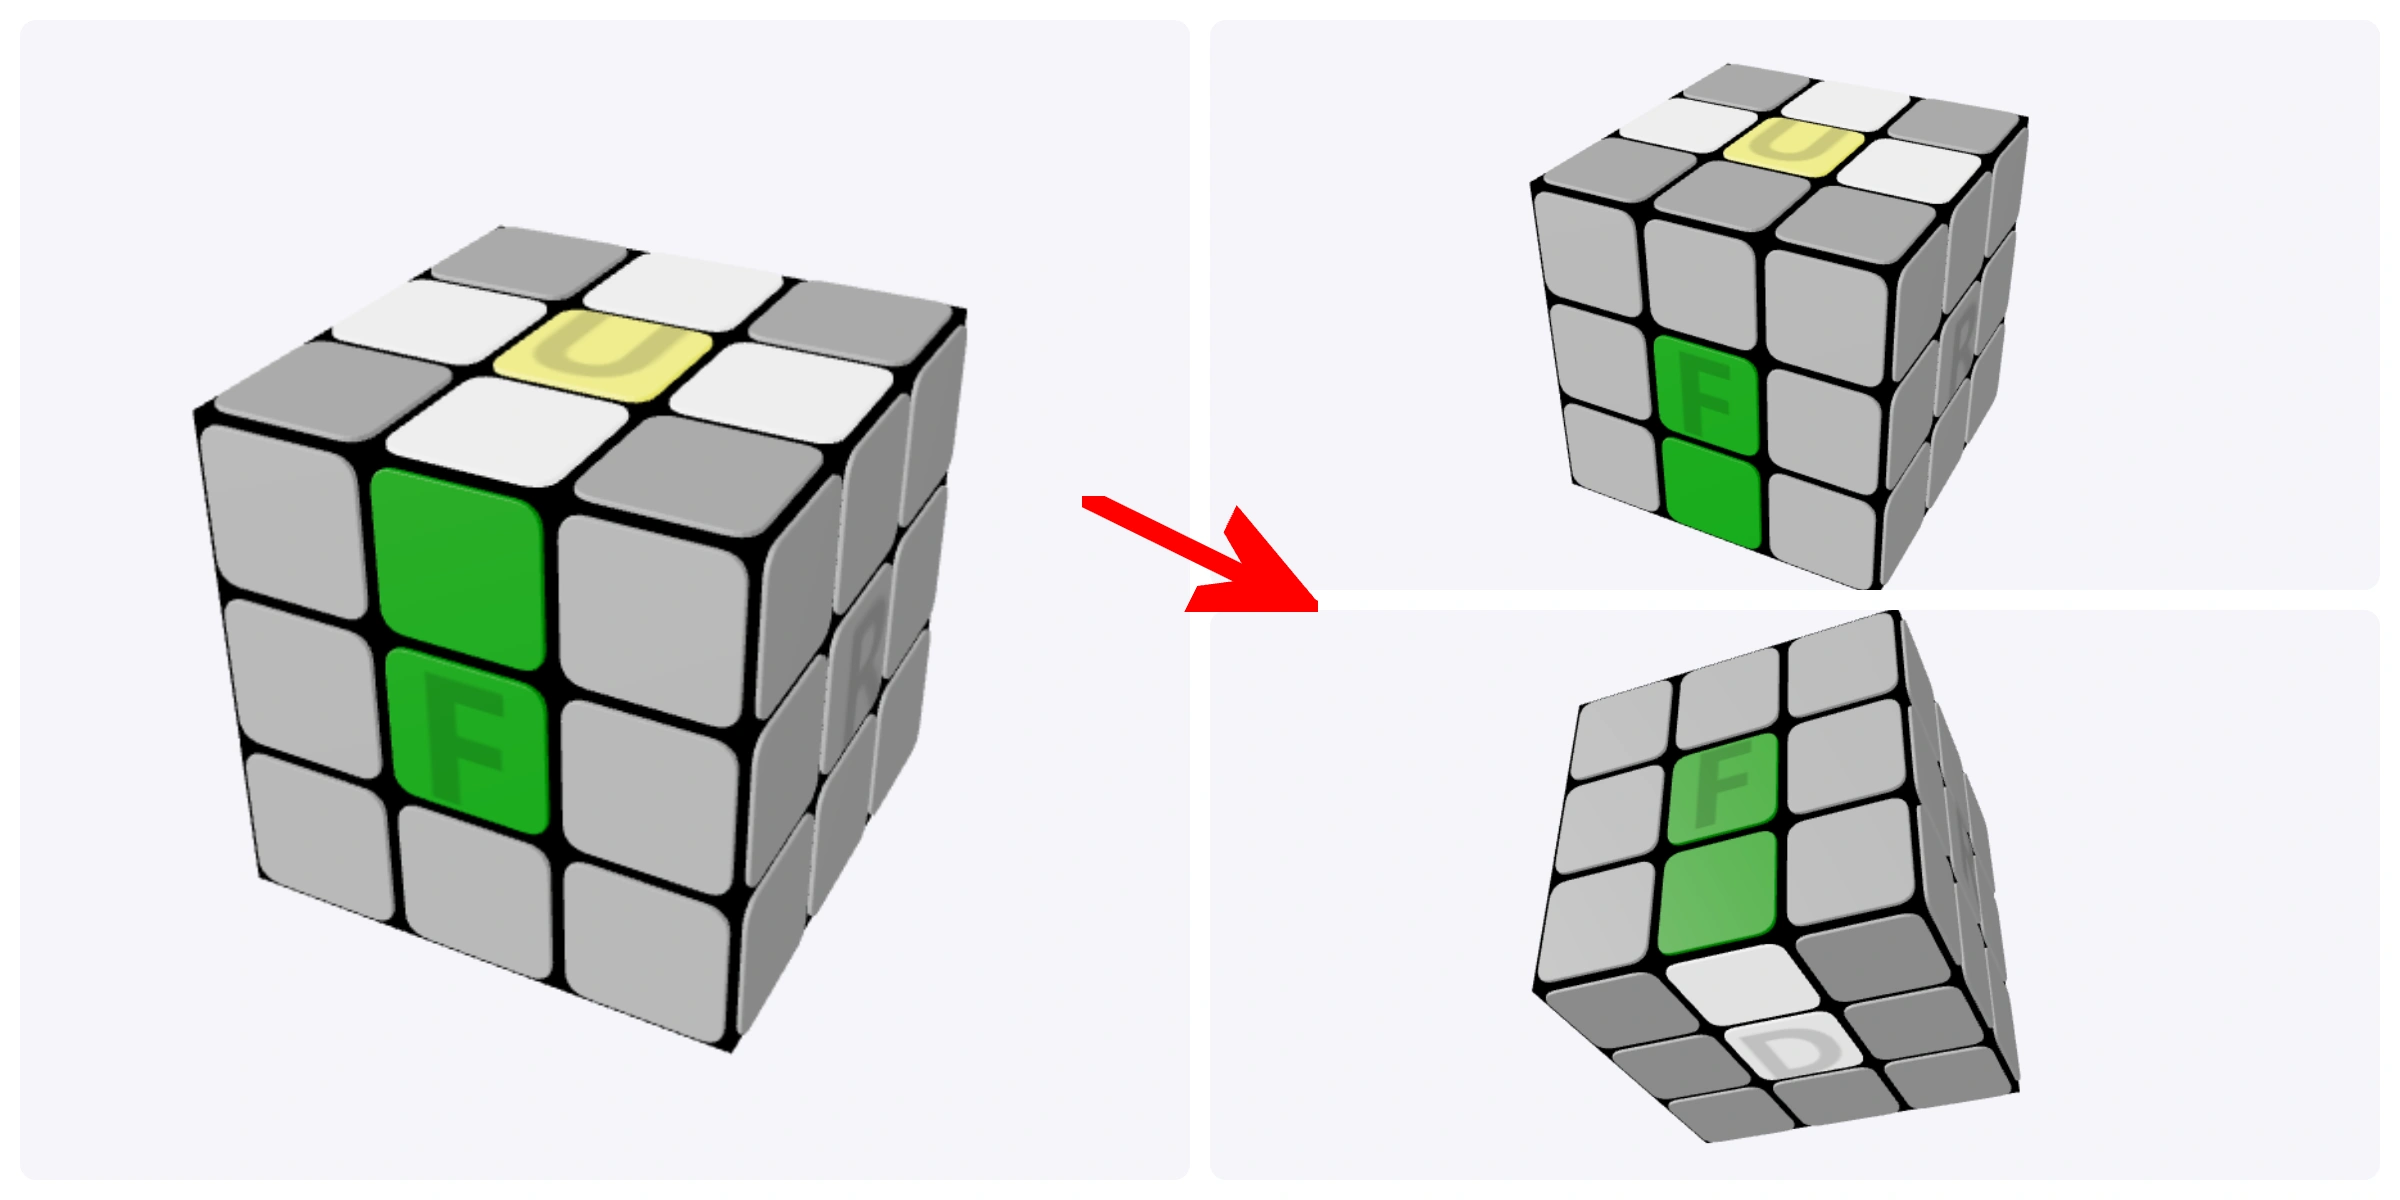
F2
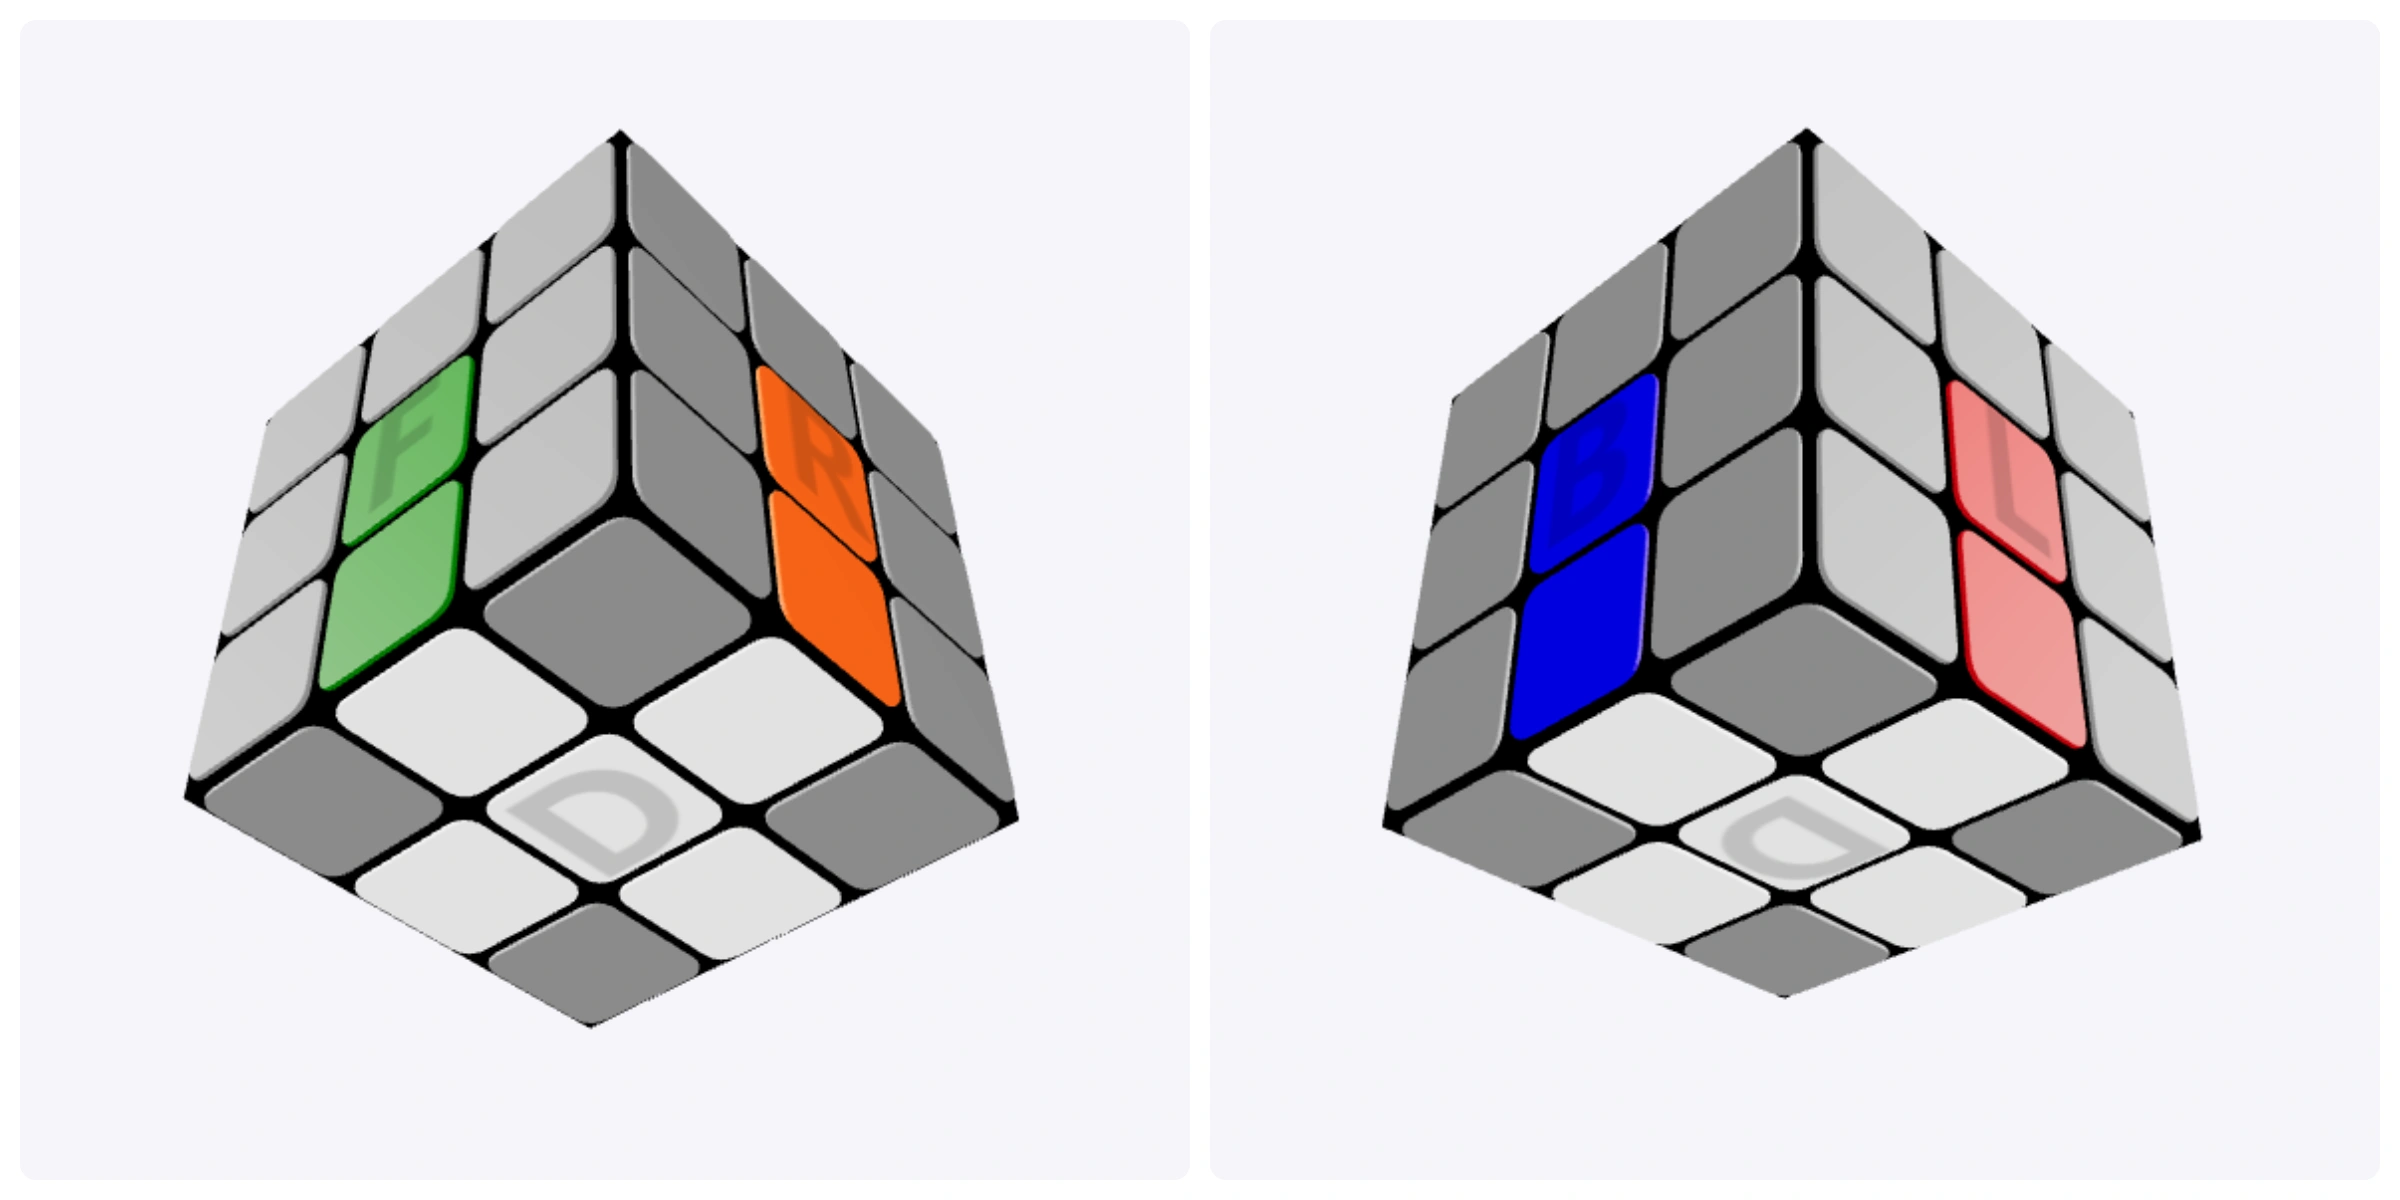
Repeat for all four edges. A solved white cross has white stickers on the bottom and matching edge-and-center colors on all four sides.
2. Solve the White Corners
Keep the white cross on the bottom. Next, insert the four white corners to finish the first layer—not just the white face. Each corner’s two side colors must also match the adjacent centers.
Insert Each Corner with One Short Move Sequence
Place the Corner Above Its Correct Slot
Find a white corner in the top layer. Its other two colors tell you where it belongs. For example, the white-red-green corner belongs between the red and green centers.
Rotate the whole cube so that slot is at the front-right of the bottom layer. Turn the top layer to place the corner directly above it, then use this sequence:
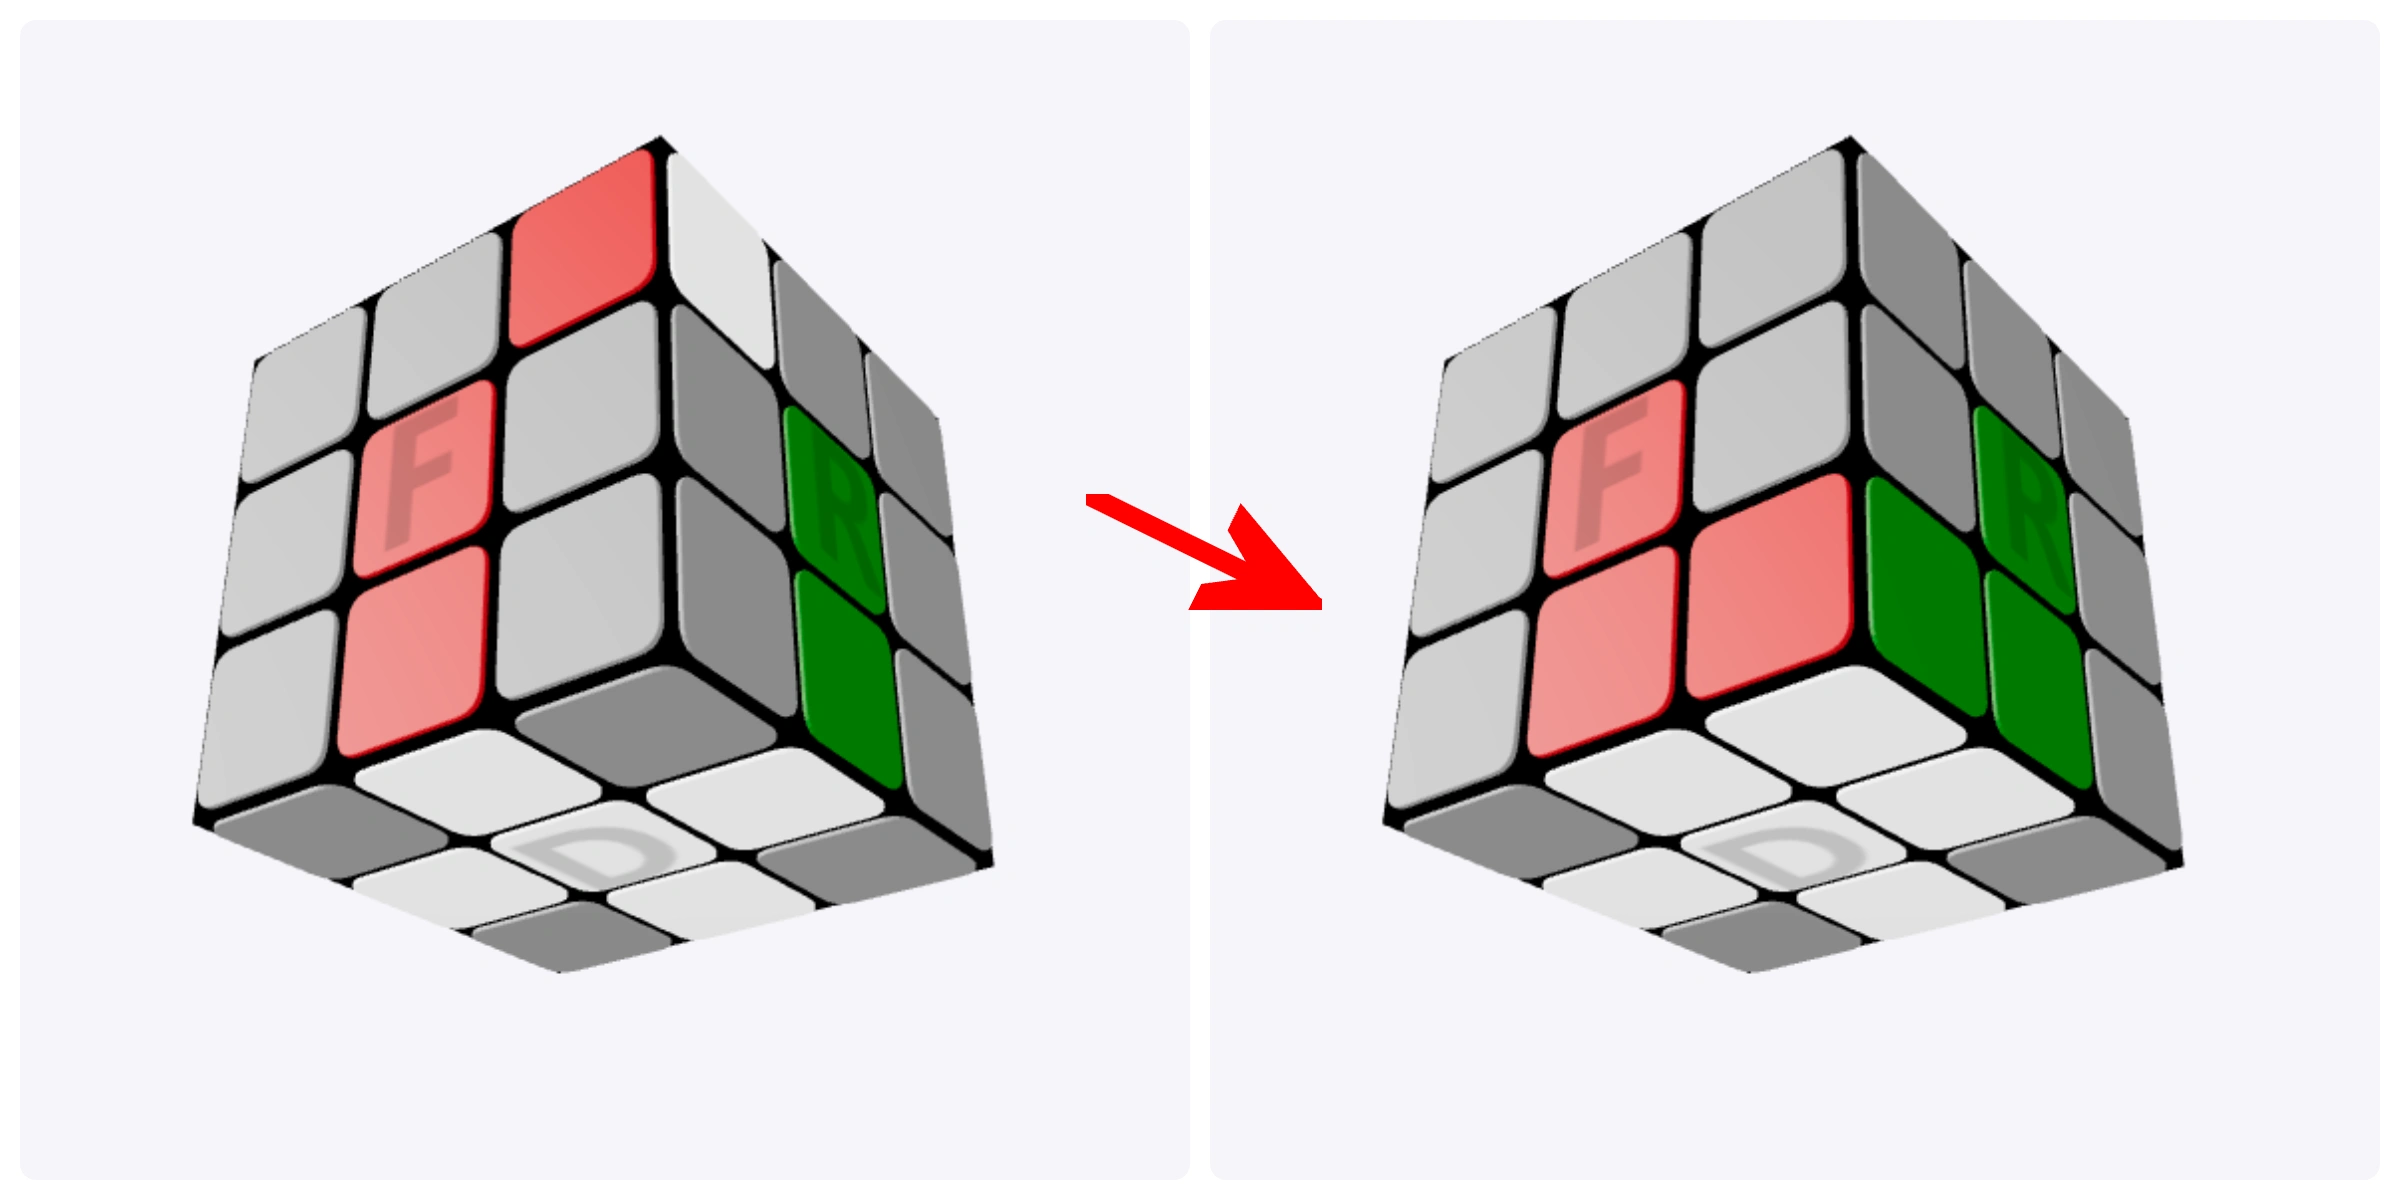
R U R' U'

Not Solved Yet? Repeat Without Changing Your Grip
Depending on which way the white sticker faces, the corner may need one, three, or five repetitions in total. Check after each complete four-move sequence.
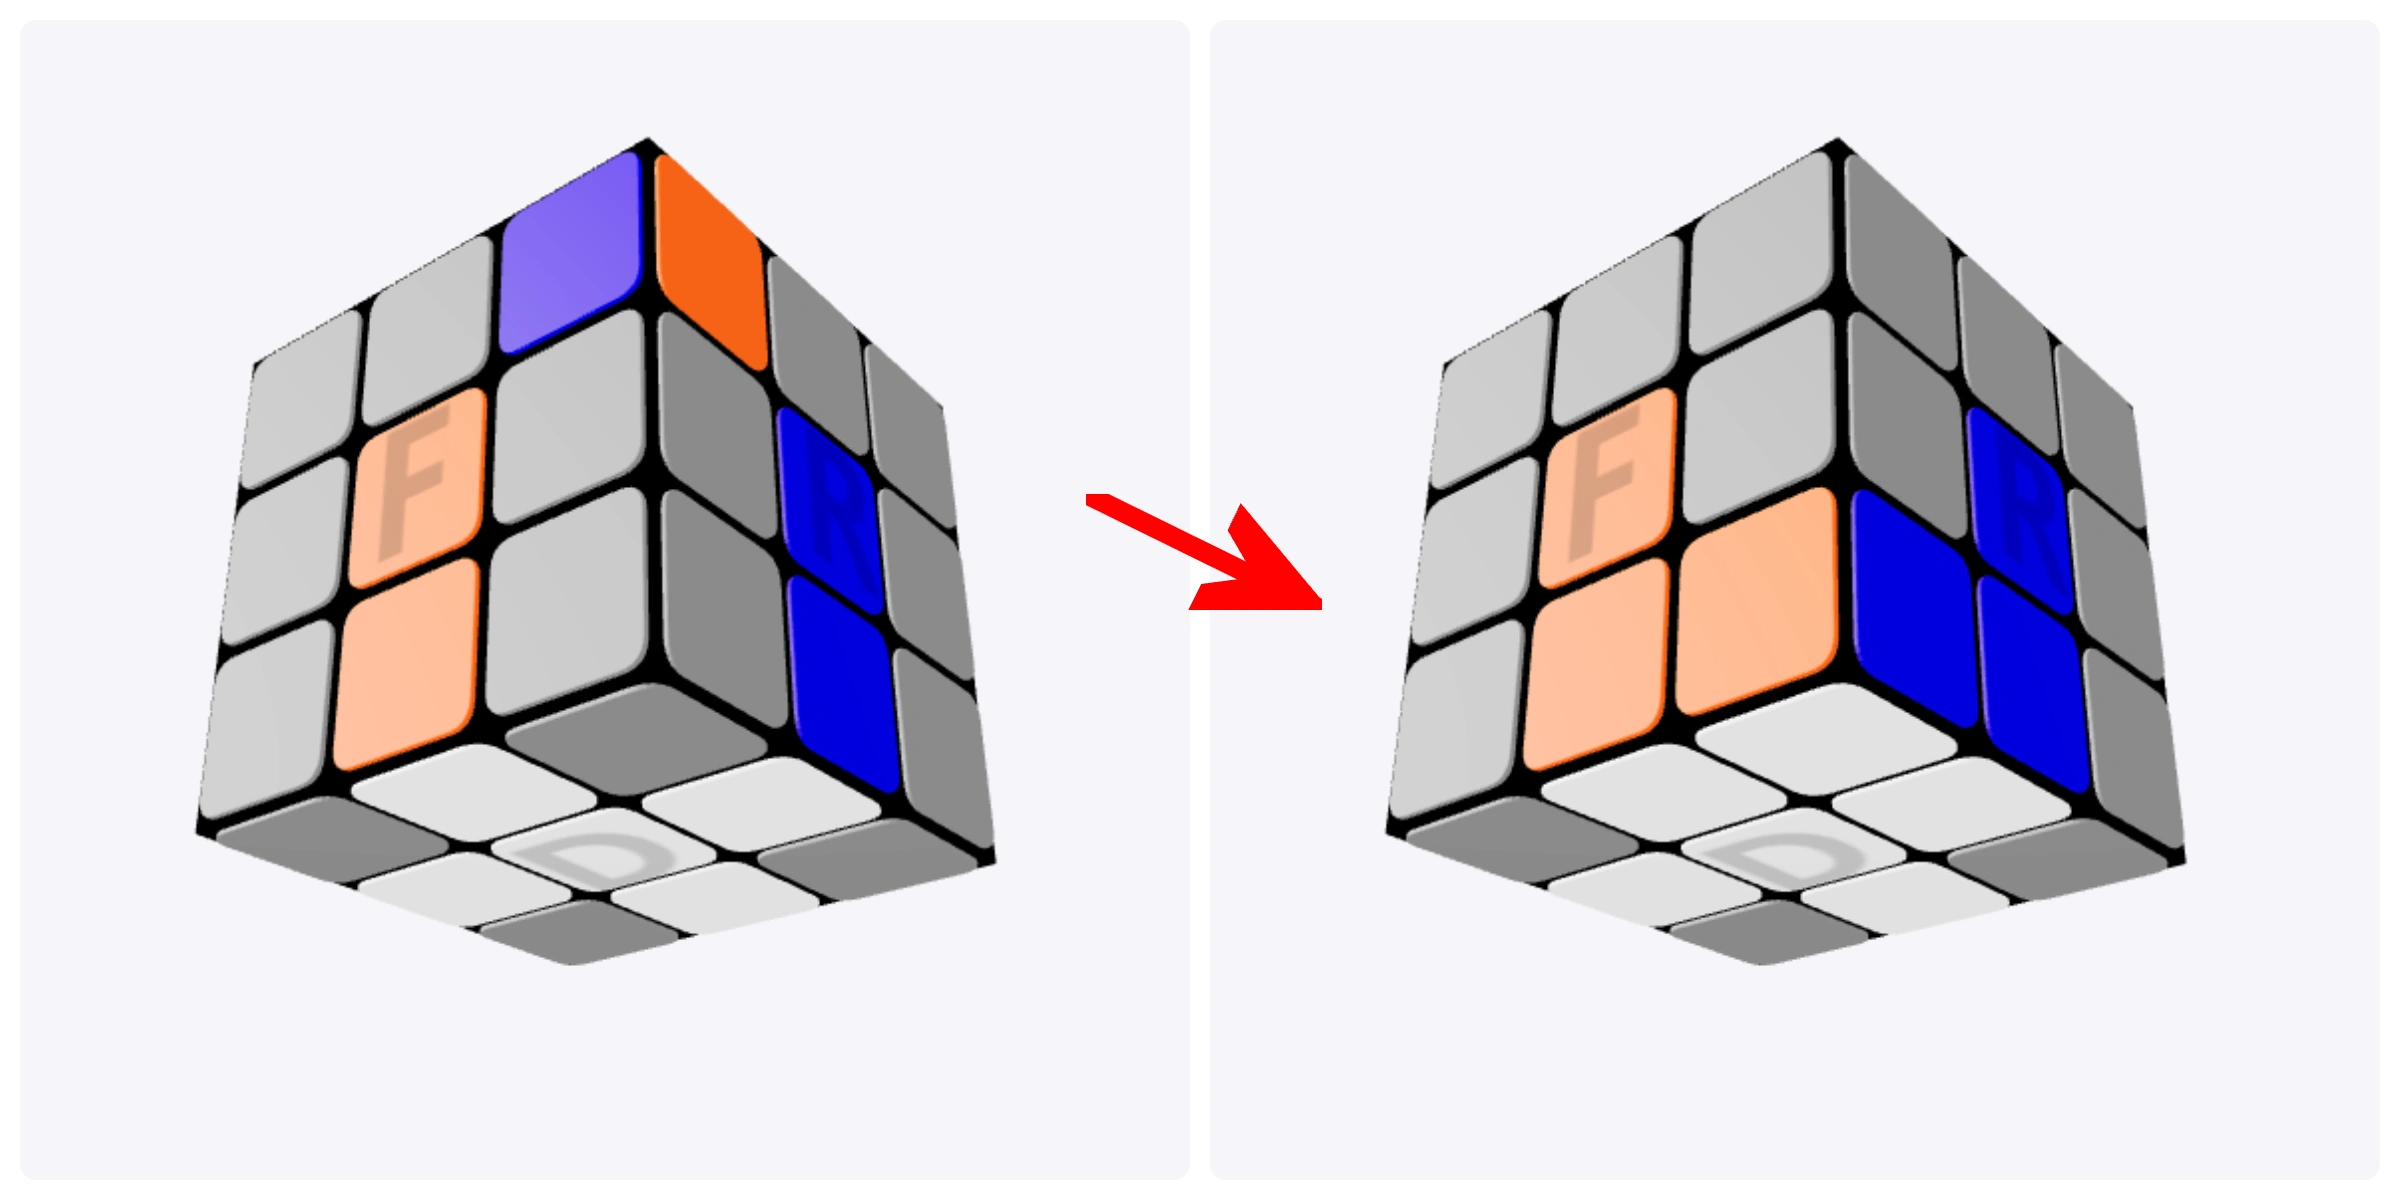
This setup takes three repetitions in total.
(R U R' U') × 3
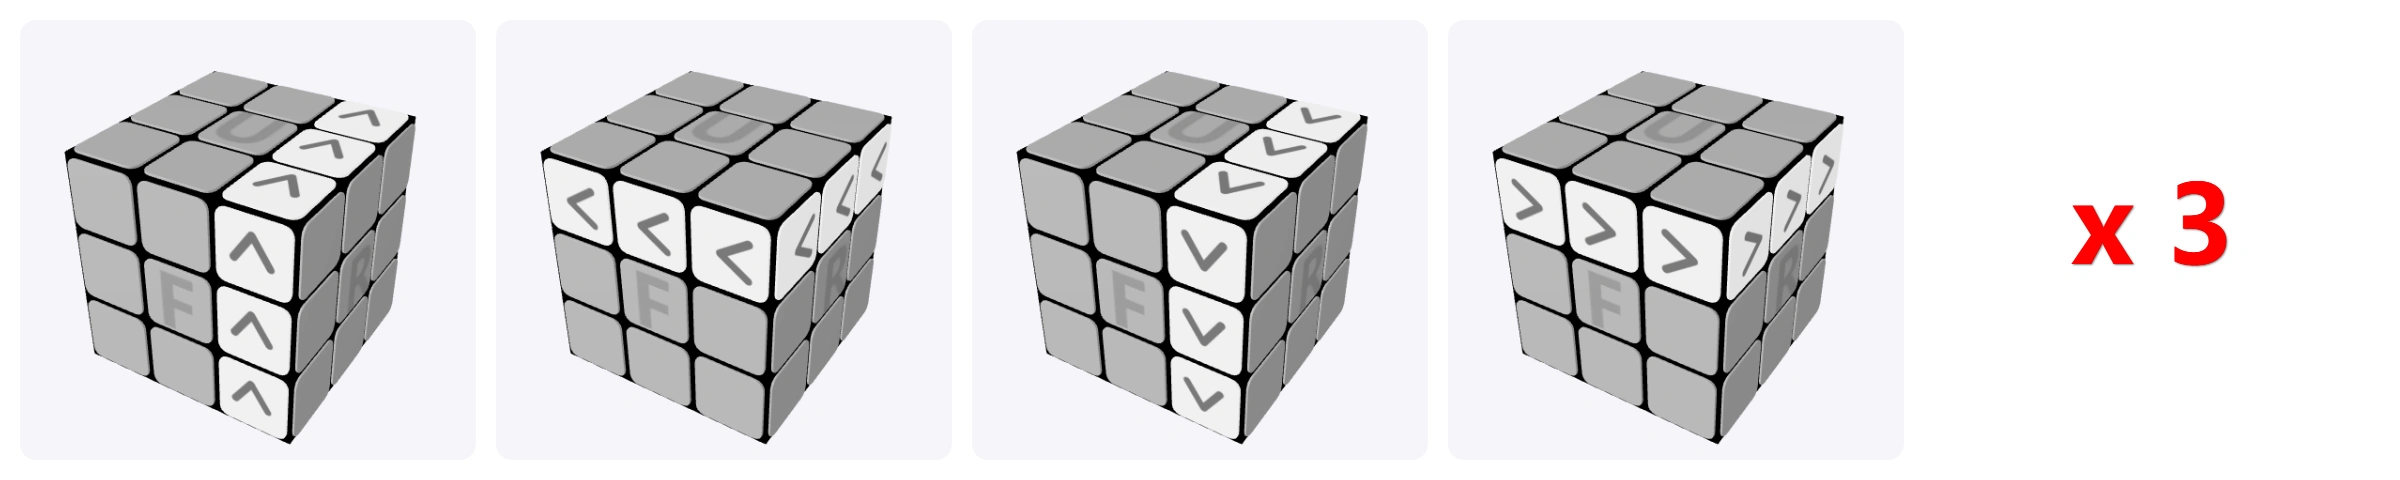
Another Corner Orientation
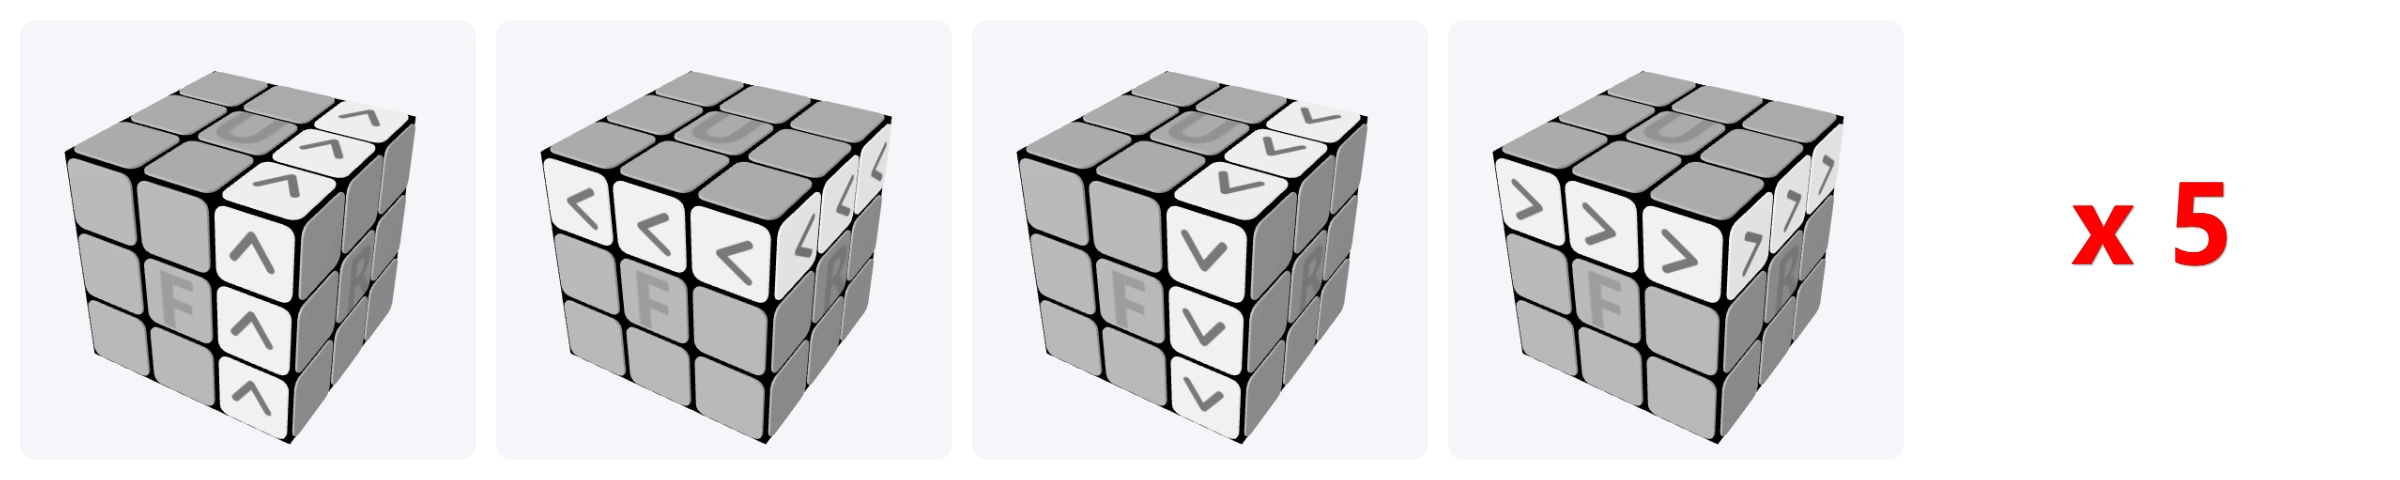
This starting position takes five repetitions in total. Don’t turn the cube or add extra top-layer moves between repetitions.
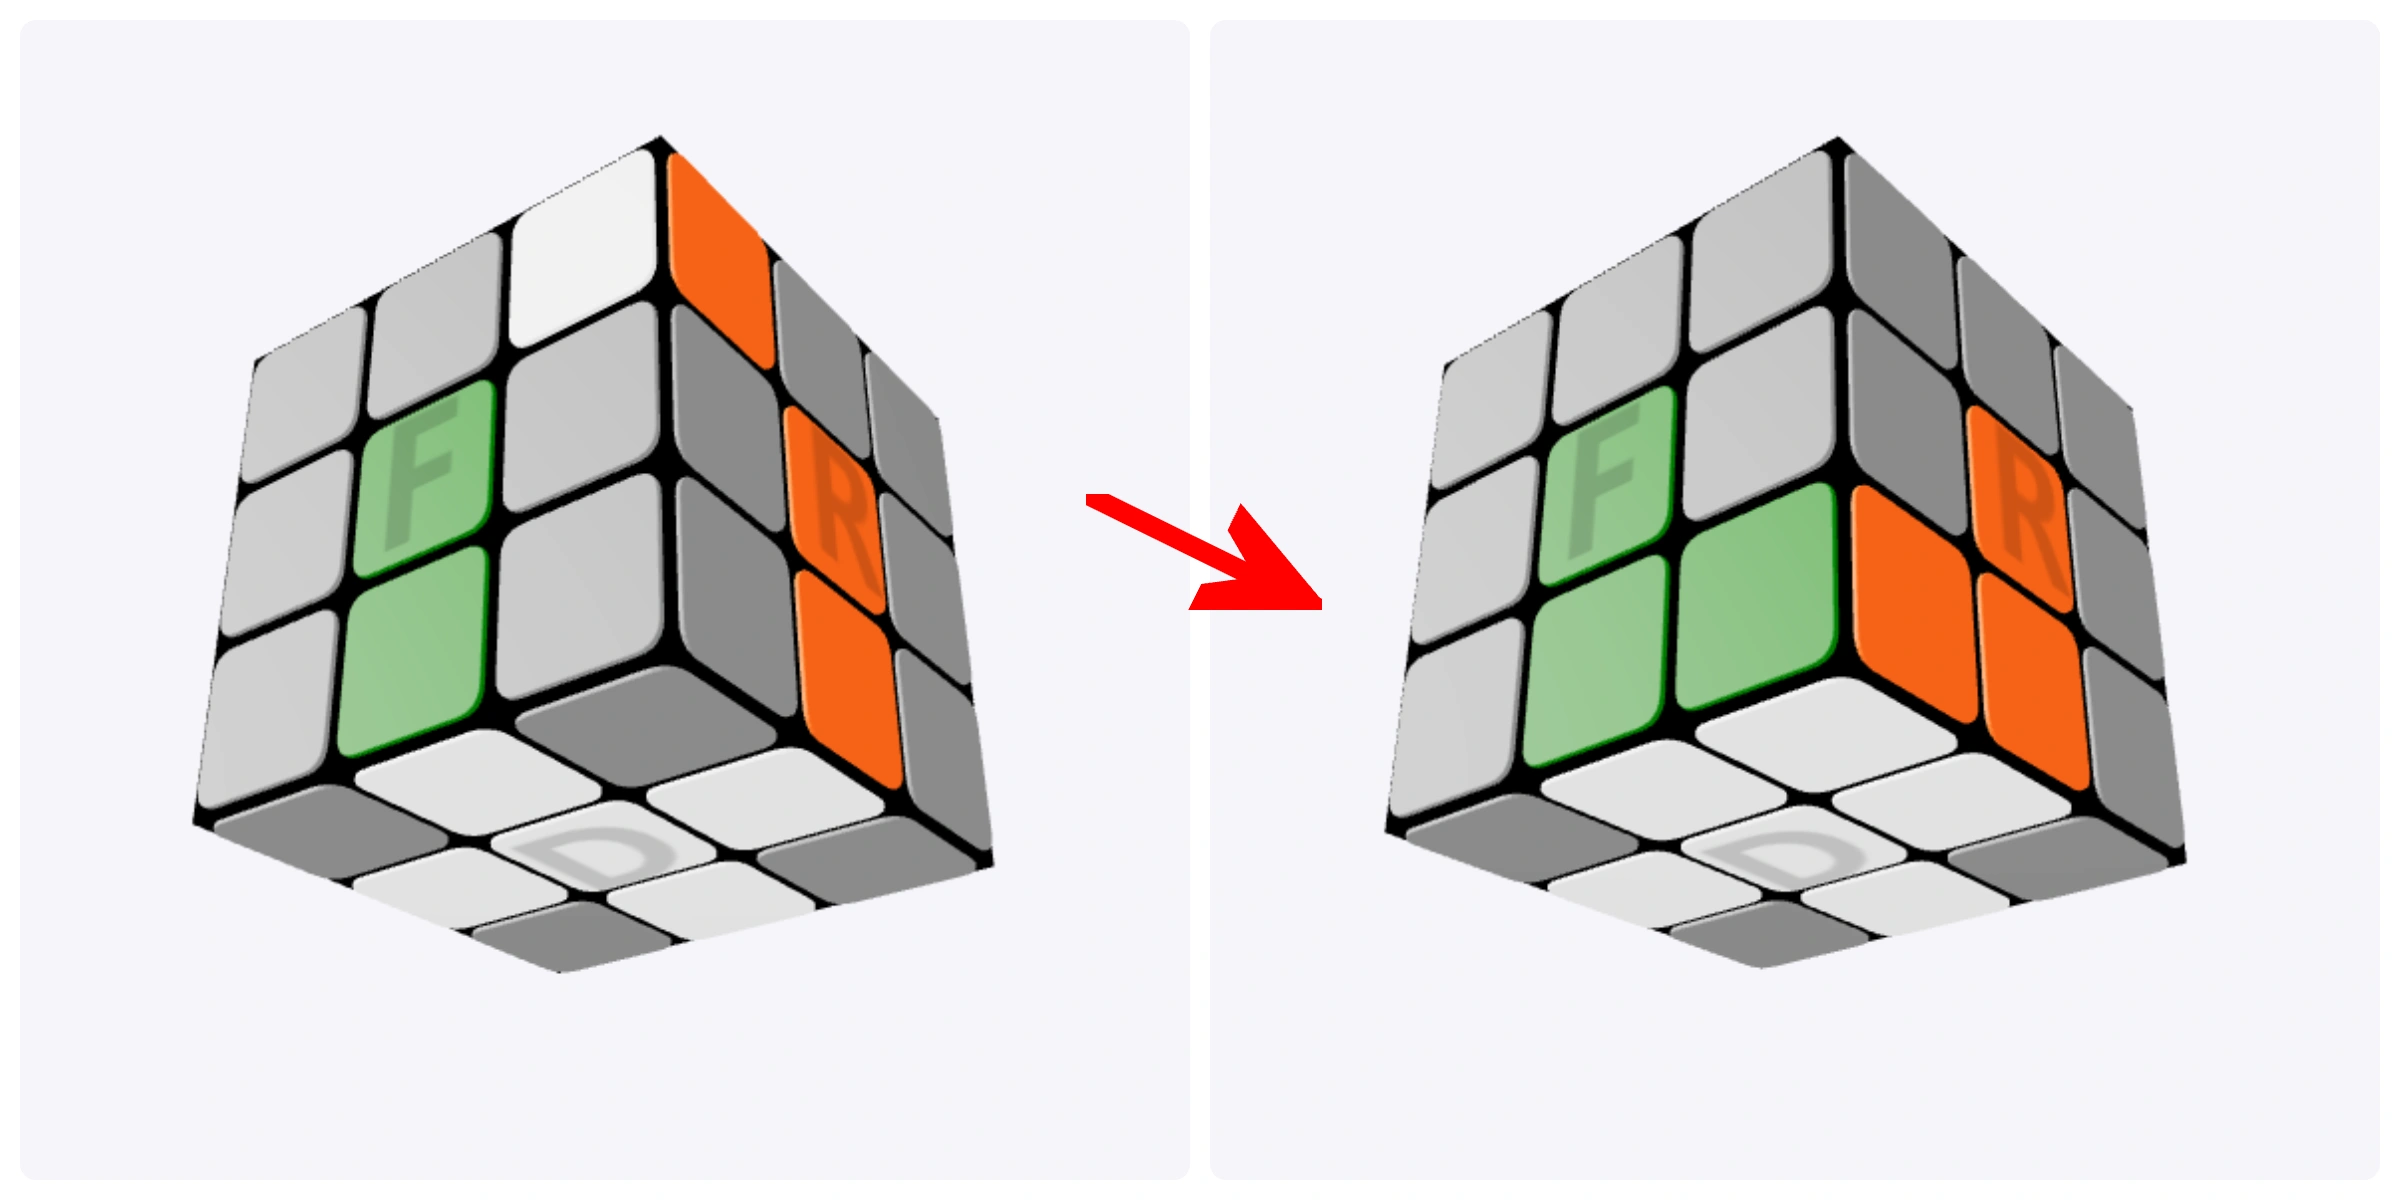
(R U R' U') × 5
A White Corner Is Stuck in the Wrong Bottom Slot
Hold the problem corner at the bottom-front-right. Perform the sequence once to bring it into the top layer. Then place it above its correct slot and insert it using the method above.
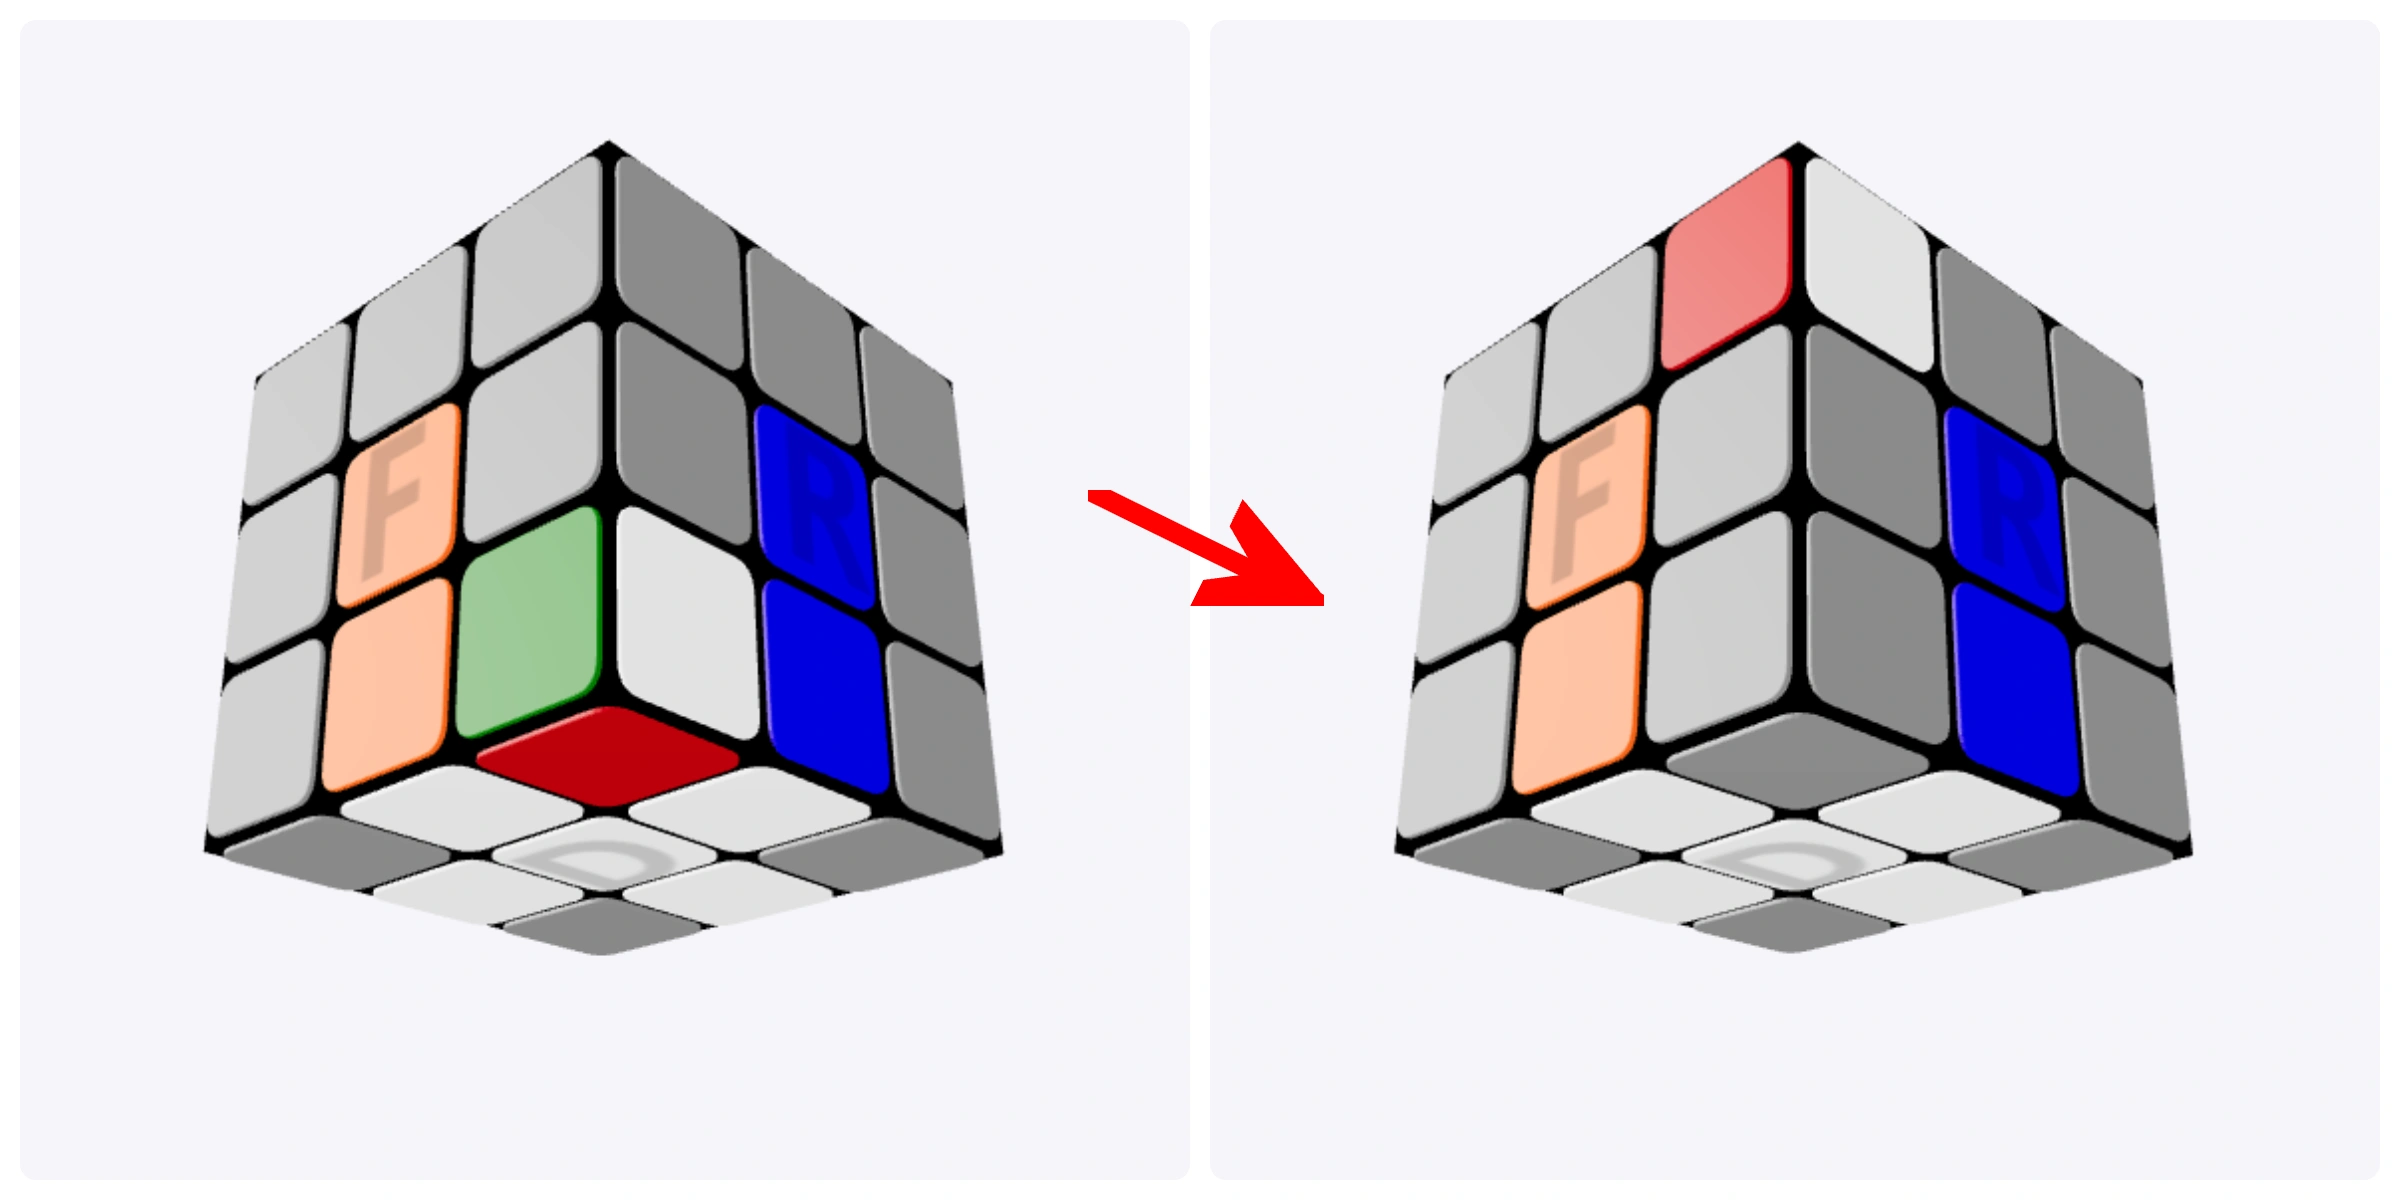
R U R' U'
3. Solve the Middle Layer
With the white layer still on the bottom, look in the top layer for an edge that does not contain yellow. That edge belongs in the middle layer.
Use its two colors to find the correct slot. Match your holding position to the relevant diagram before starting an algorithm: the front and right faces must be the same as shown.
Middle-Layer Edge Cases
Insert an Edge to the Left
Use this sequence when the edge and its destination match the left-insertion setup below.
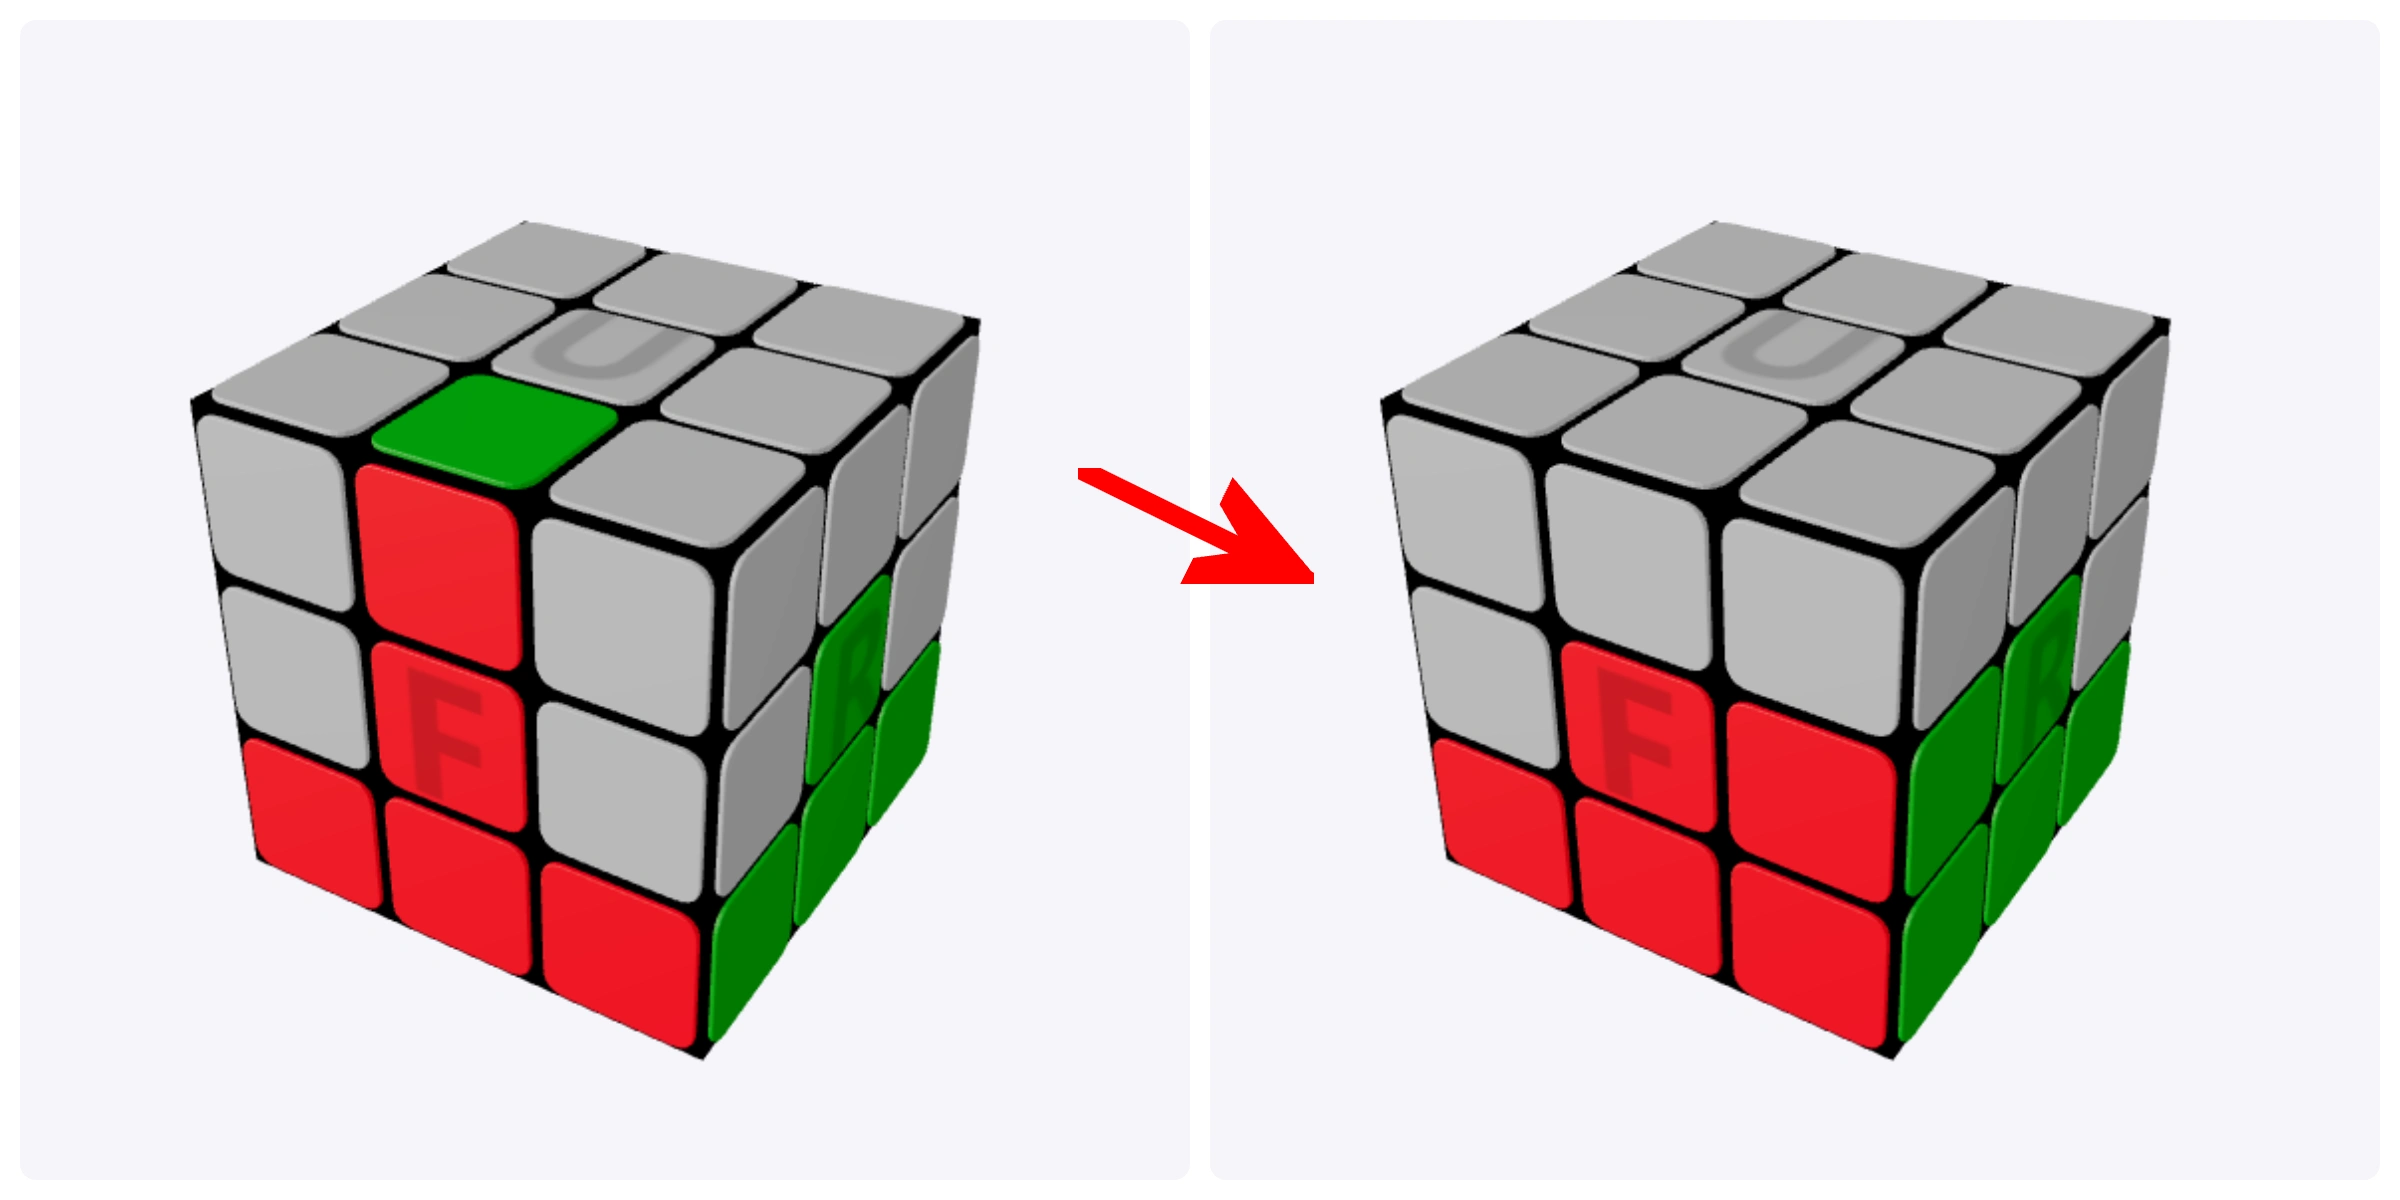
F U F U F U' F' U' F'
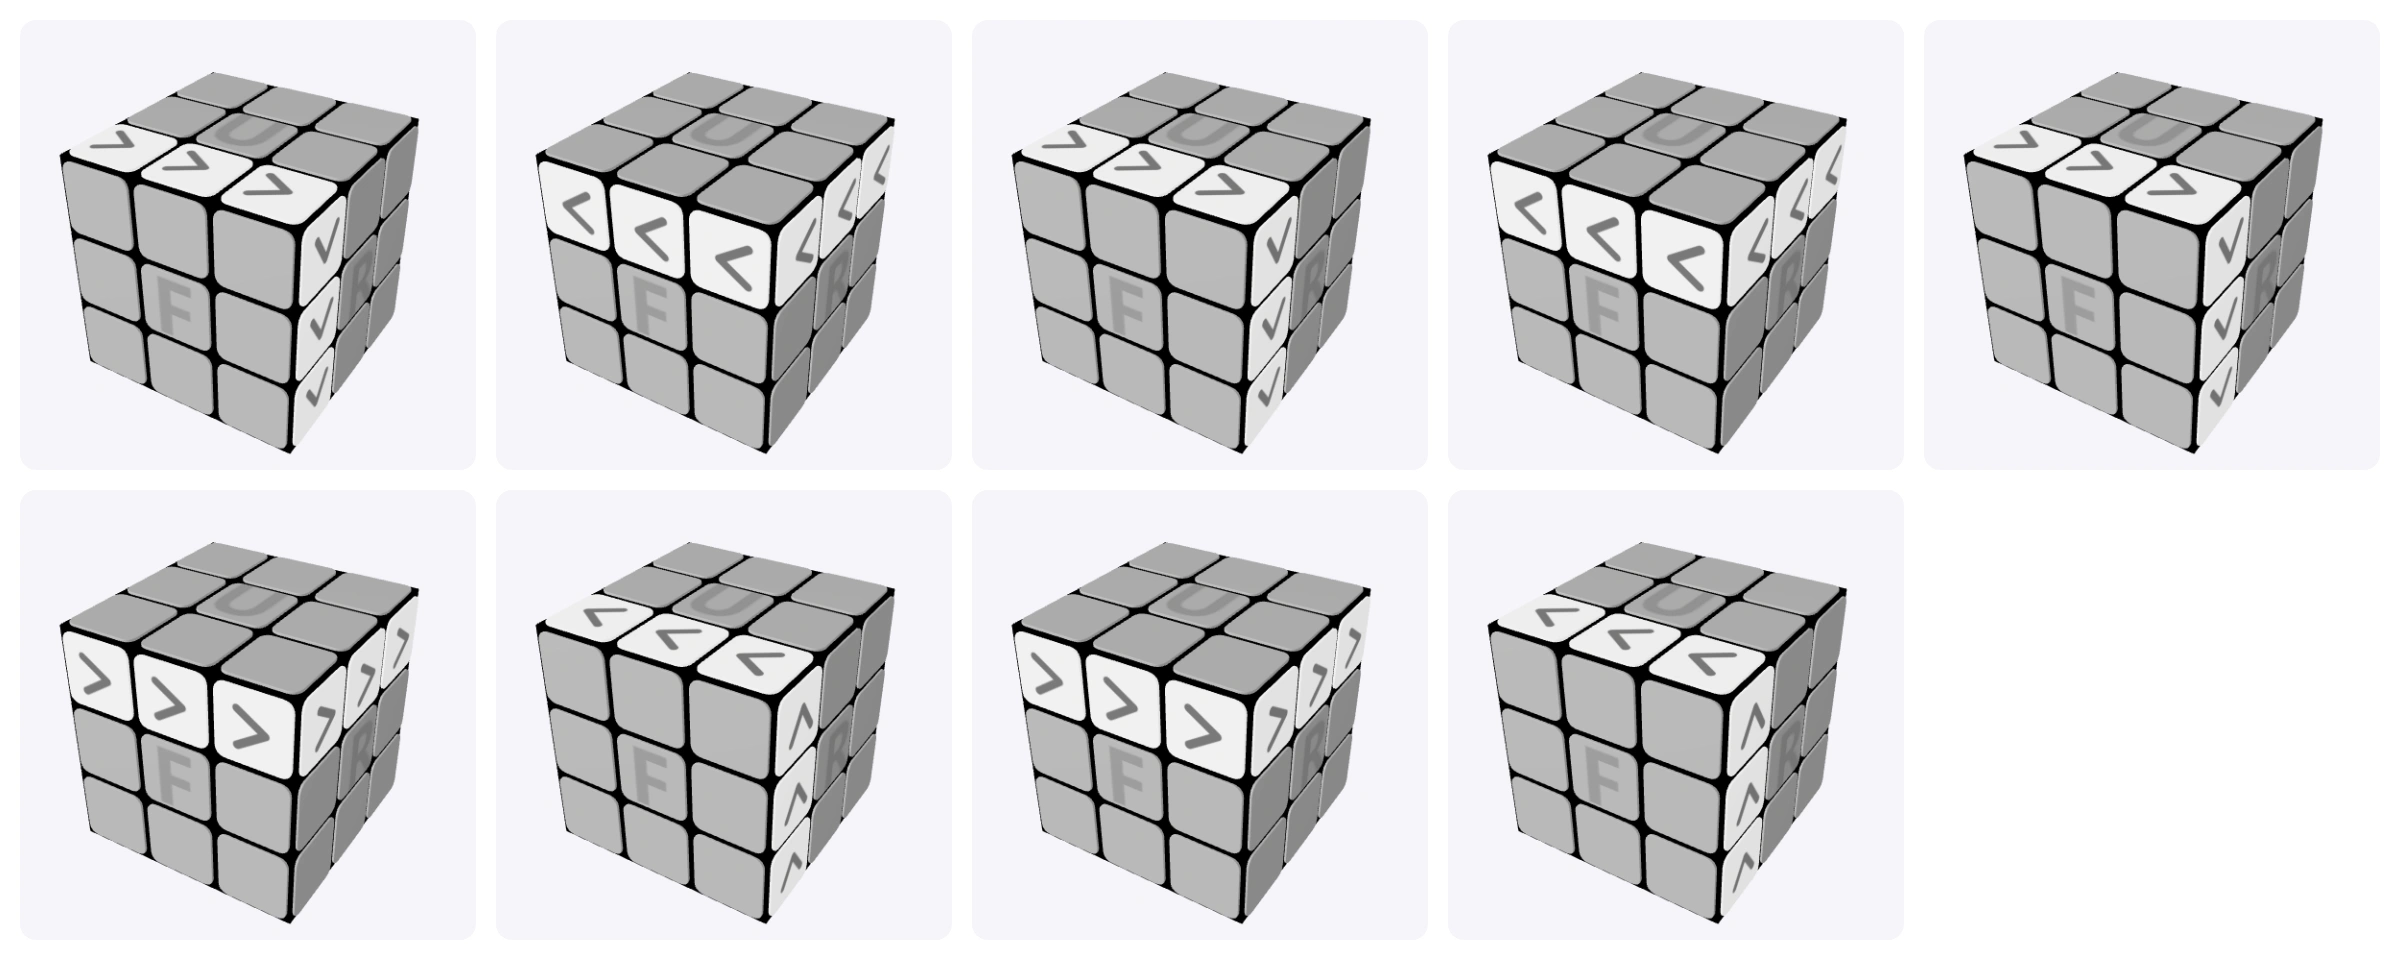
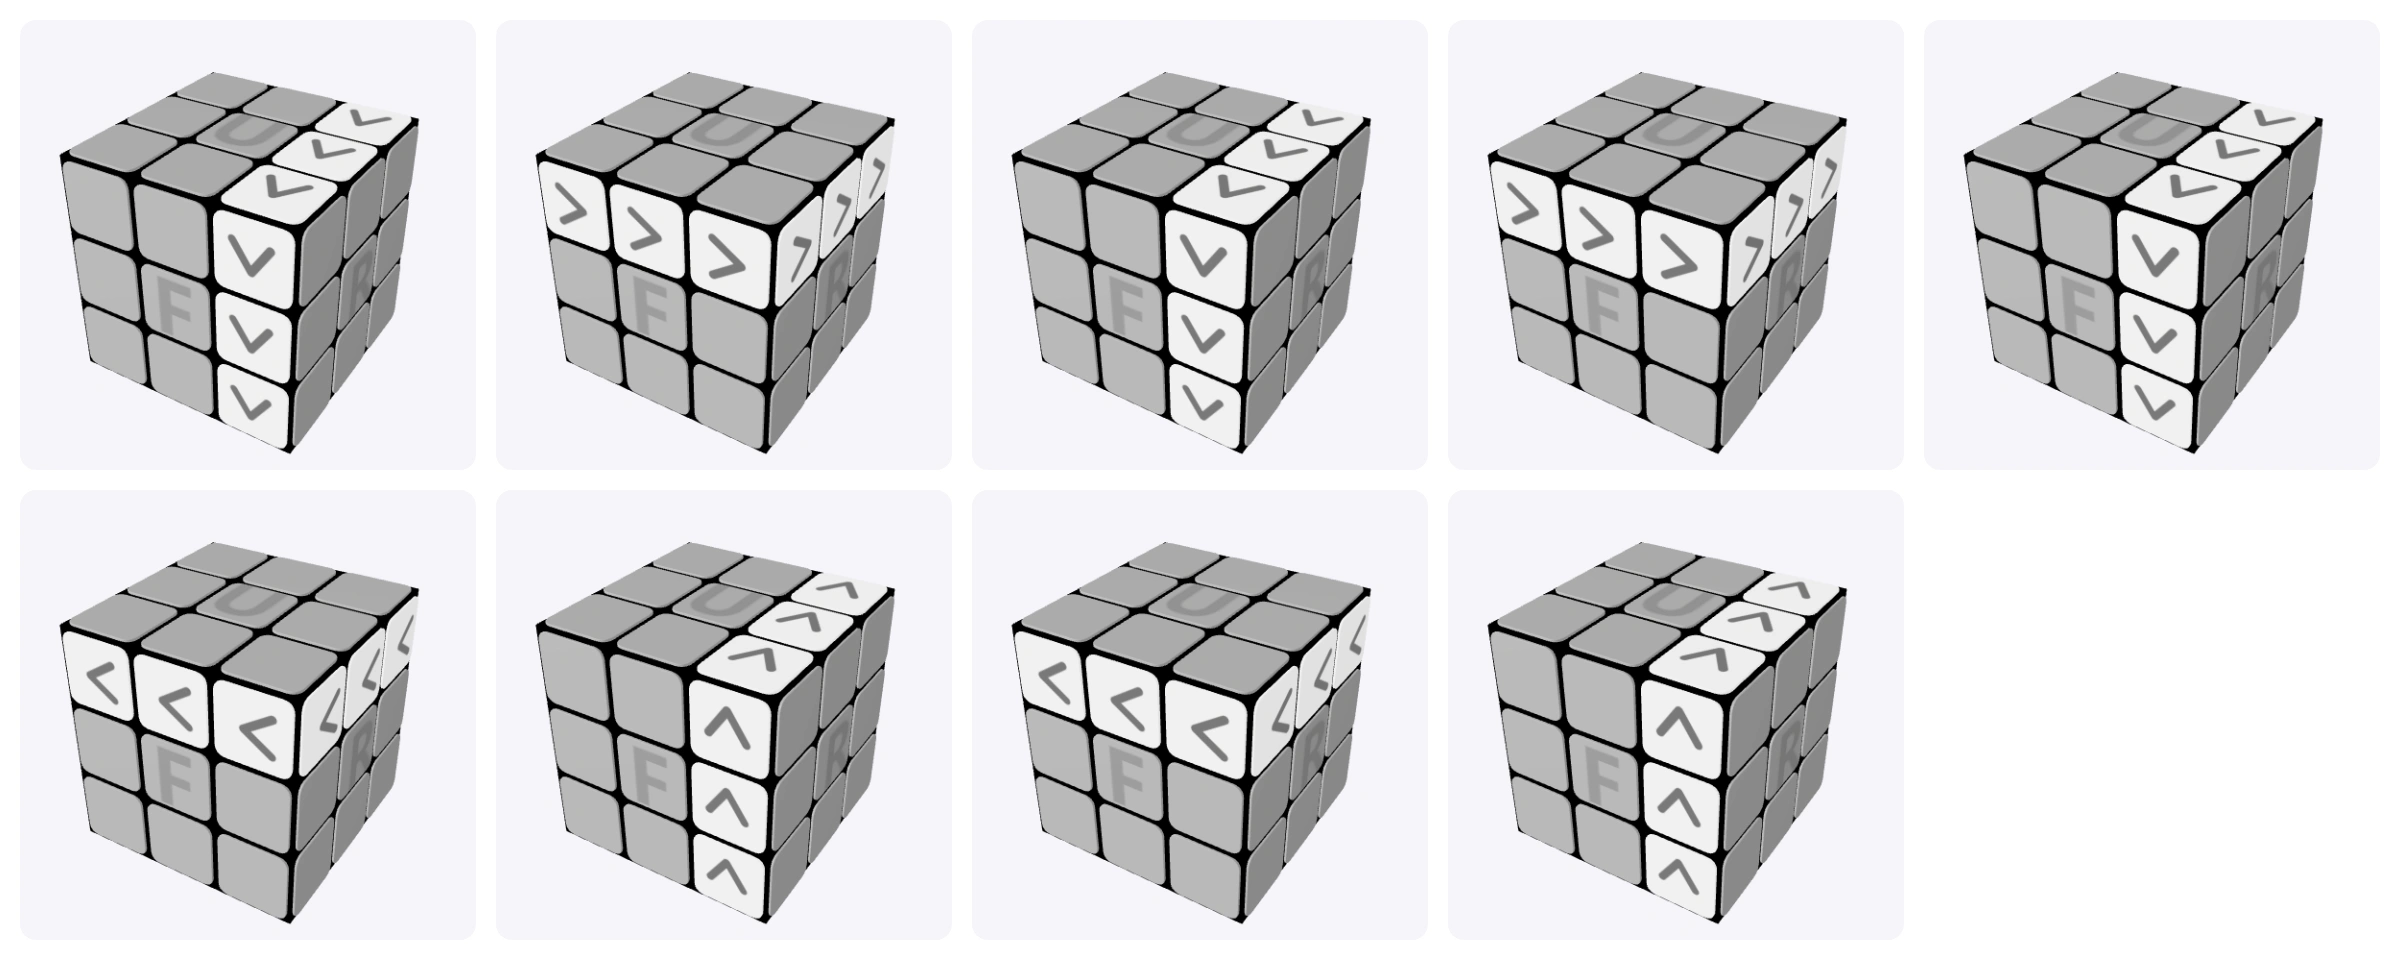
Insert an Edge to the Right
Use this sequence for the right-insertion setup. Keep the same front face throughout the algorithm.
R' U' R' U' R' U R U R
Fix an Edge in the Wrong Slot or Flipped in Place
If no usable edge remains on top, check the middle layer. An edge may be in the wrong slot or have its colors reversed. Match the illustrated setup before using this correction sequence.
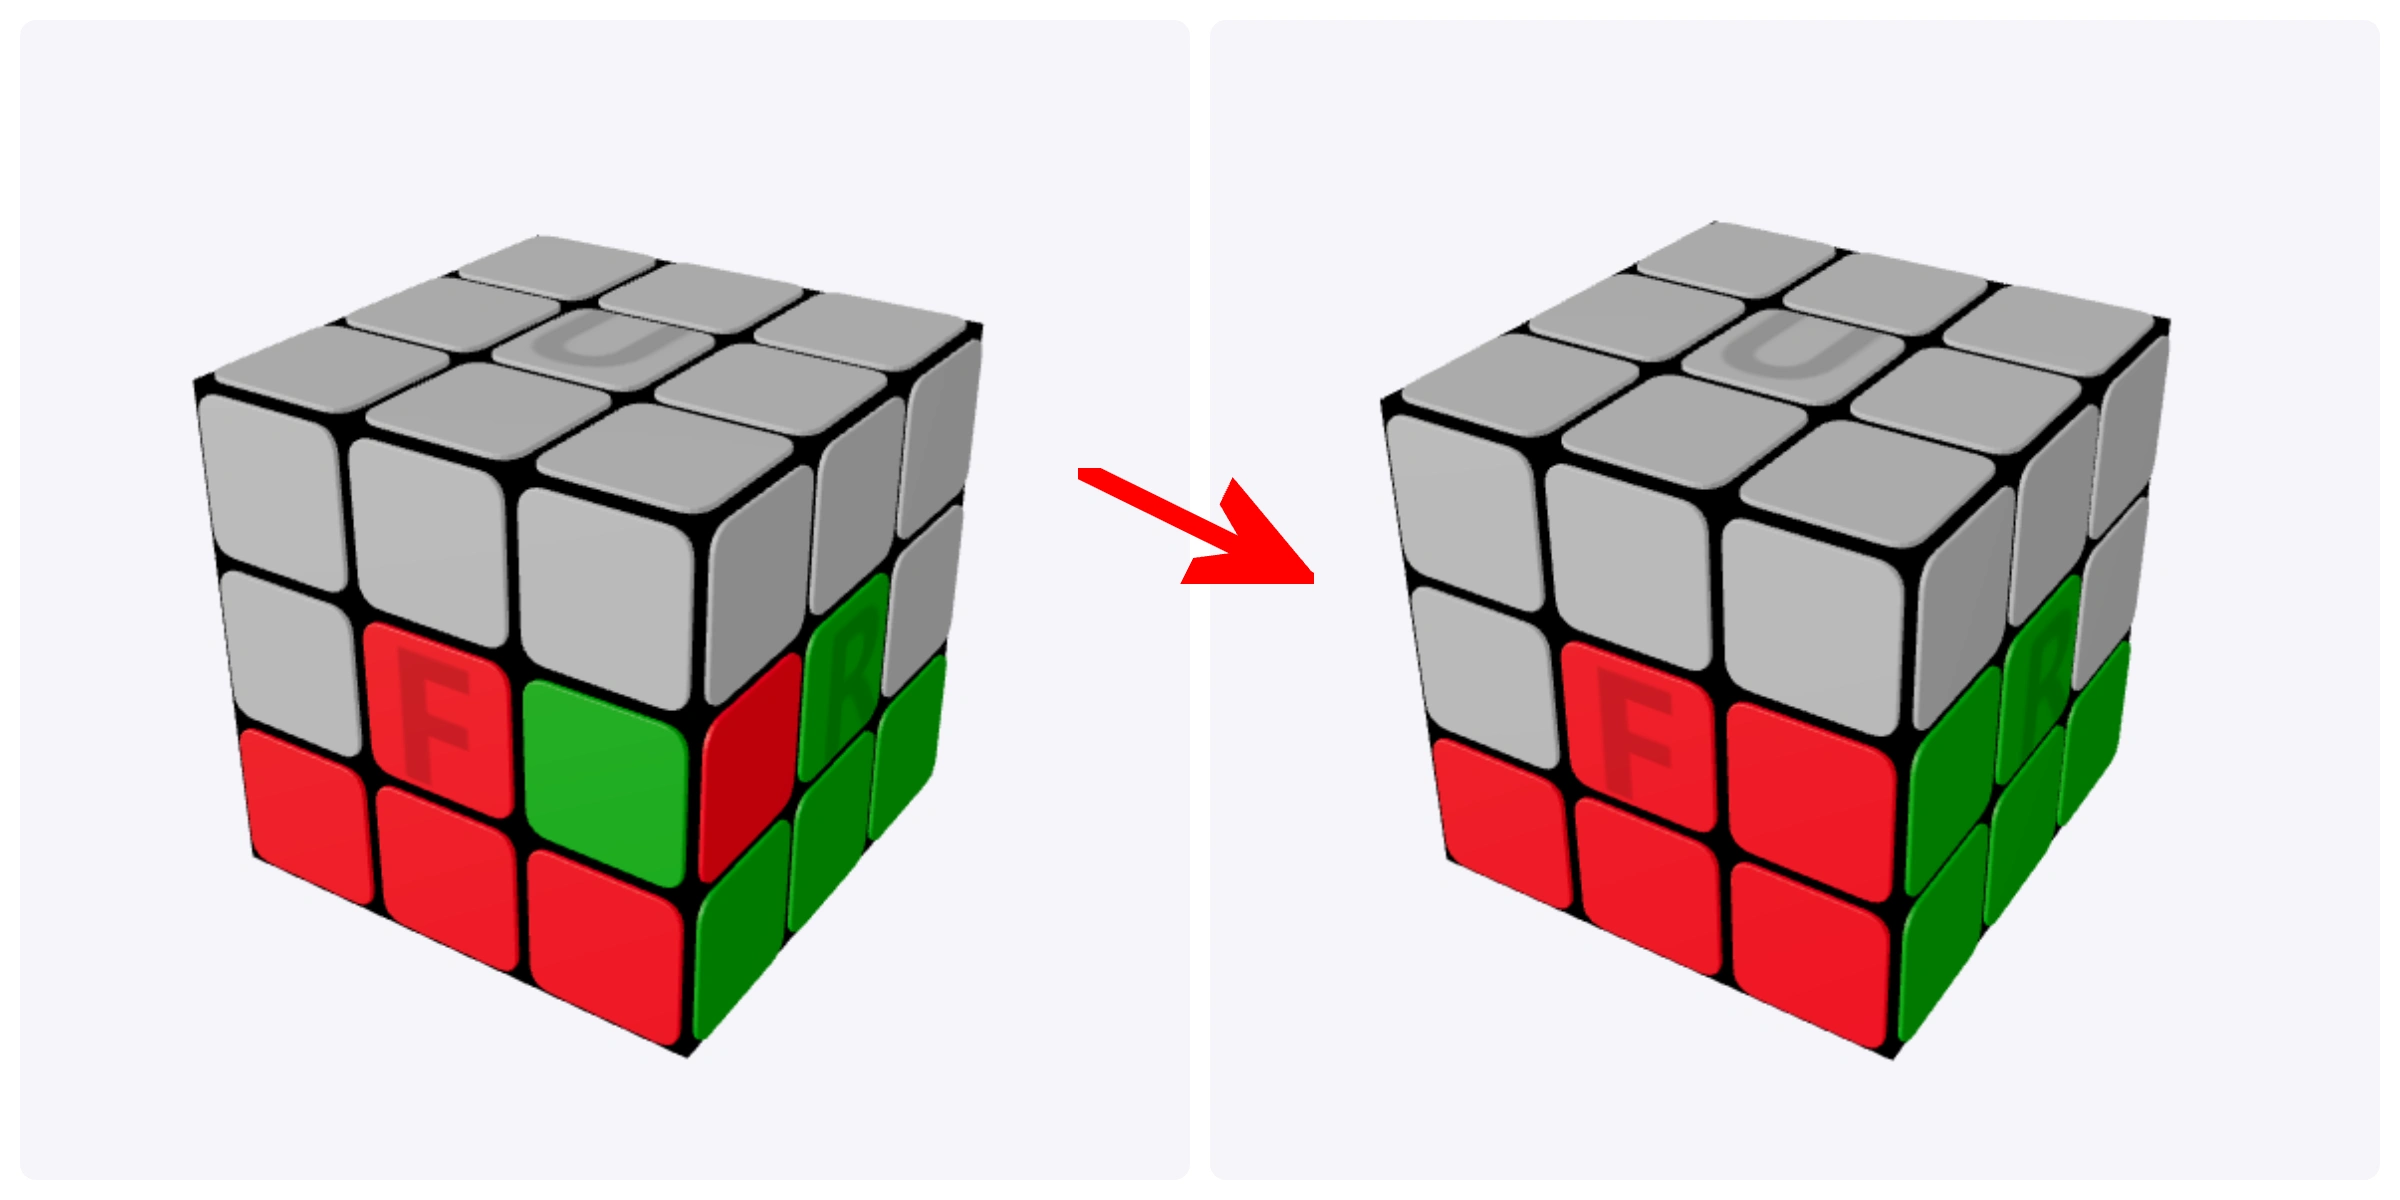
R U2 R' U R U2 R' U F' U' F
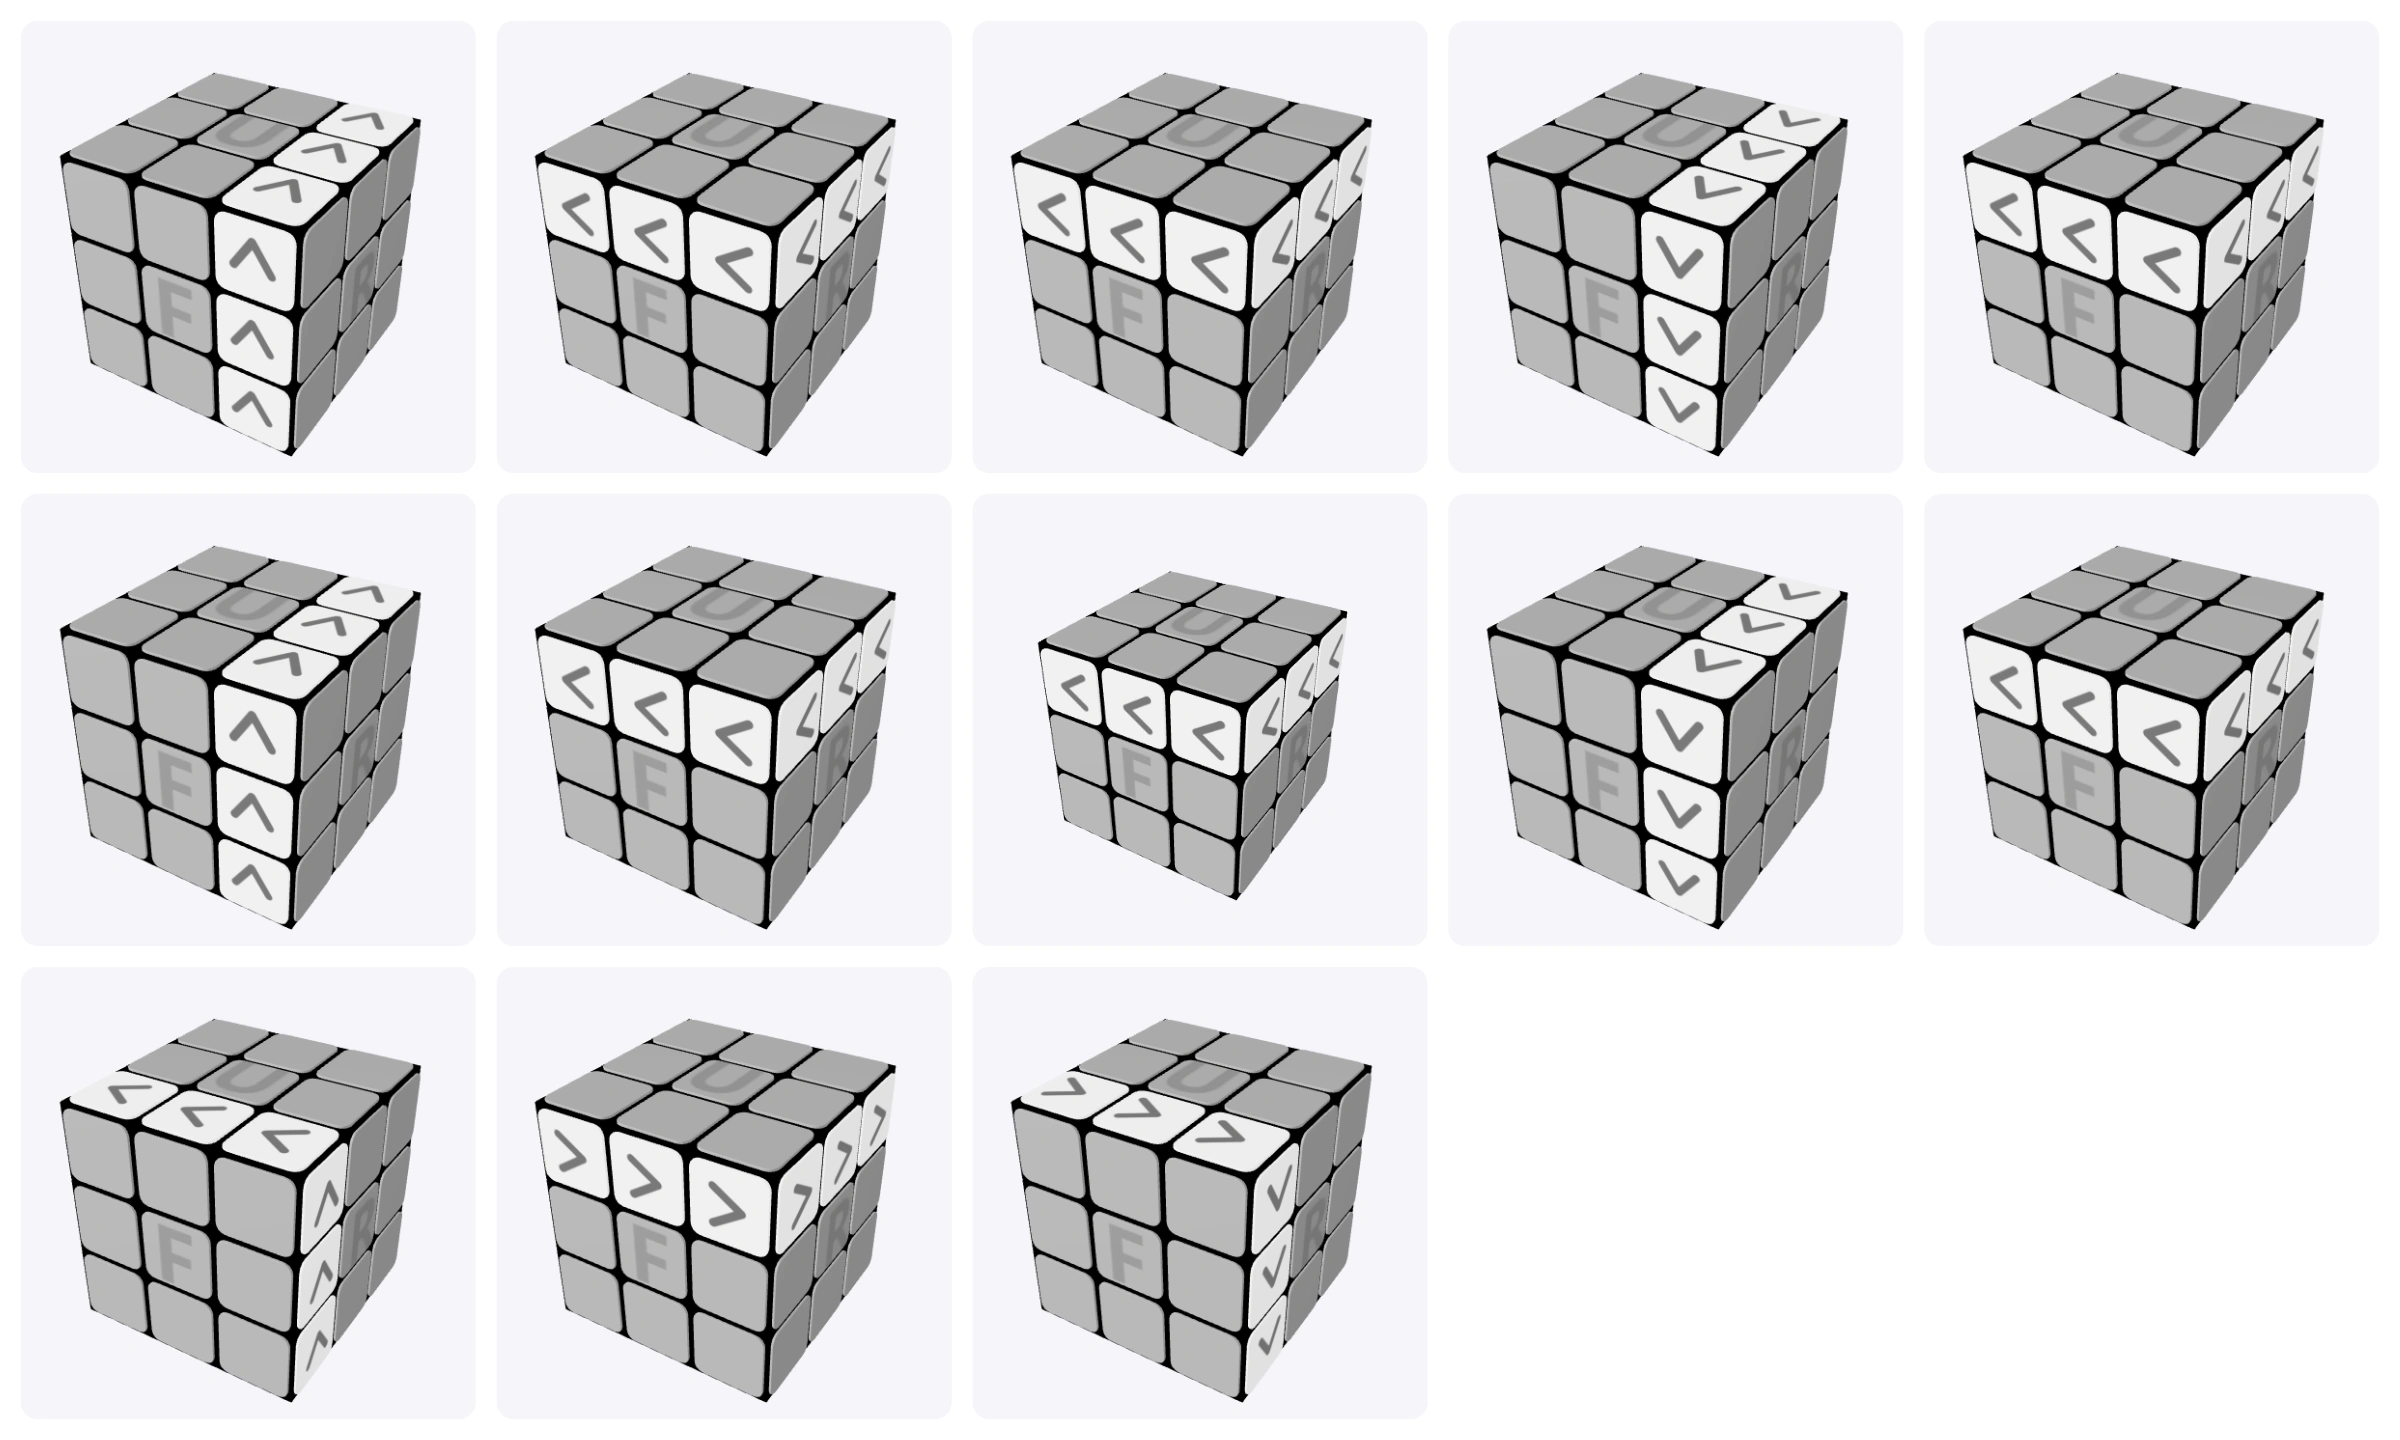
Recheck the top and middle layers afterward, then continue inserting edges until the bottom two rows match the centers on every side.
4. Make the Yellow Cross
Keep yellow on top. Your next goal is a yellow cross: the center and all four edge stickers should face upward. Ignore the yellow corners for now.
At this stage, the cross’s side colors do not need to match their centers. You’ll fix those in the final step.
Recognize the Dot, L Shape, or Line
The Dot: No Yellow Edges Face Up
If only the yellow center is showing among the center and edge positions, start with any side facing you. Perform the algorithm, then identify the new pattern.
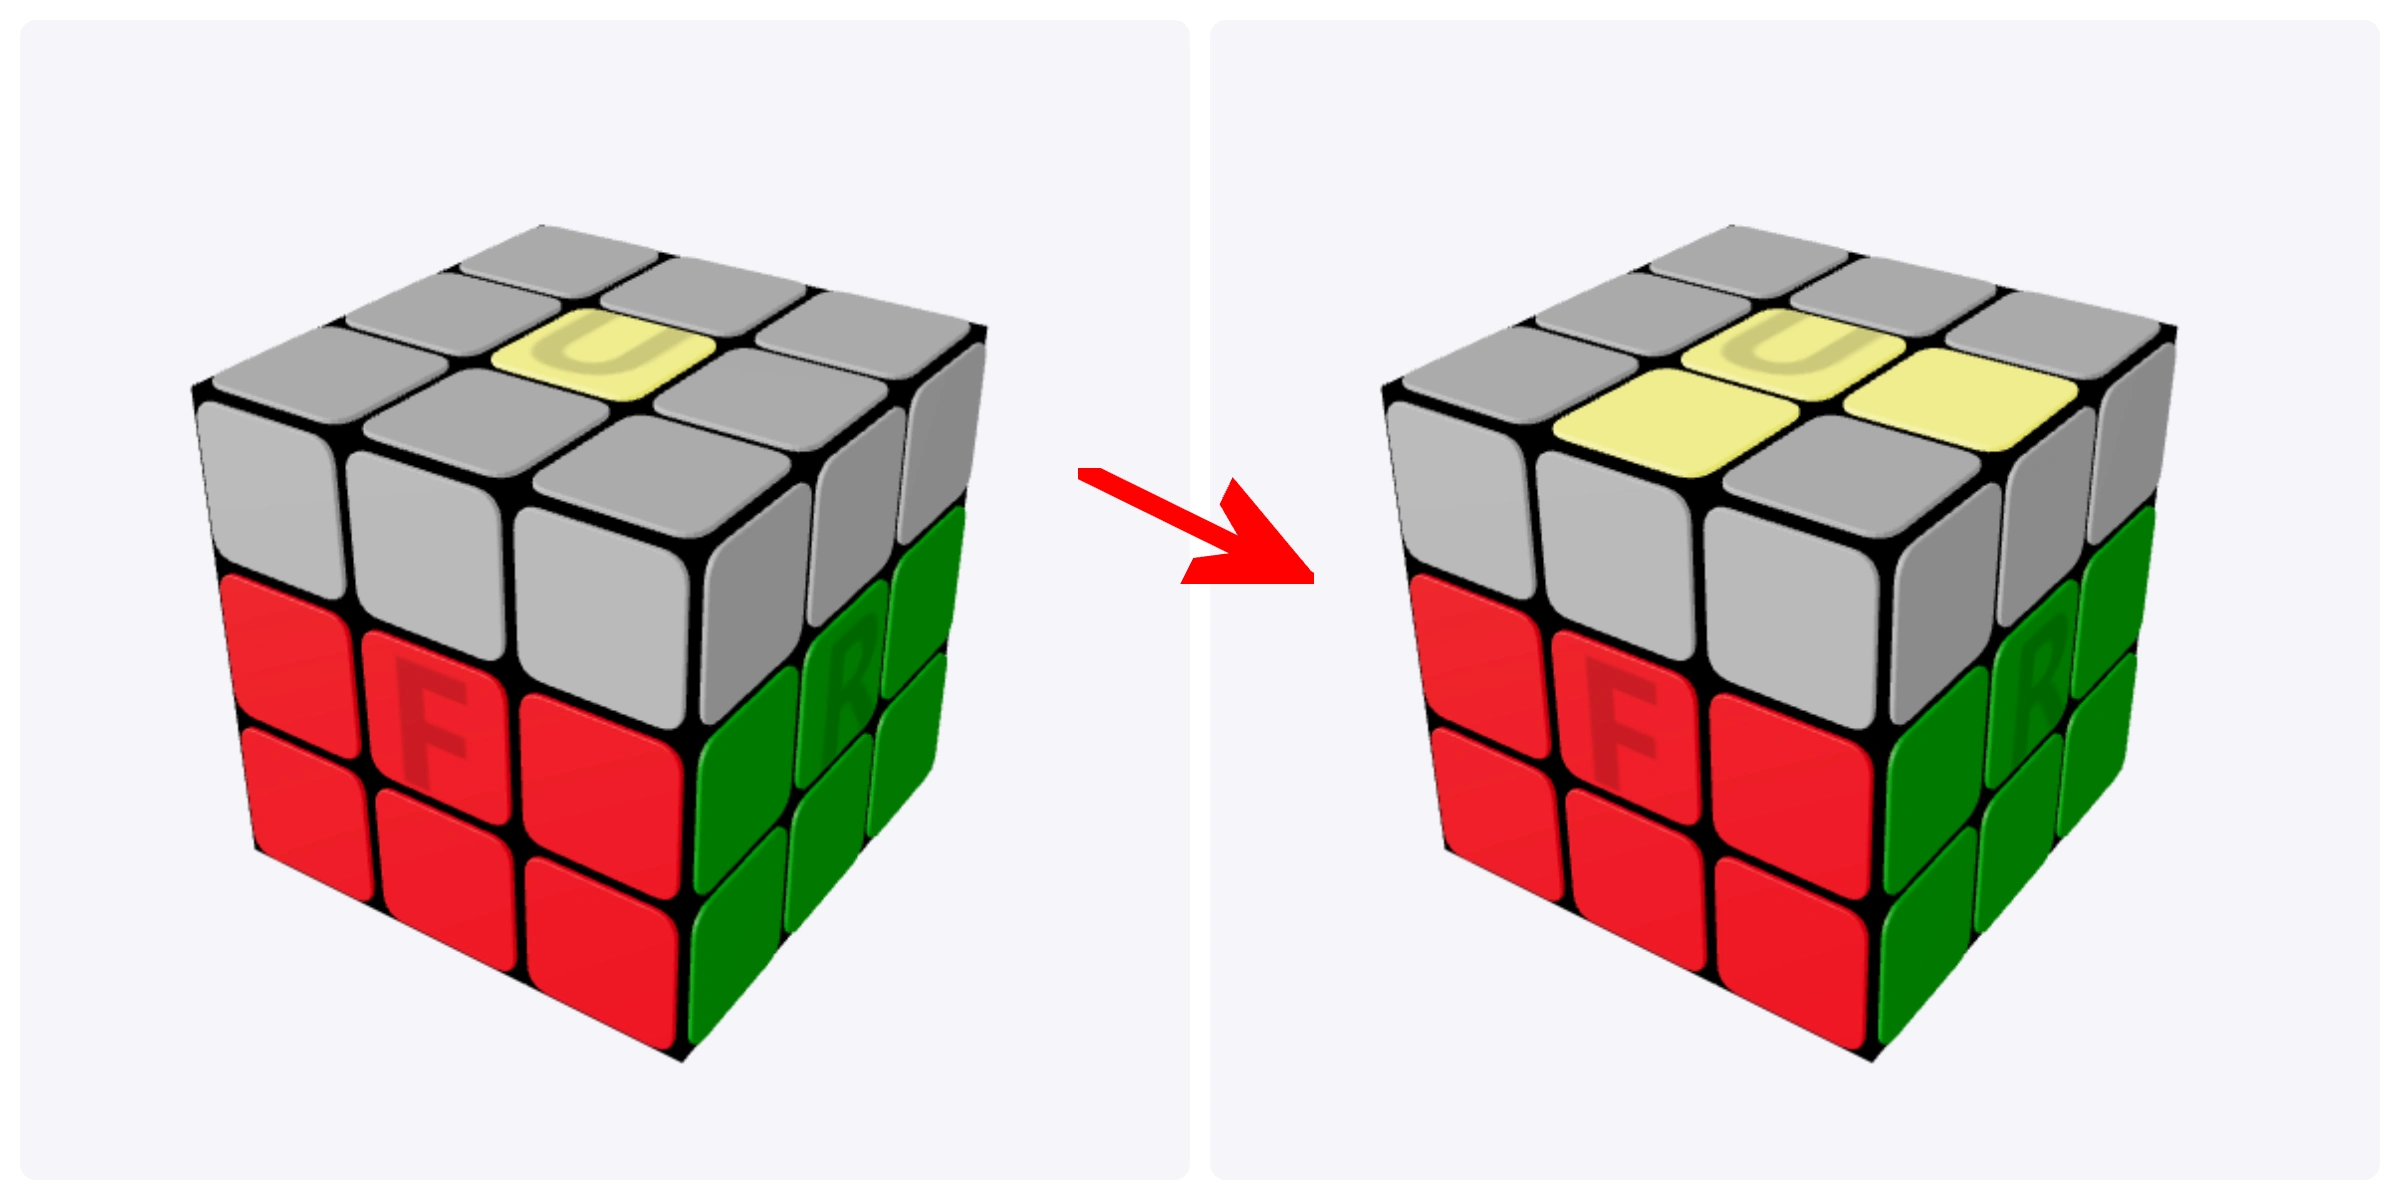
F R U R' U' F'
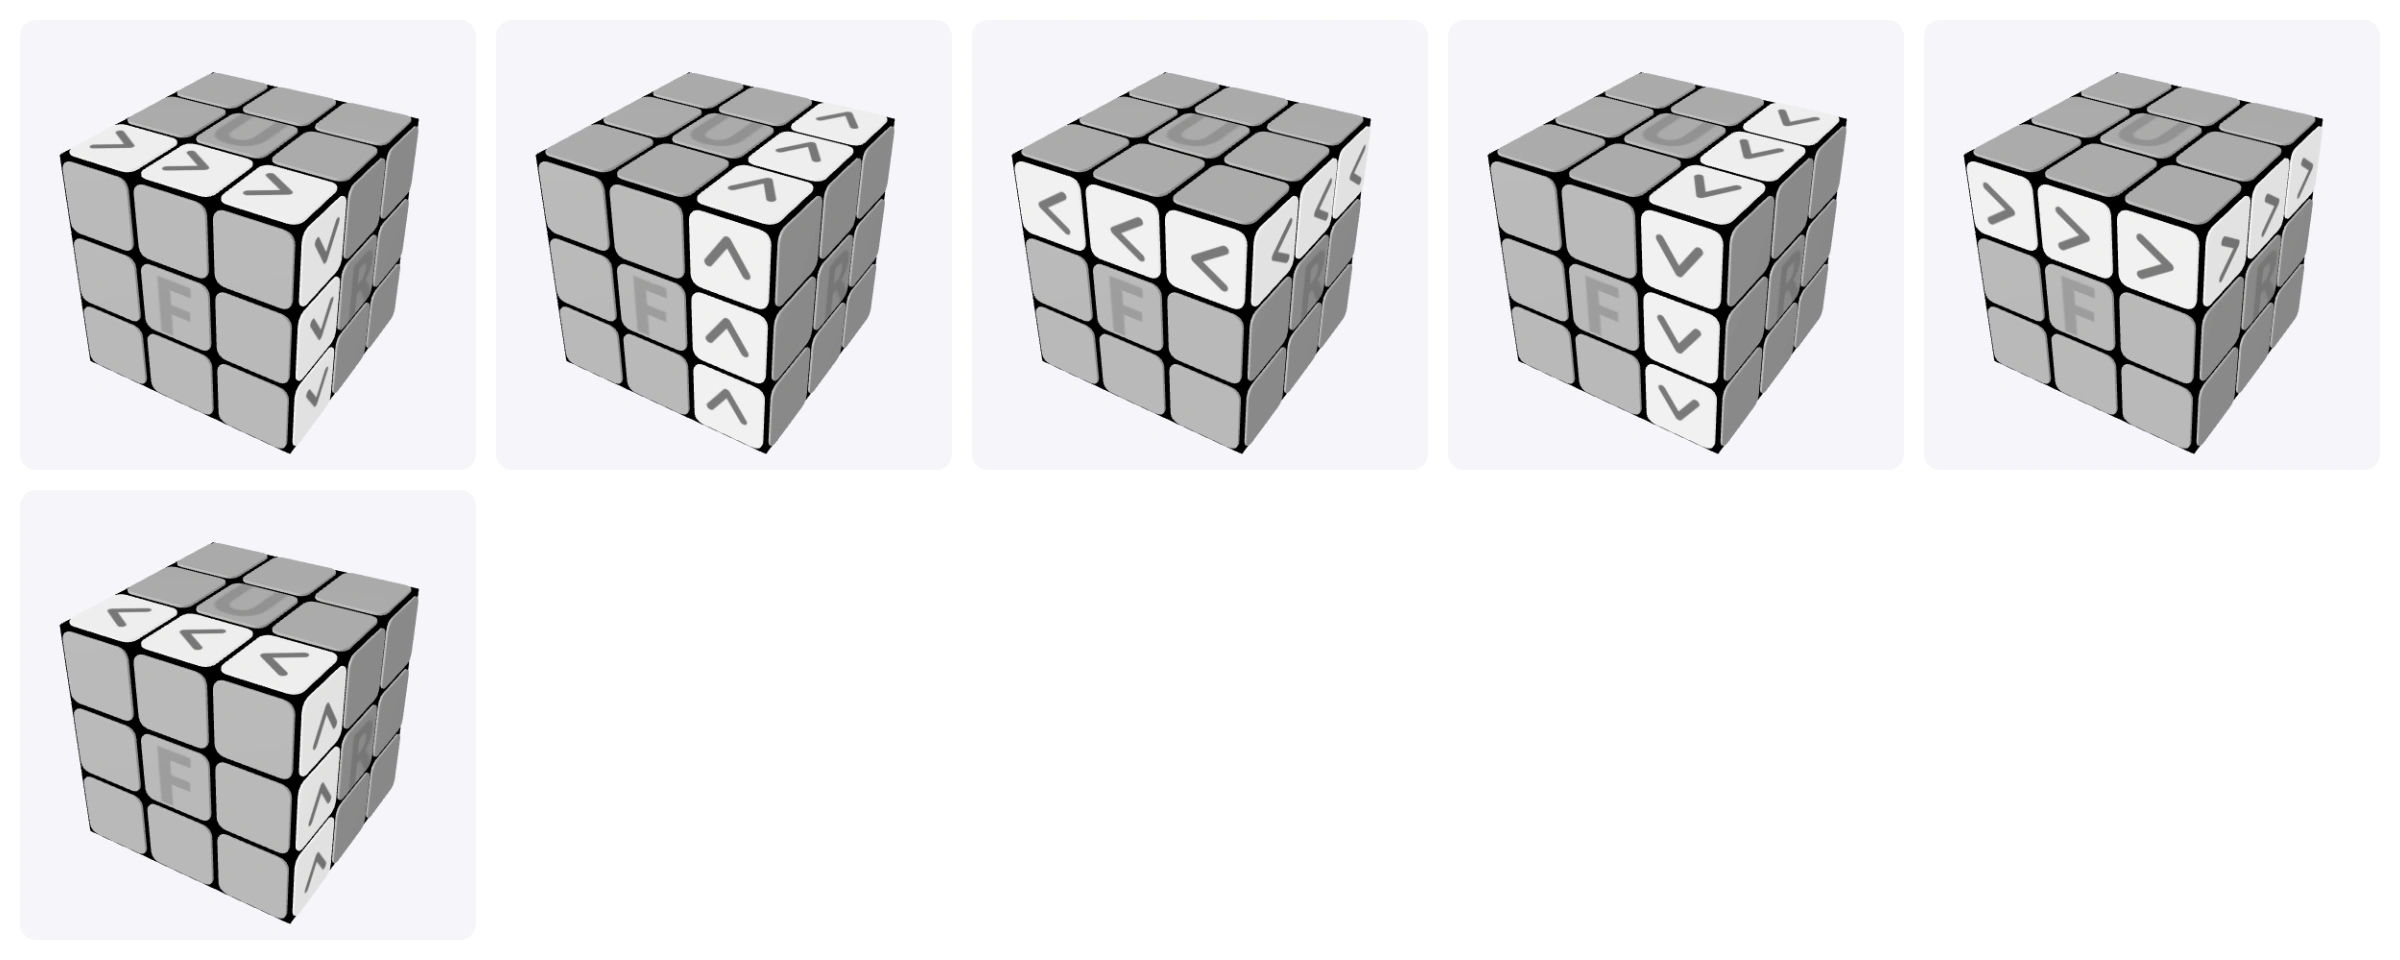
The L Shape: Two Adjacent Yellow Edges Face Up
For the algorithm below, turn the top layer so the two yellow edges are at the front and right of the yellow center. Perform the sequence, then check the result and reposition the top layer if needed.
F R U R' U' F'
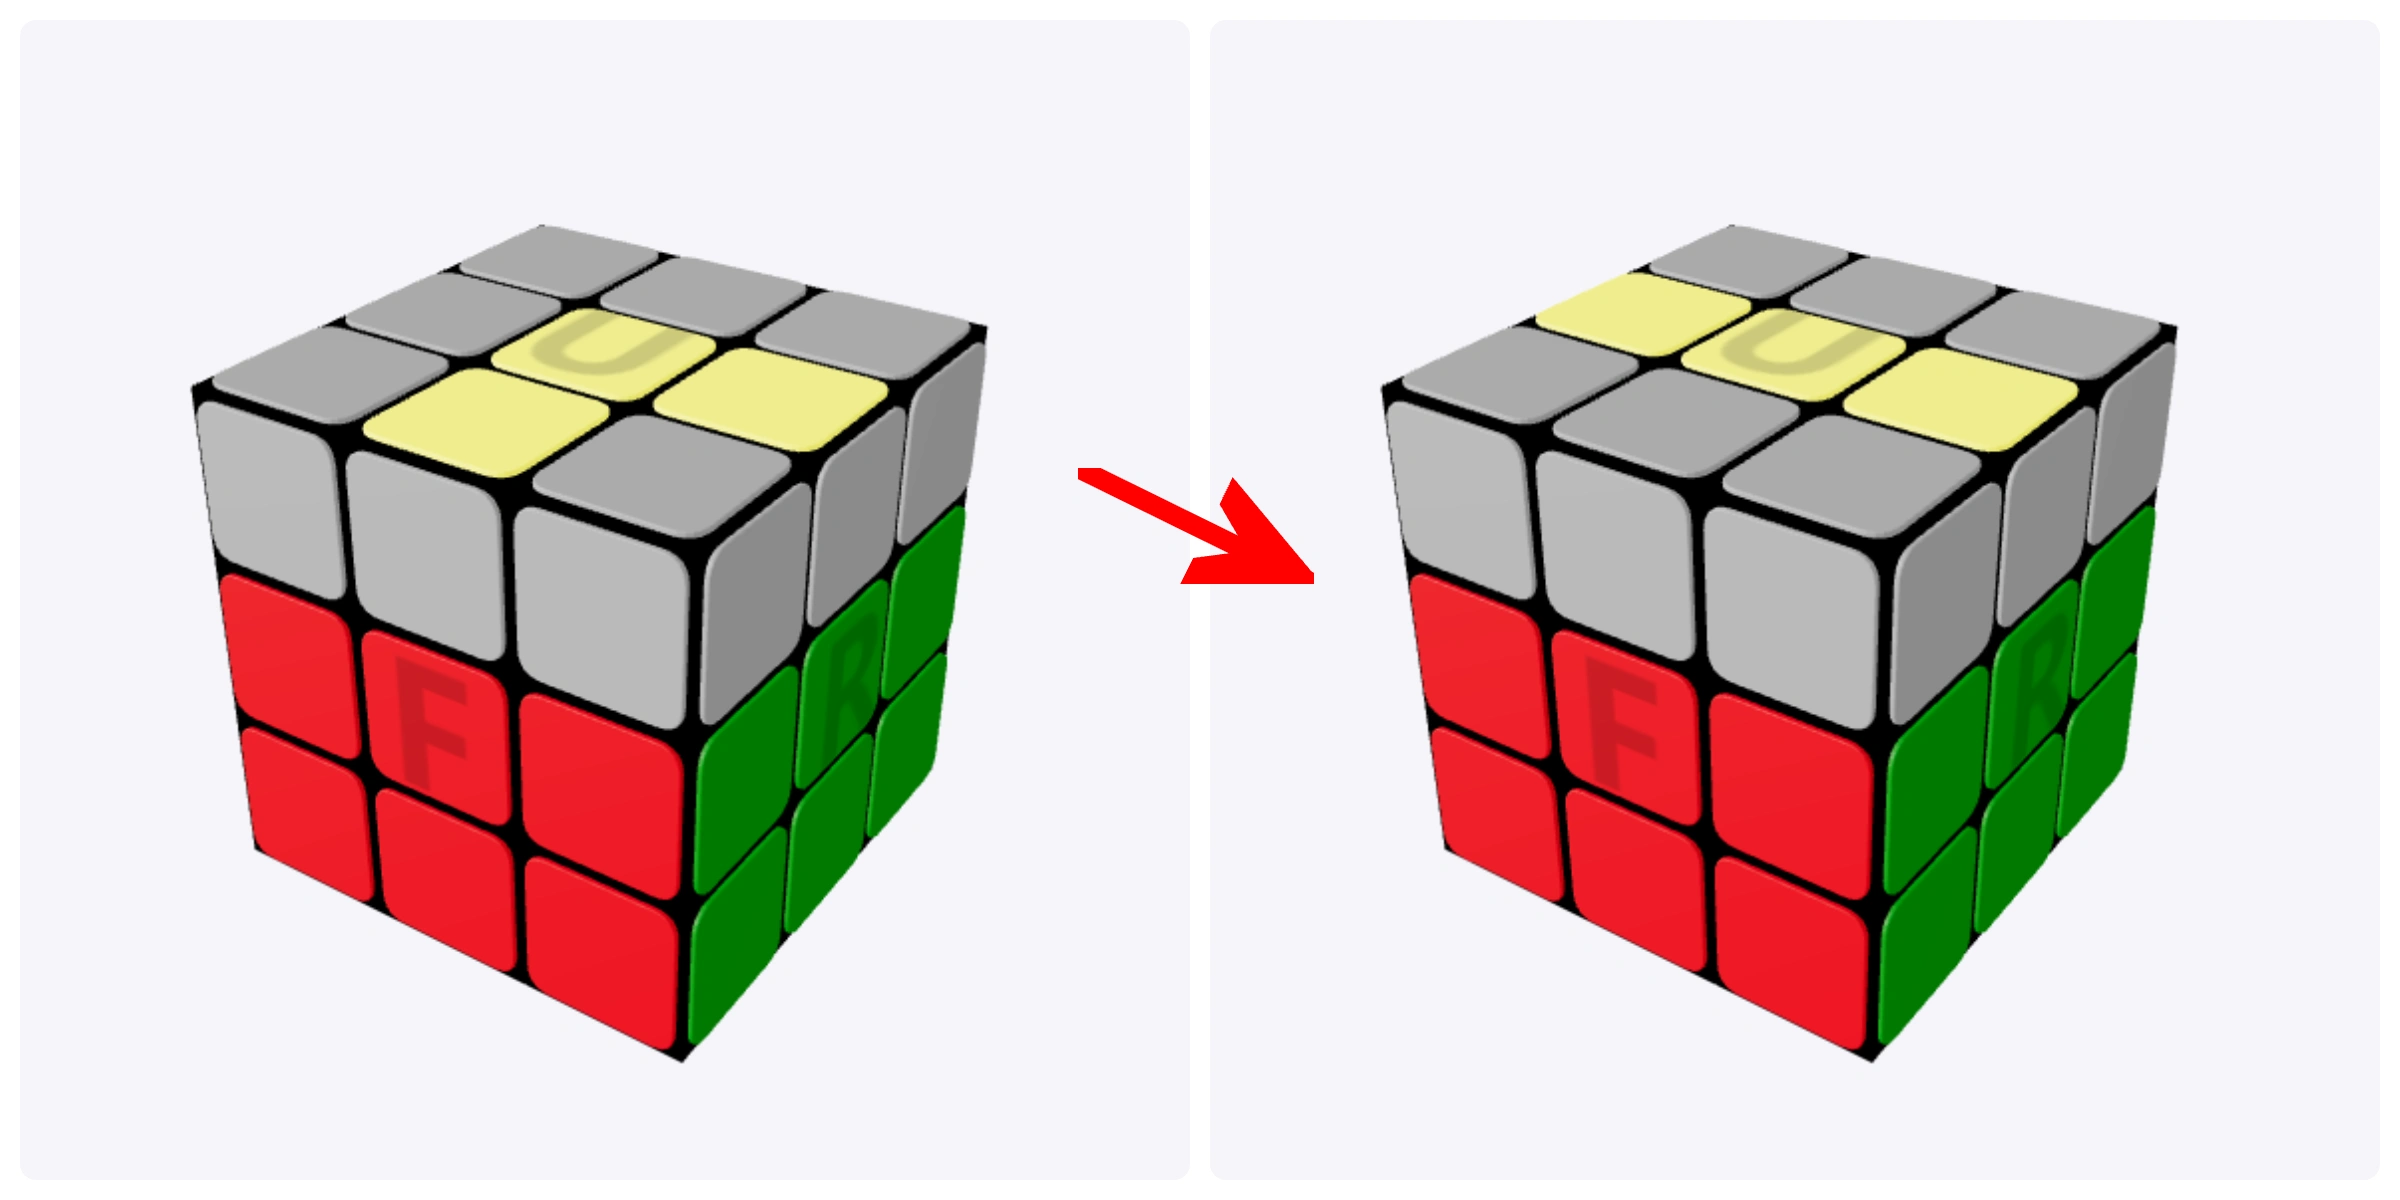
The Line: Two Opposite Yellow Edges Face Up
Turn the top layer so the yellow line runs left to right, not front to back. Perform the algorithm once to make the cross.
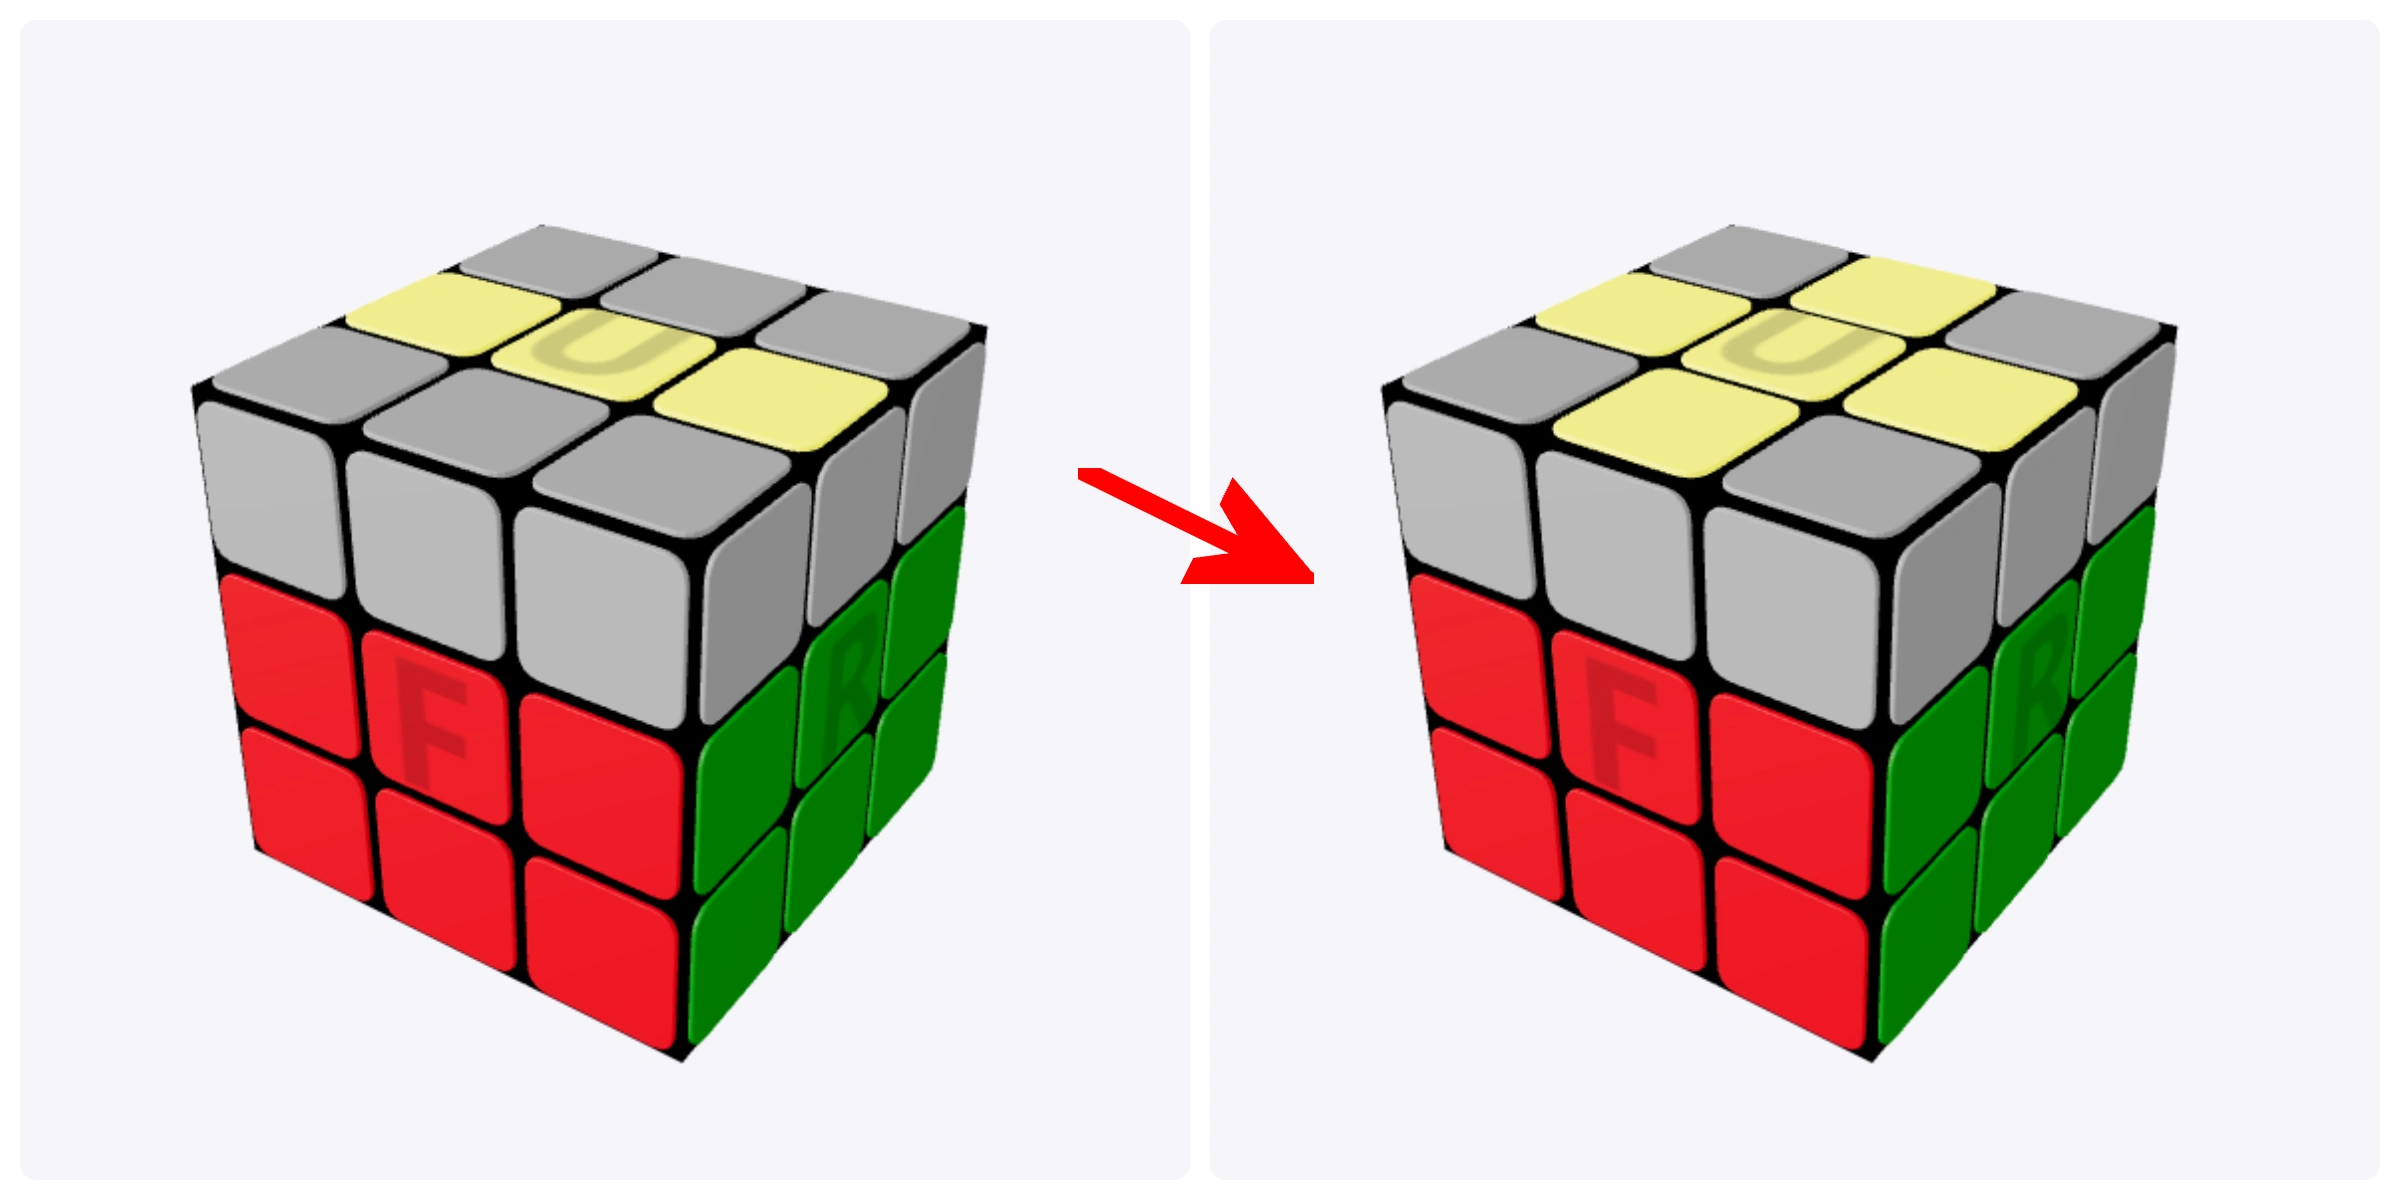
F R U R' U' F'
5. Solve the Yellow Face
Now turn the yellow corner stickers upward to complete the top face. The corners may still be in the wrong positions—that’s normal. This step fixes their orientation, not their location.
Use the same algorithm for each case below. The important part is the setup: match the yellow corner stickers to the relevant diagram before each attempt.
Count the Yellow Corners Facing Up
Two Yellow Corners Face Up
Compare both the top and side stickers with the diagram. Turn only the top layer to match the setup, then perform the algorithm and reassess.
R' U' R U' R' U2 R
Another Two-Corner Pattern
Two yellow corners can face up in different arrangements. Use this diagram if it matches your cube more closely.
R' U' R U' R' U2 R
No Yellow Corners Face Up
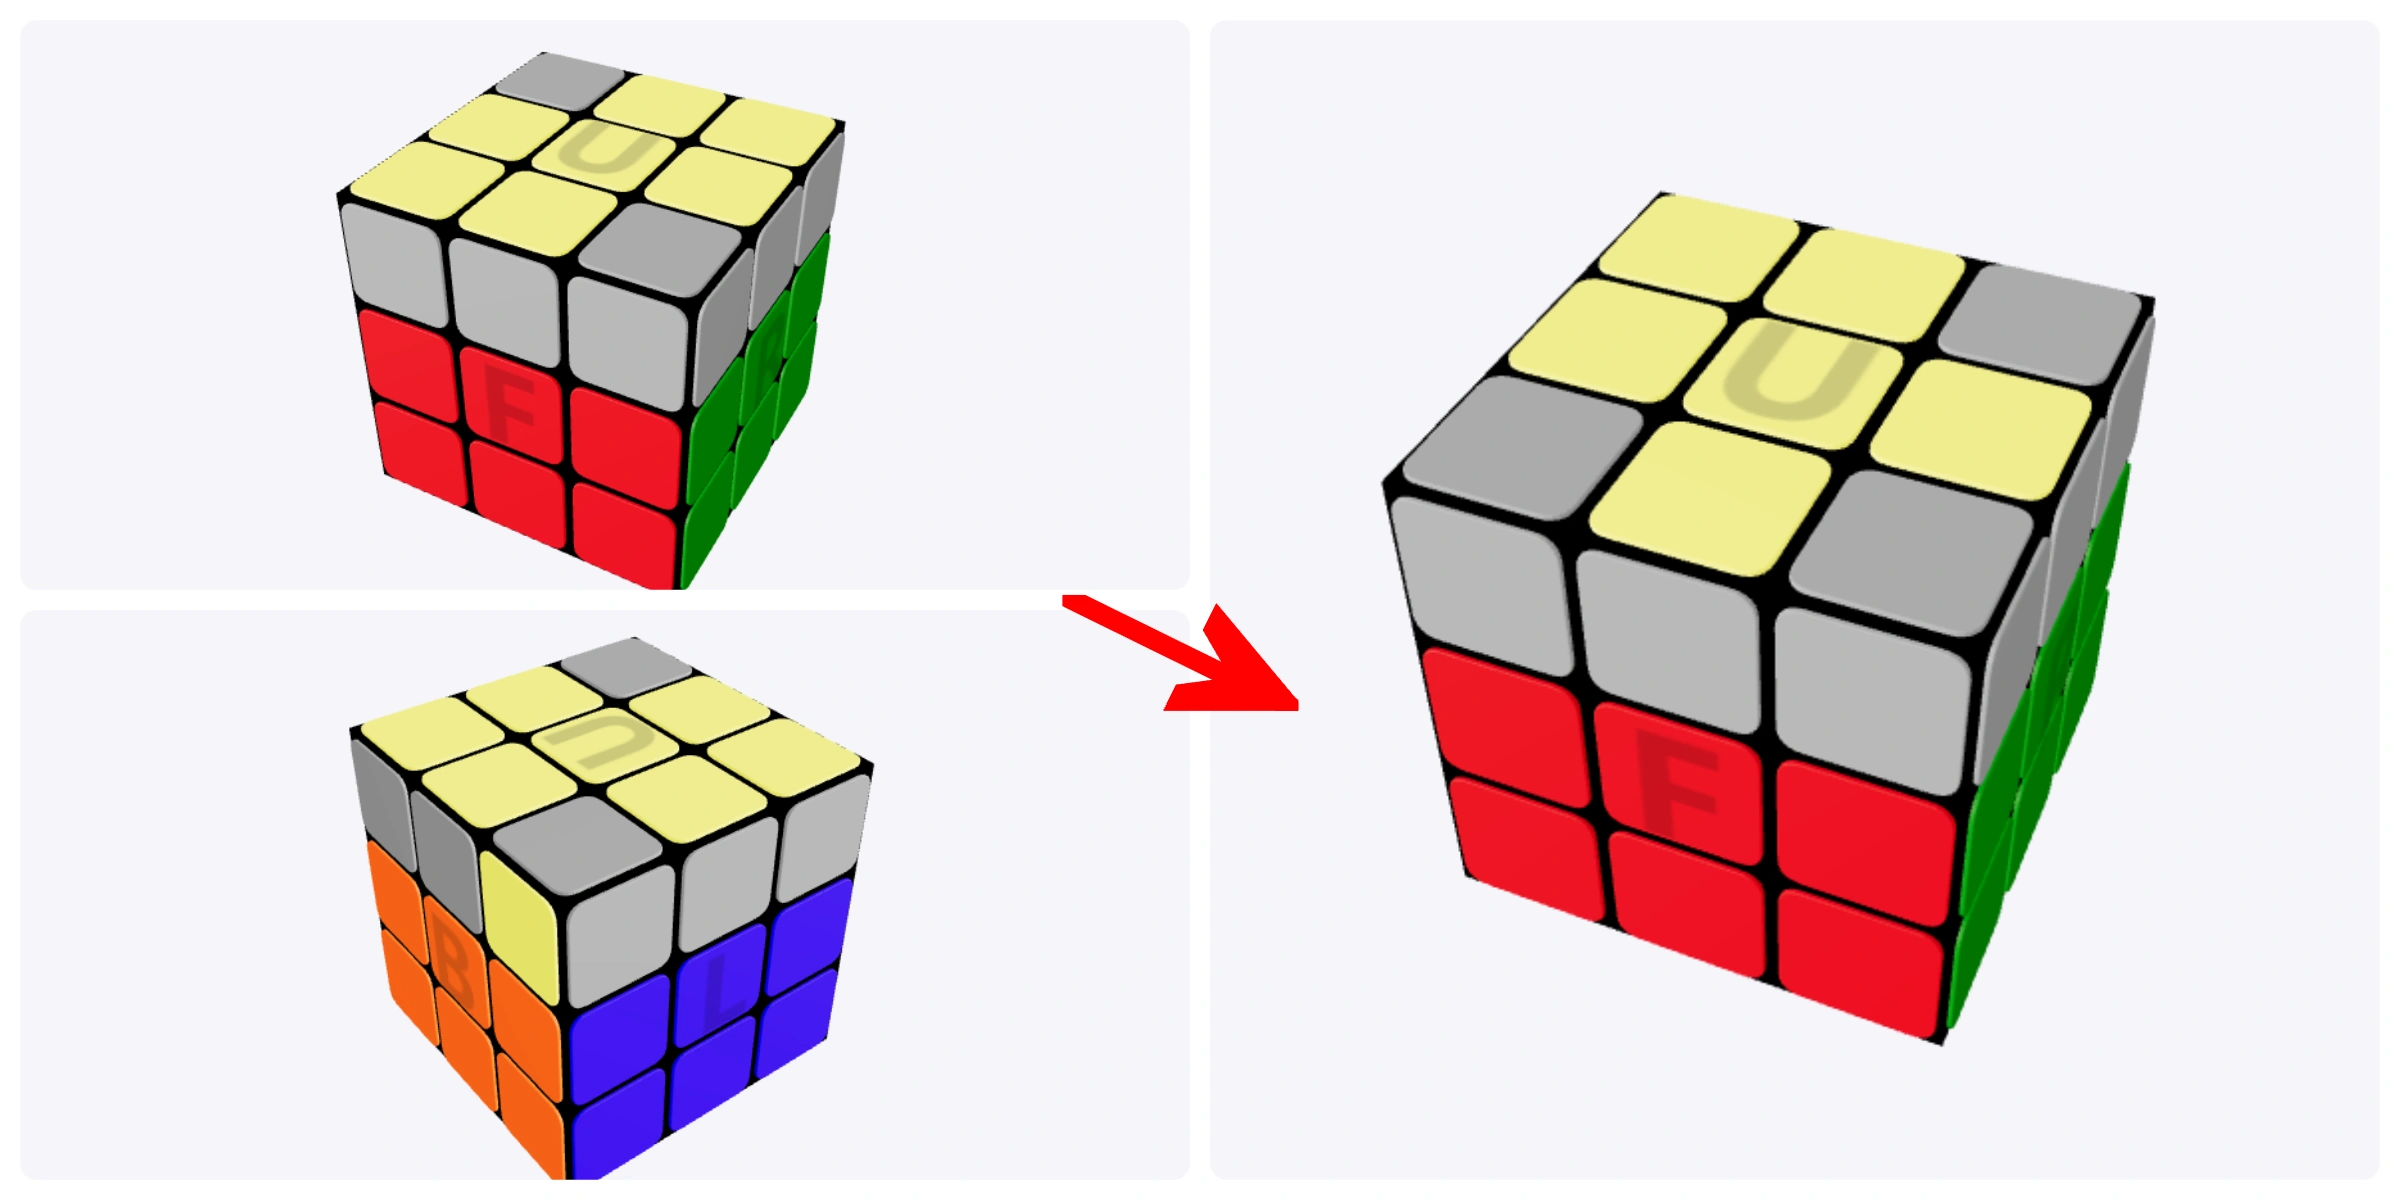
The yellow cross is intact, but all four yellow corner stickers face sideways. Match the side-sticker arrangement shown before applying the algorithm.
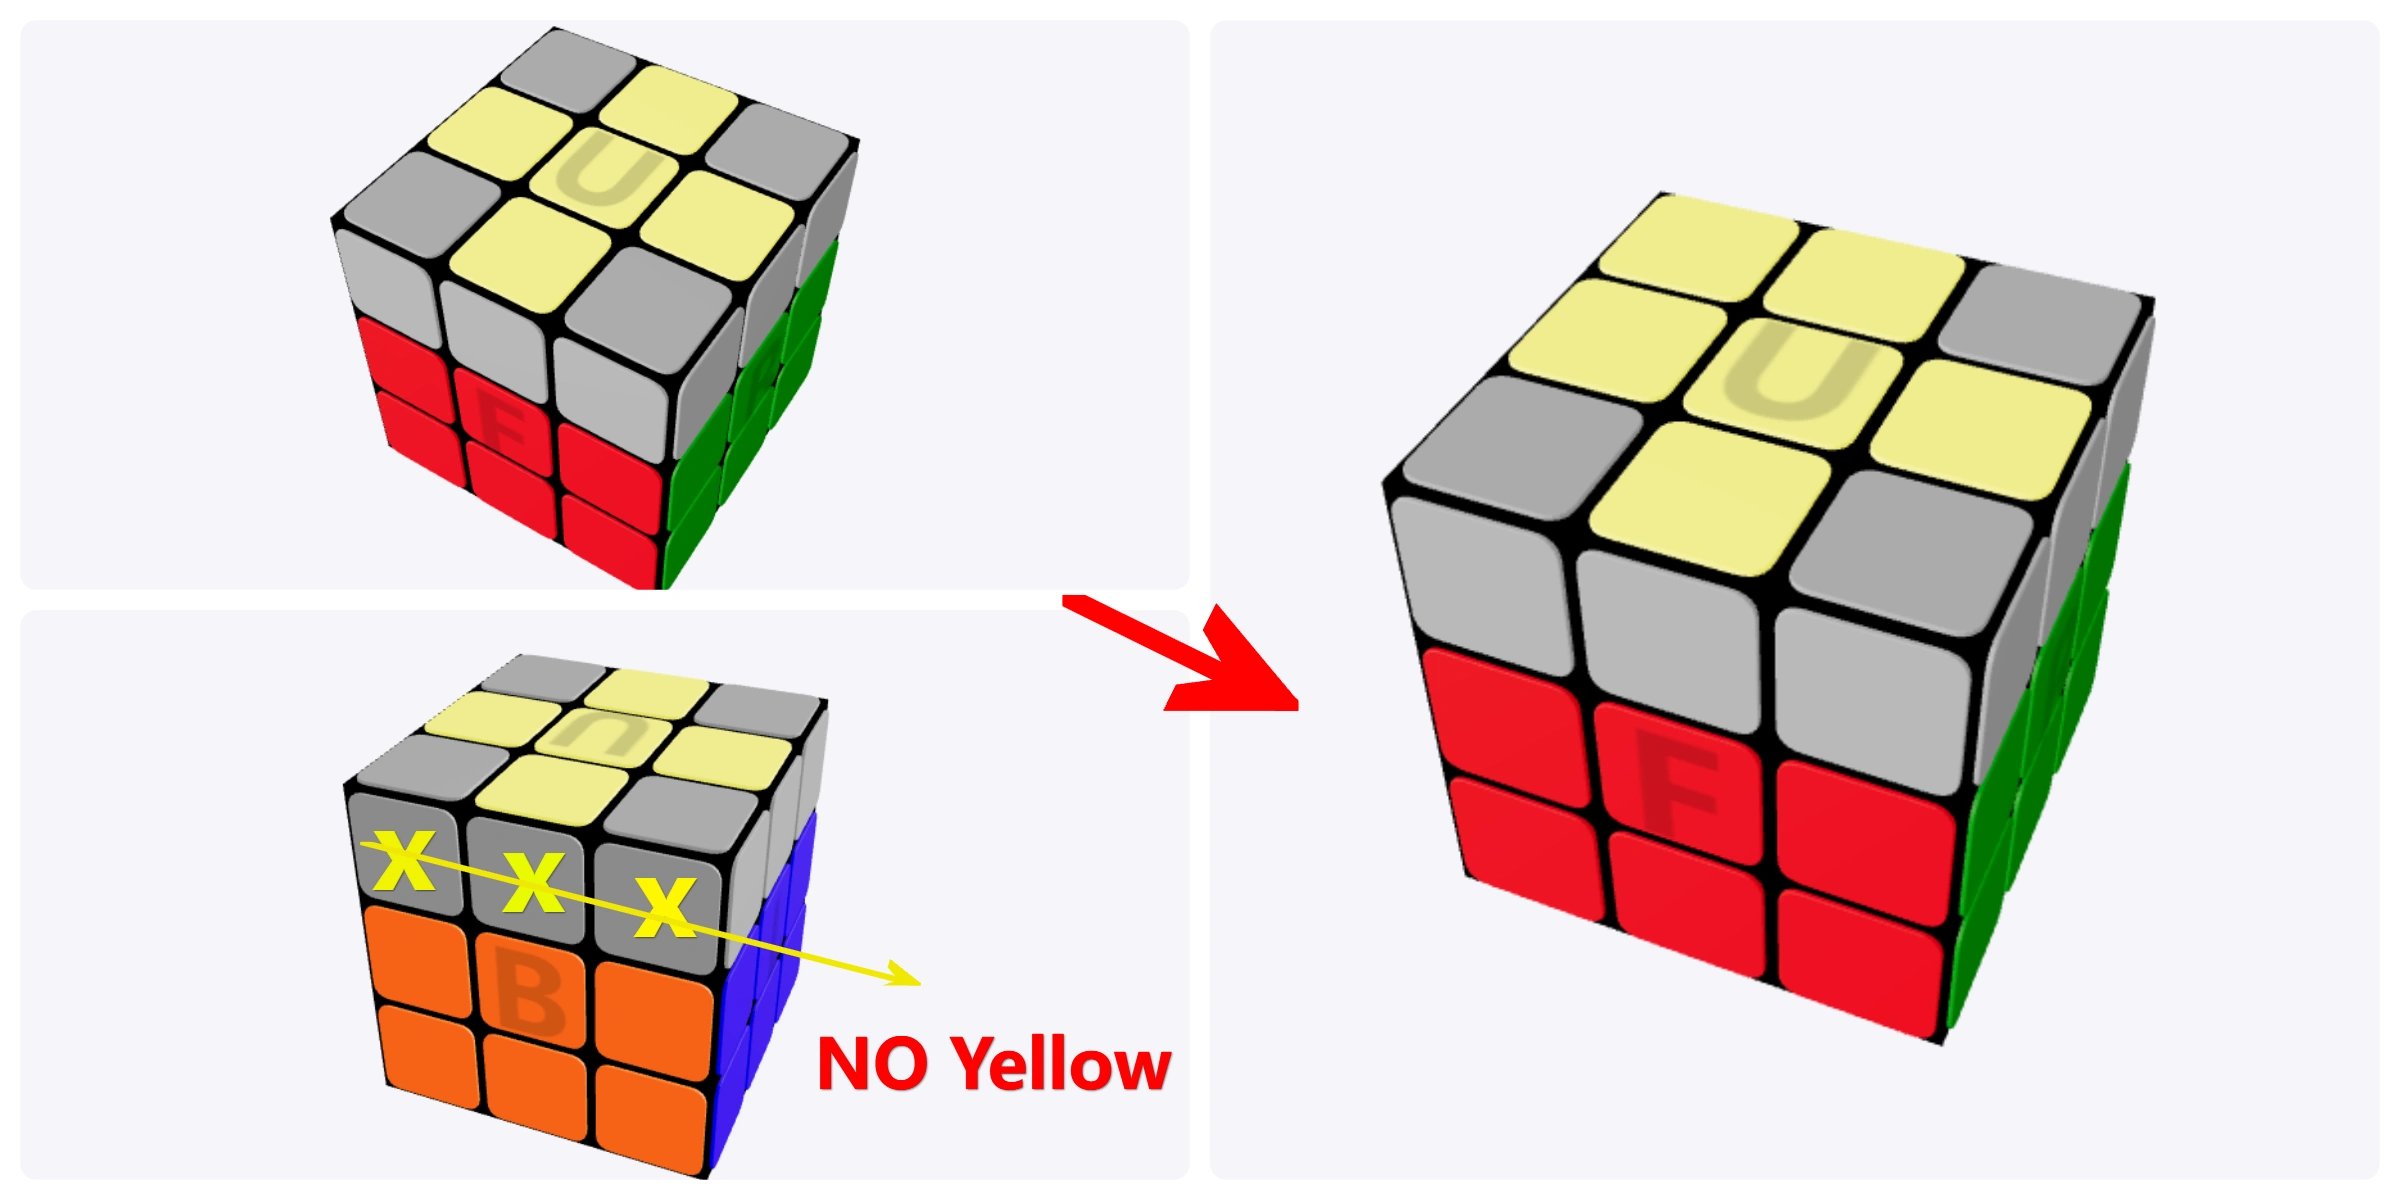
R' U' R U' R' U2 R
One Yellow Corner Faces Up: The Fish Pattern
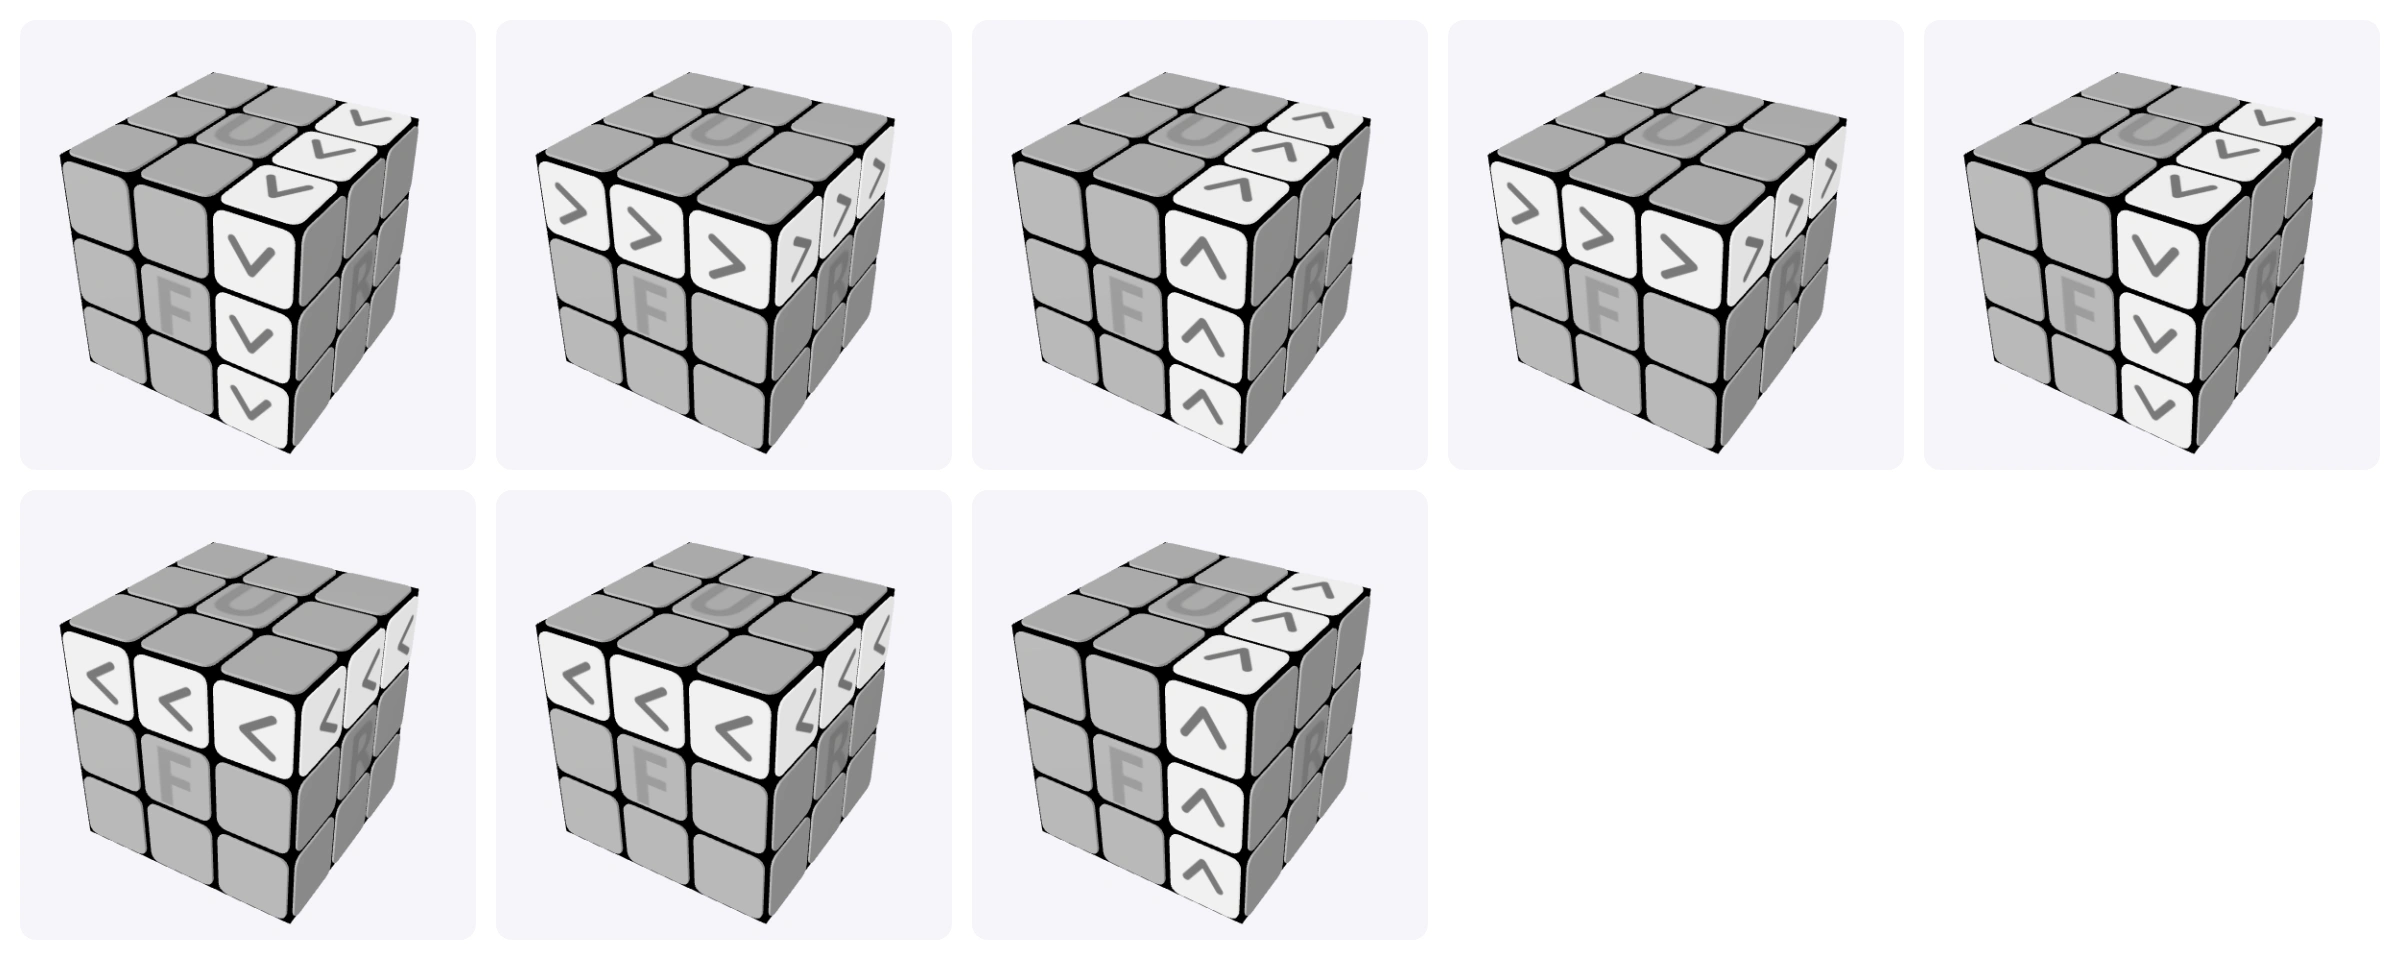
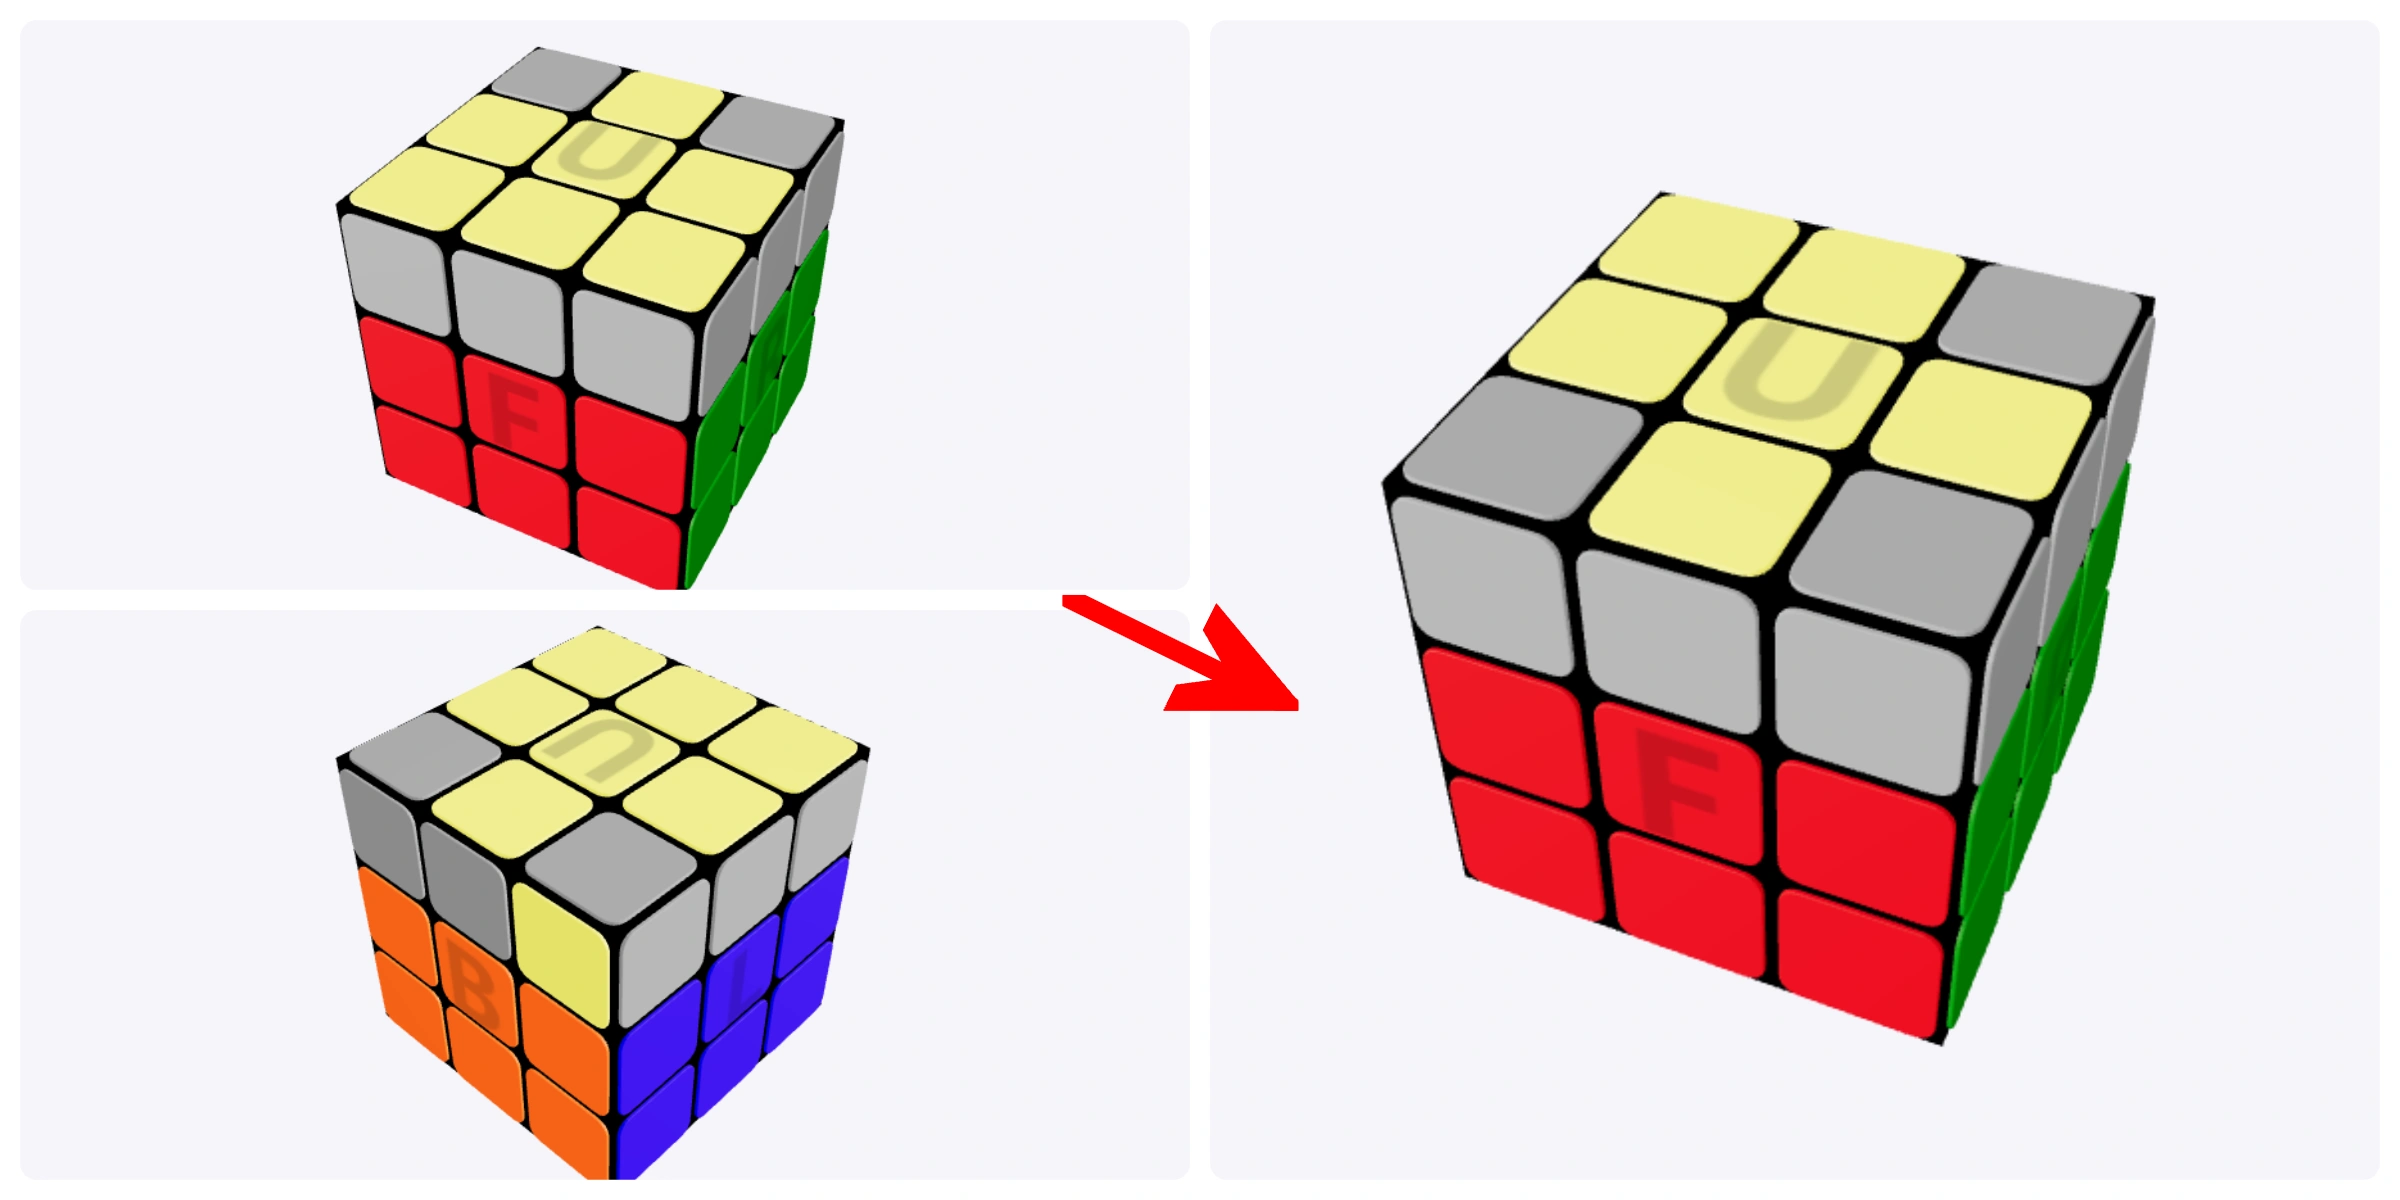
The yellow cross plus one yellow corner makes a fish-like shape. Position the upward-facing yellow corner at the back-left, and compare the side stickers with the diagram.
Perform the algorithm. If the yellow face is not complete, inspect the new pattern and set it up again before repeating.
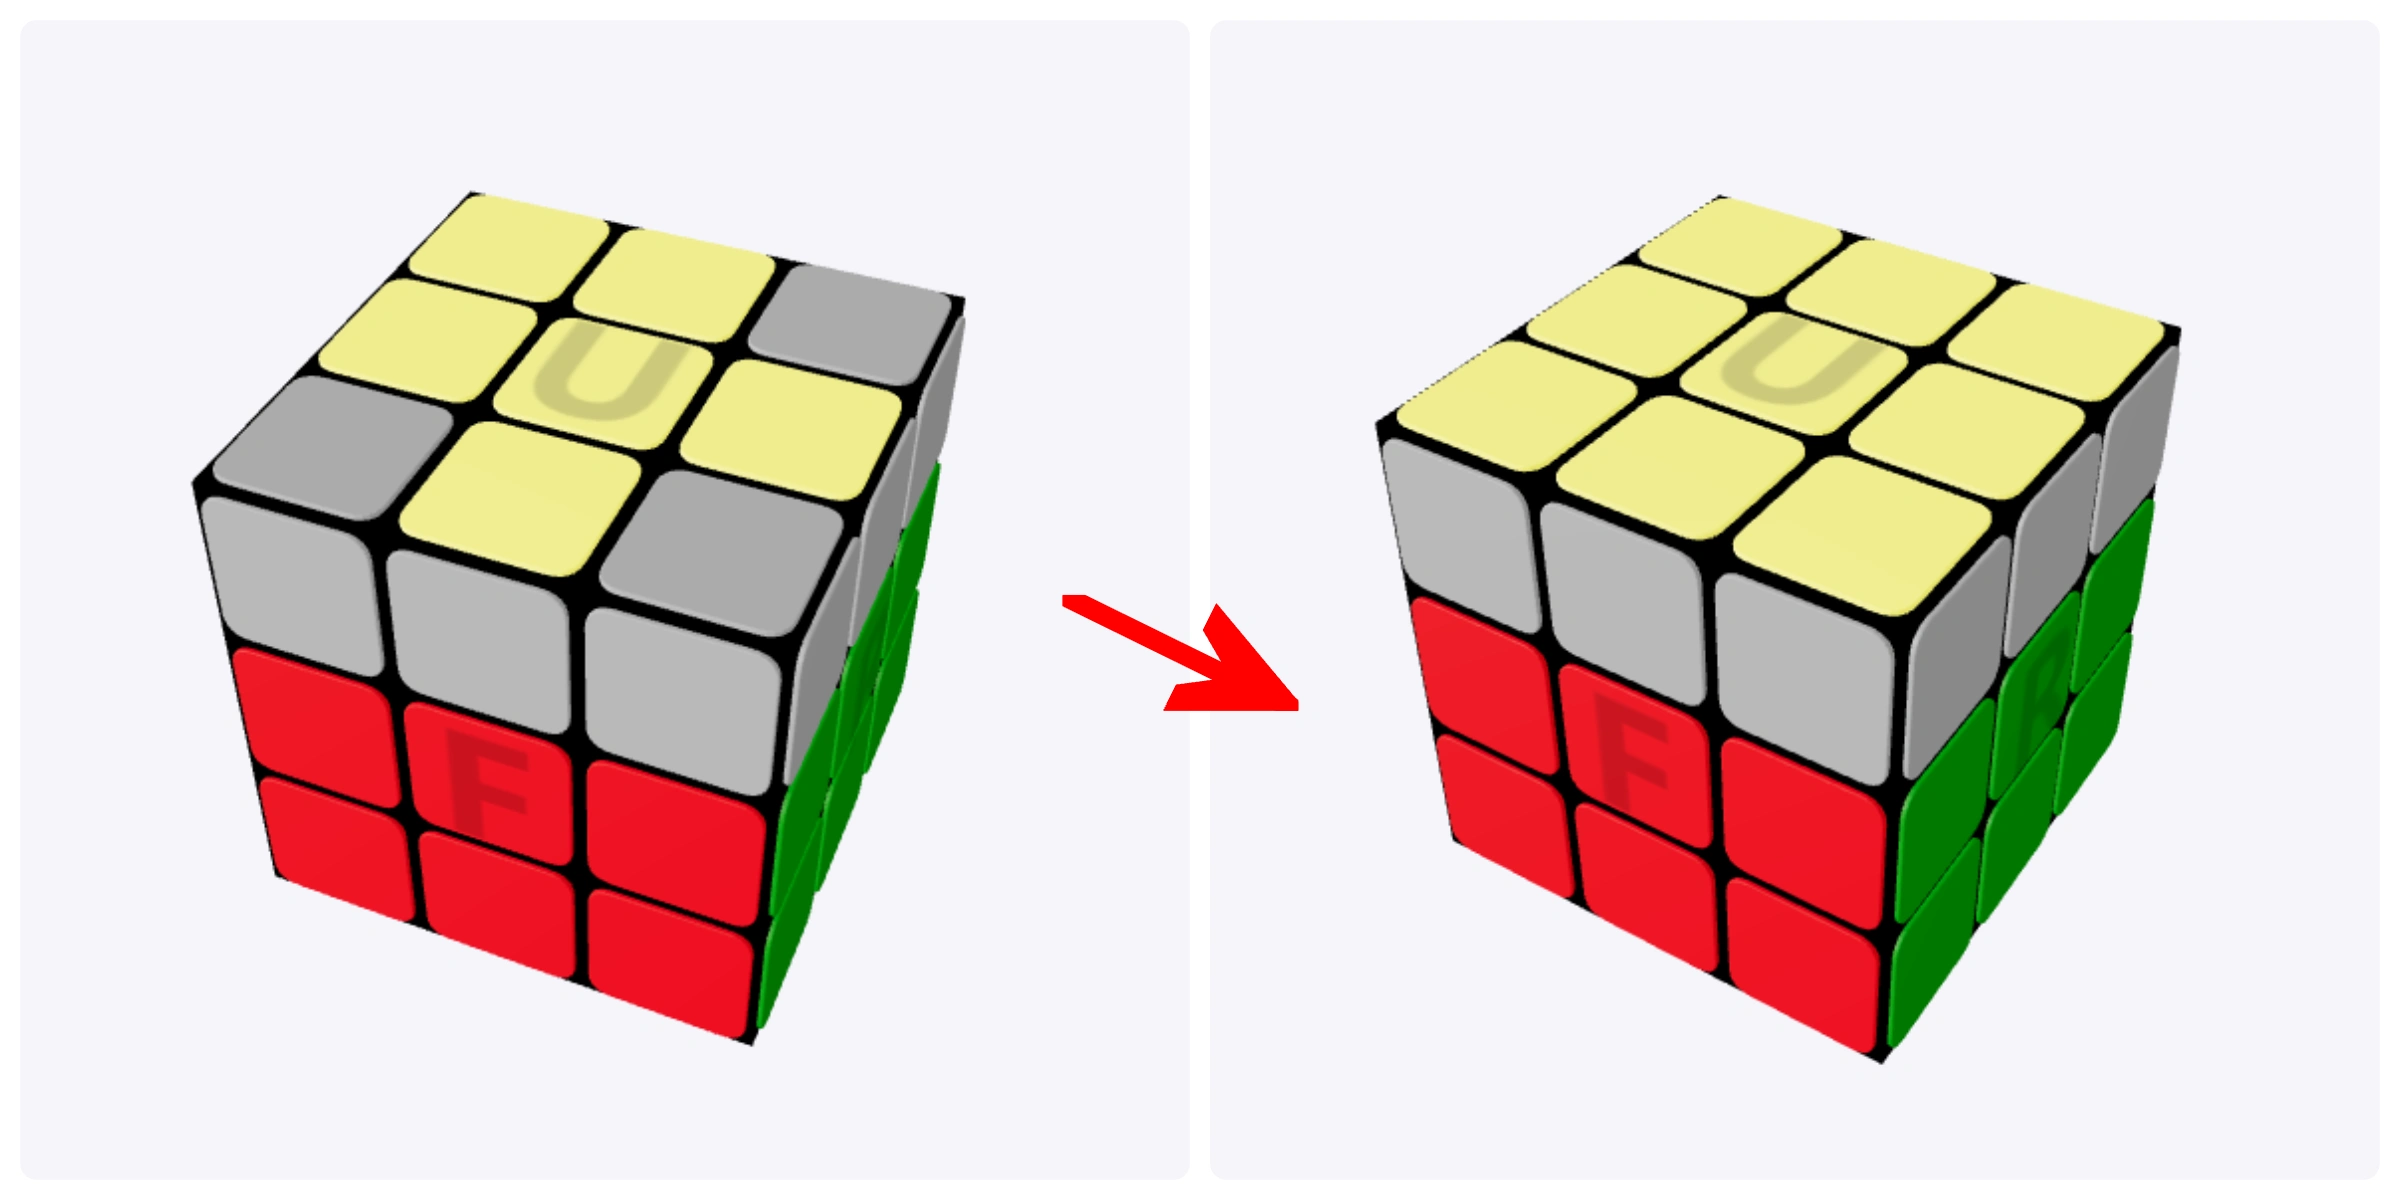
R' U' R U' R' U2 R
6. Put the Yellow Corners in the Right Places
A solid yellow face doesn’t mean the top layer is solved yet. Now move the yellow corners into their correct positions while keeping yellow on top.
Look around the upper row of each side for two corner stickers of the same color. Cubers often call this matching pair “headlights.” Ignore the edge sticker between them.
Find a Matching Pair of Corner Stickers
You Have a Matching Pair on One Side
Hold the matching pair at the front for this algorithm. Keep yellow on top and perform the full sequence.
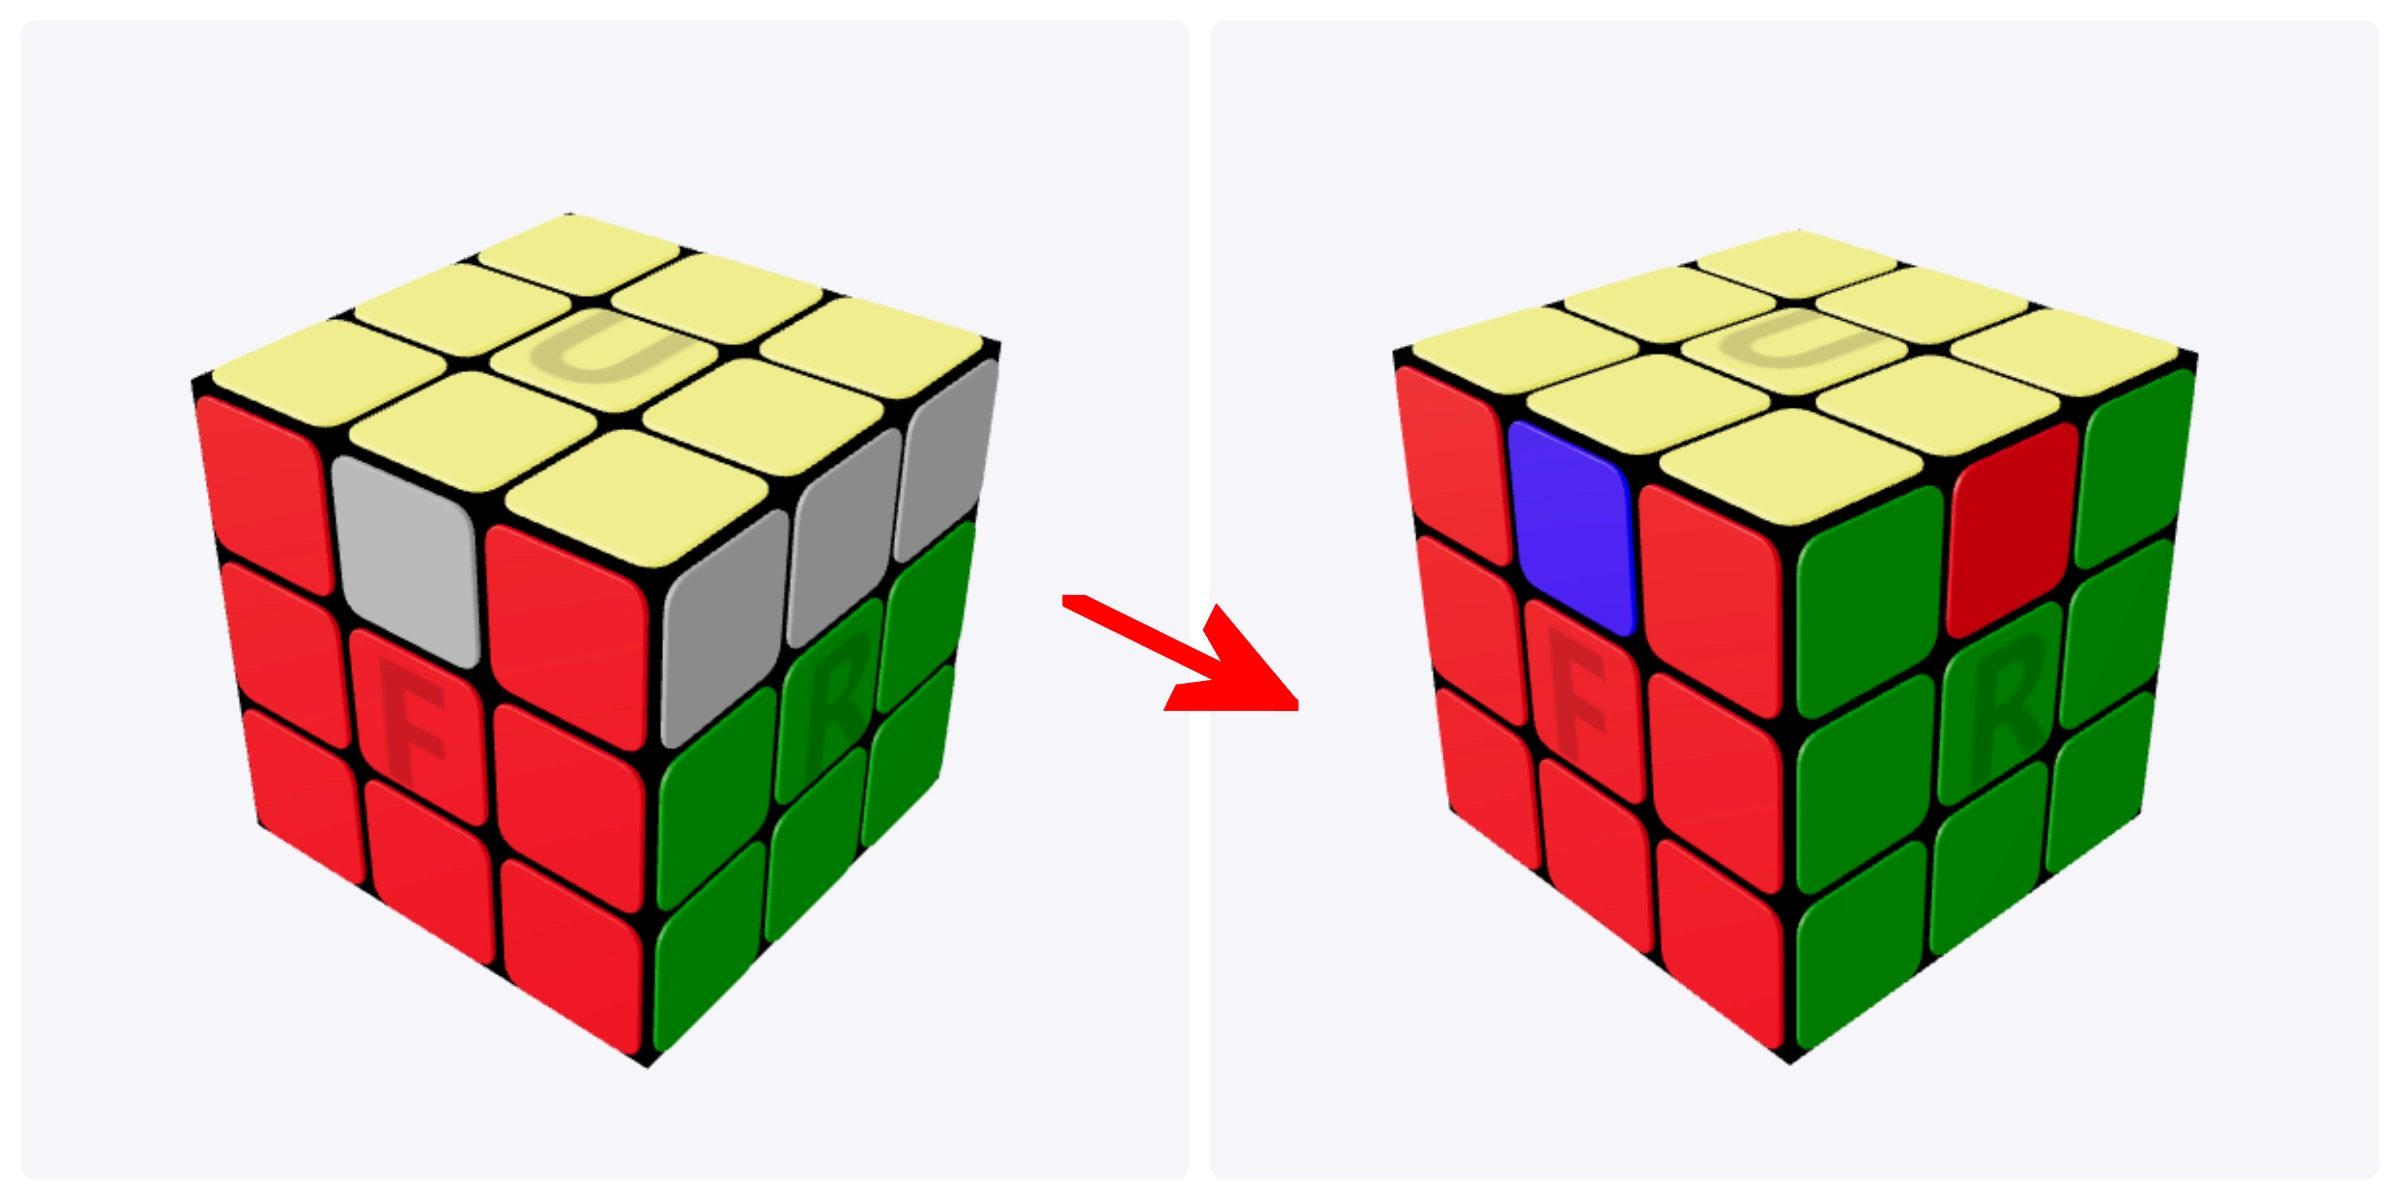
R B' R F2 R' B R F2 R2
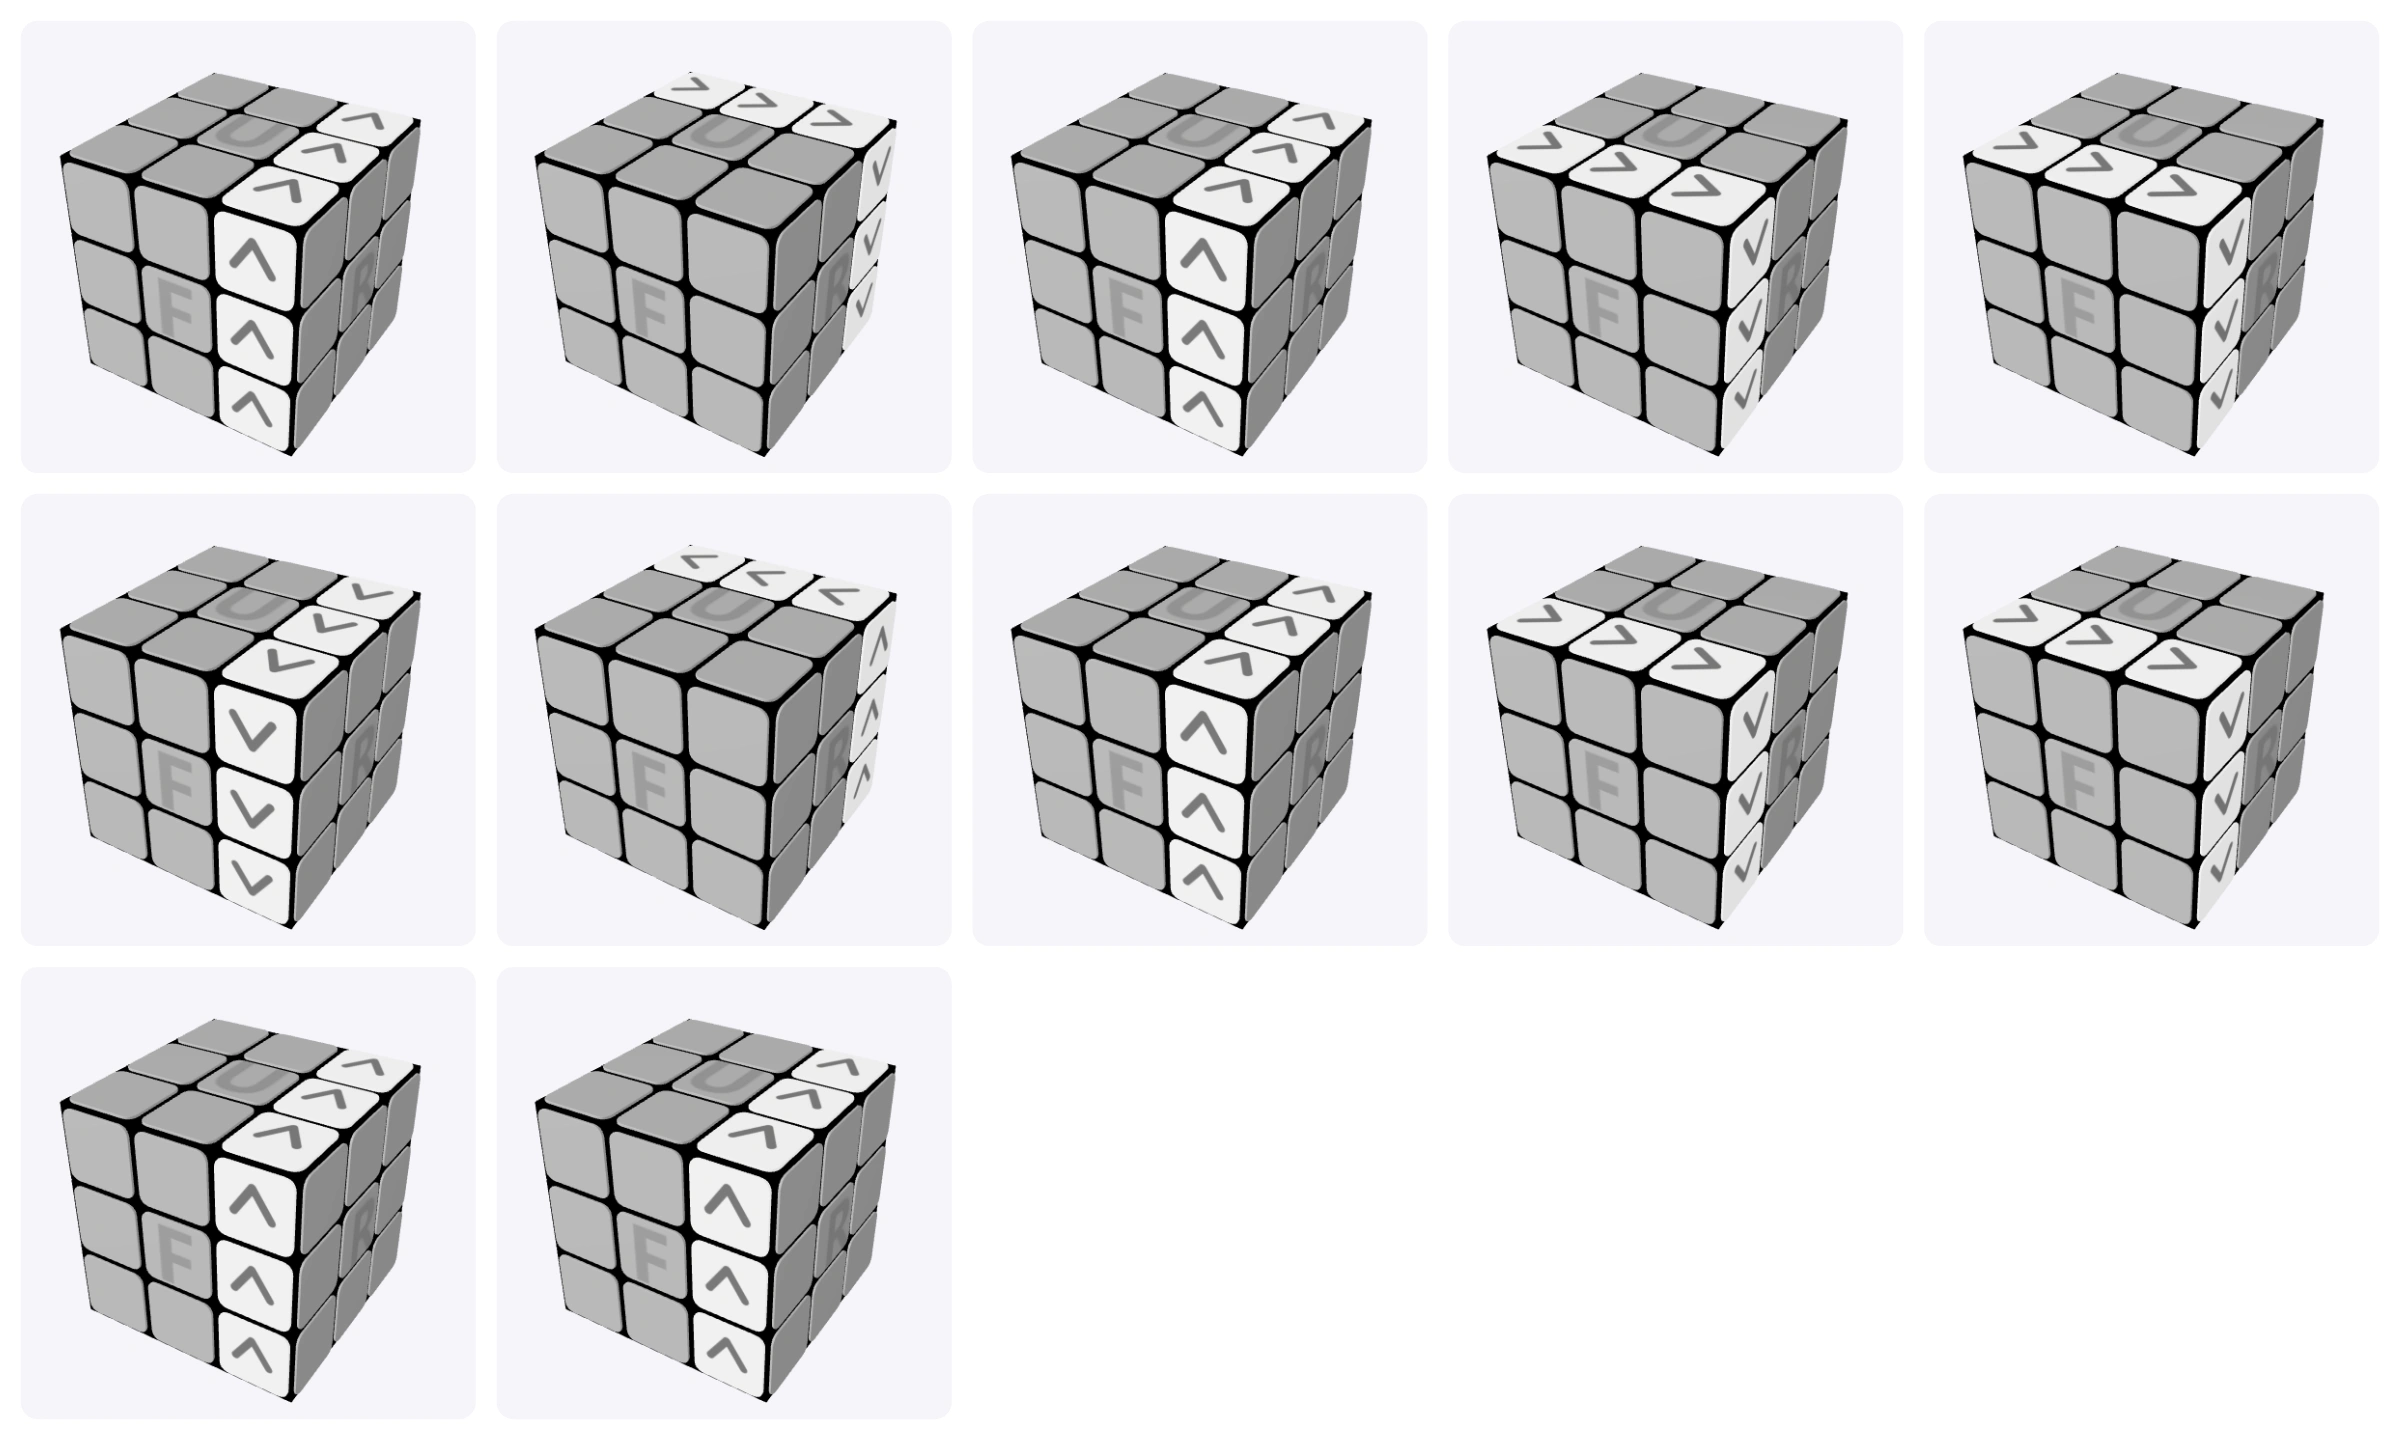
Afterward, turn the top layer as needed to line up the corner colors with their centers.
There Are No Matching Pairs
Start with any side facing you and perform the algorithm once. Then look for a matching pair, bring that side to the front, and follow the matching-pair case.
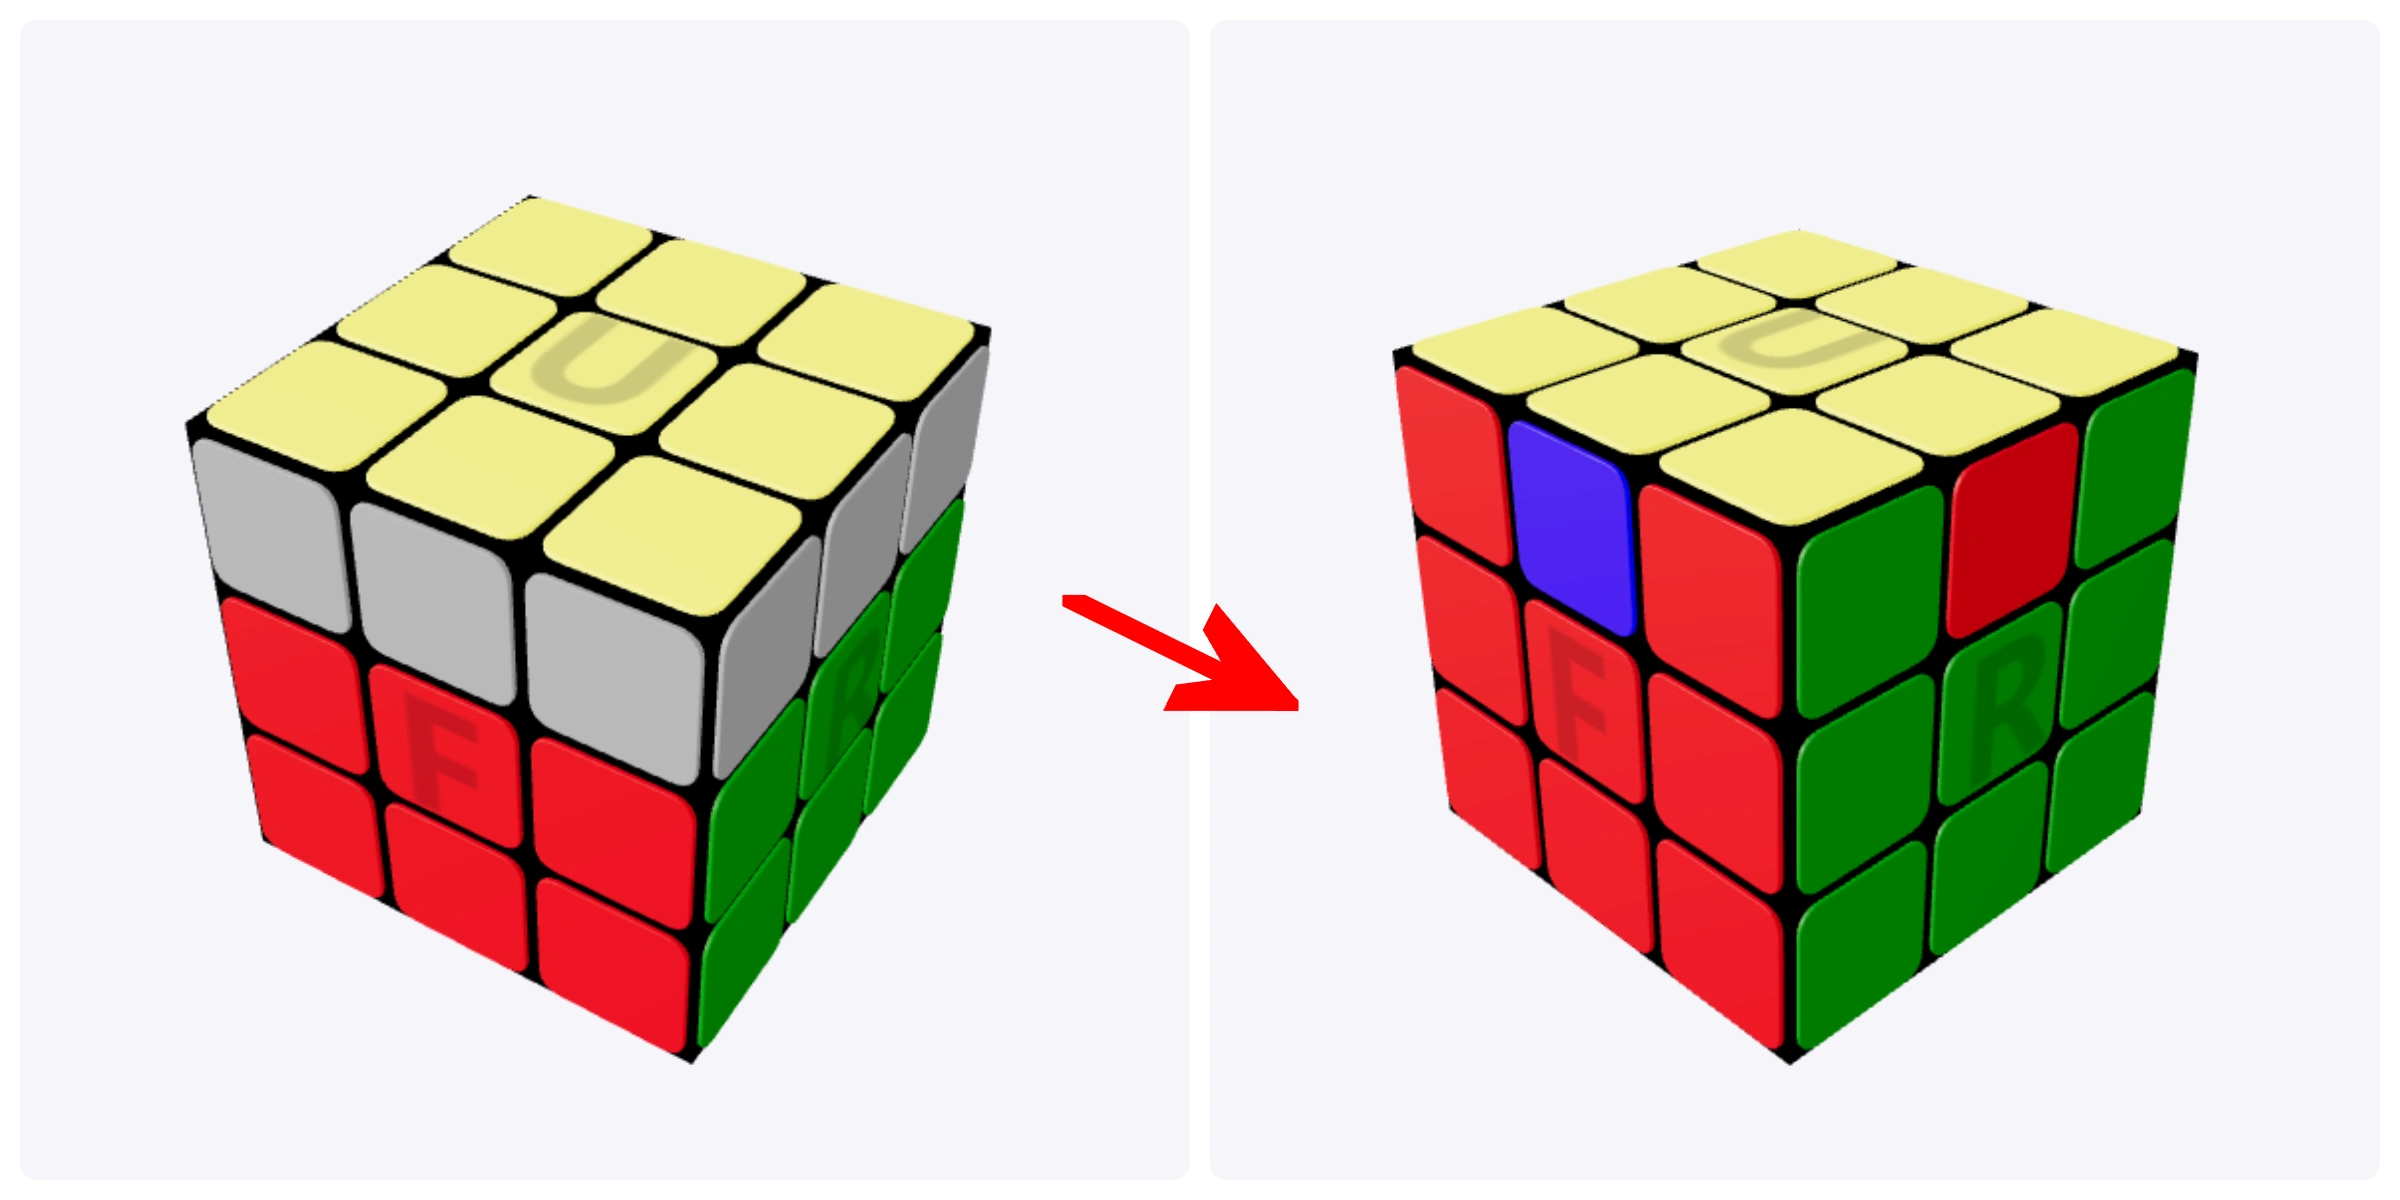
R B' R F2 R' B R F2 R2
Check the cube between attempts. If you create a matching pair, reposition it before repeating the algorithm.
7. Solve the Last-Layer Edges
You’re almost done. The yellow face and its corners are solved; only the top-layer edges need to move. This final algorithm cycles three edges while leaving the corners in place.
Before you start, make sure the top-layer corners are aligned with the side centers.
Look for a Completed Side
One Side Is Already Solved
Hold the completed side at the front for this algorithm. Perform the sequence once, then check the remaining edges.
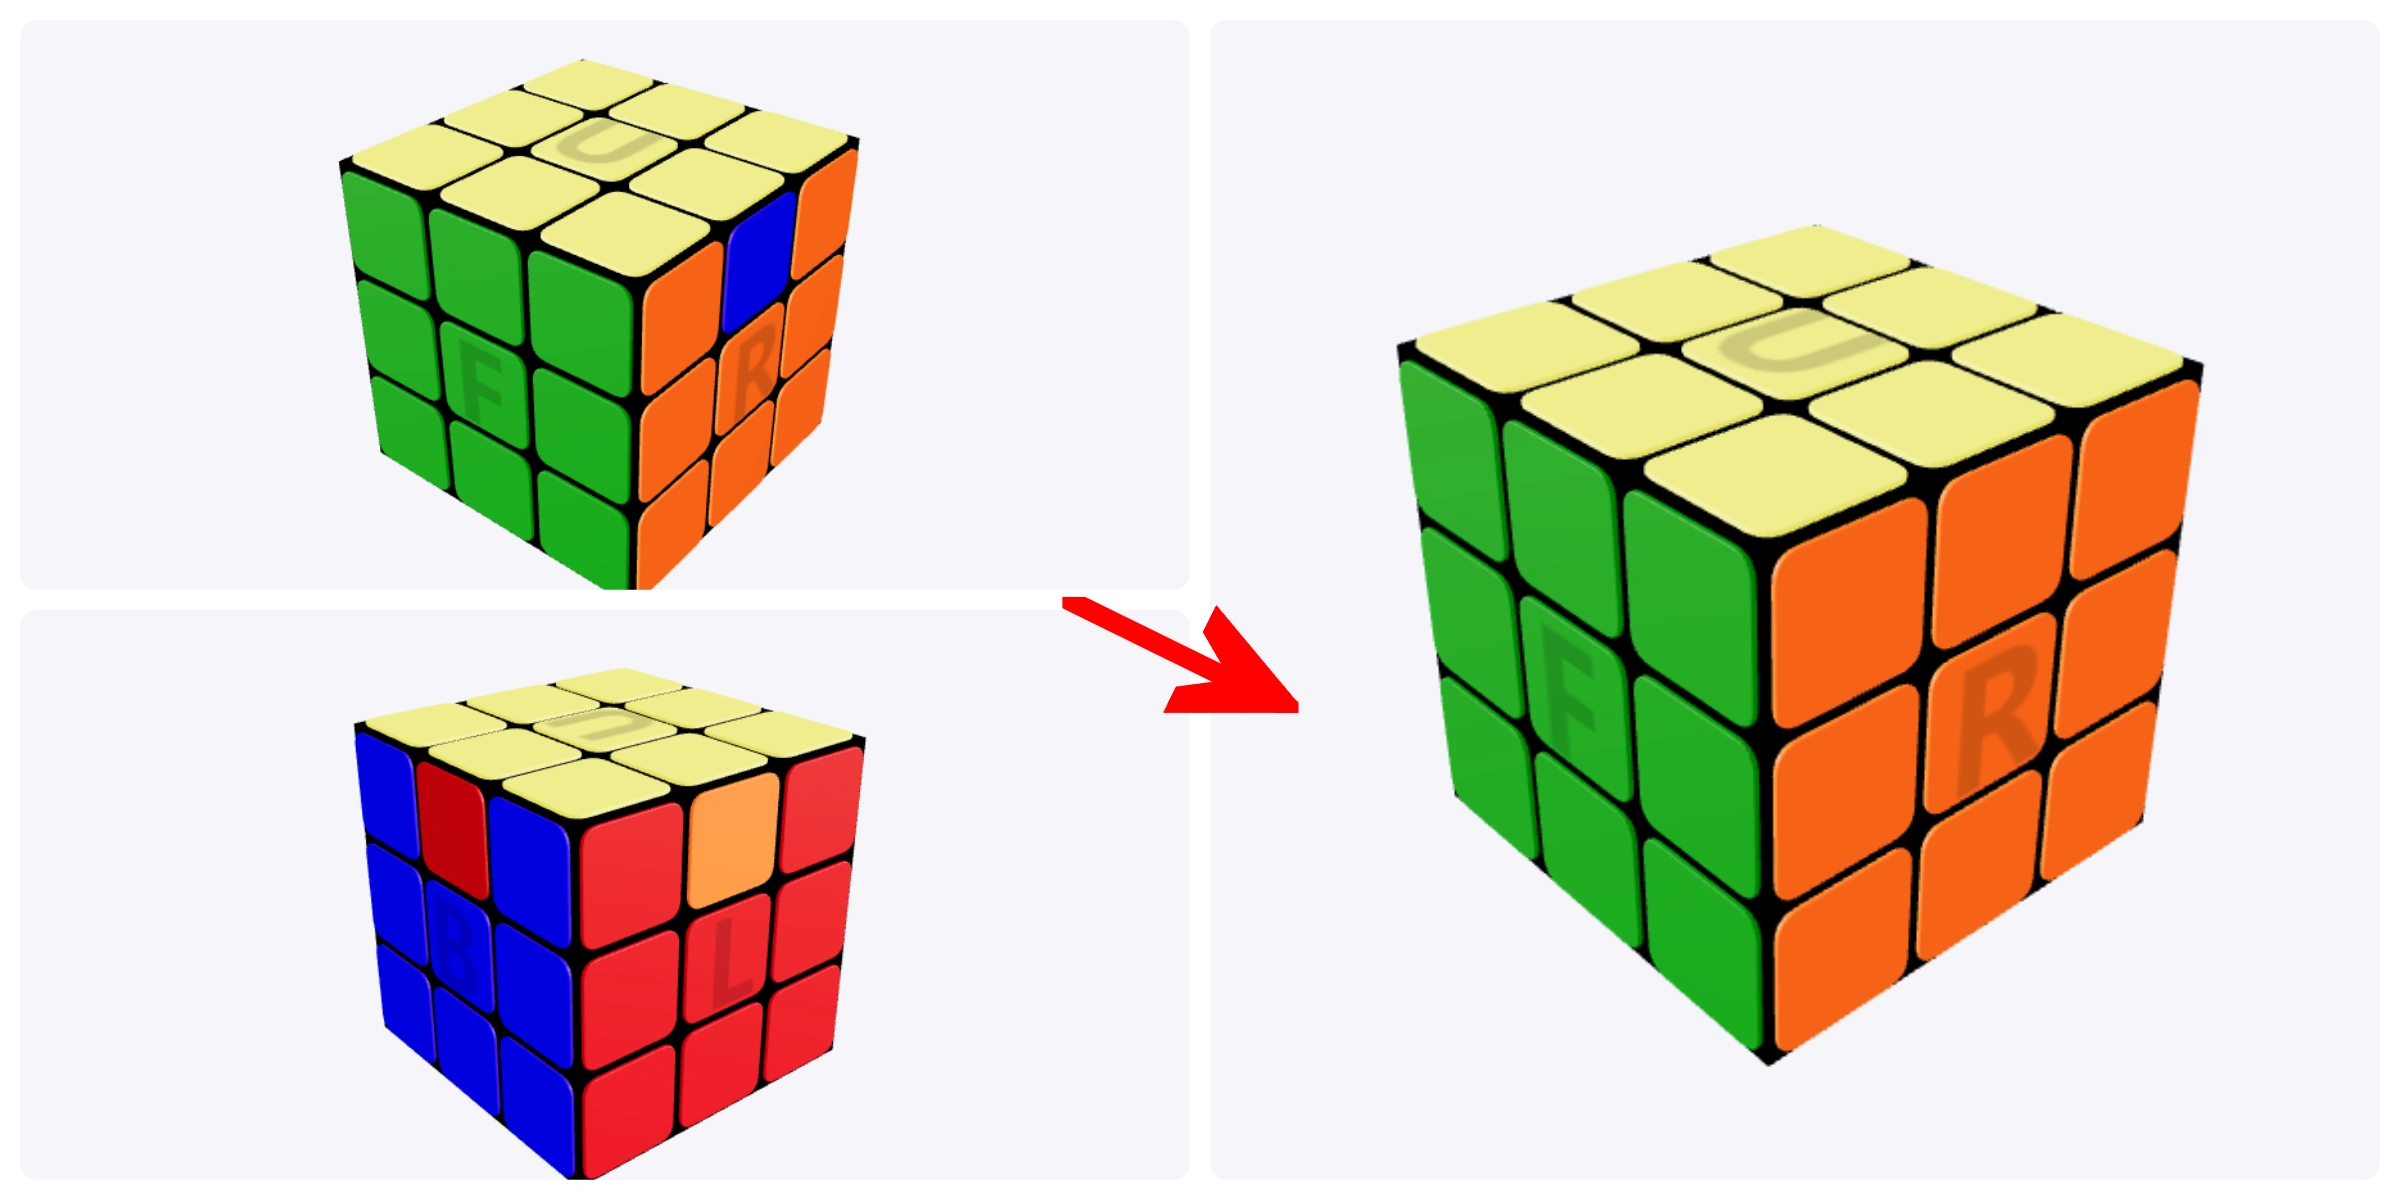
R' U R' U' R' U' R' U R U R2
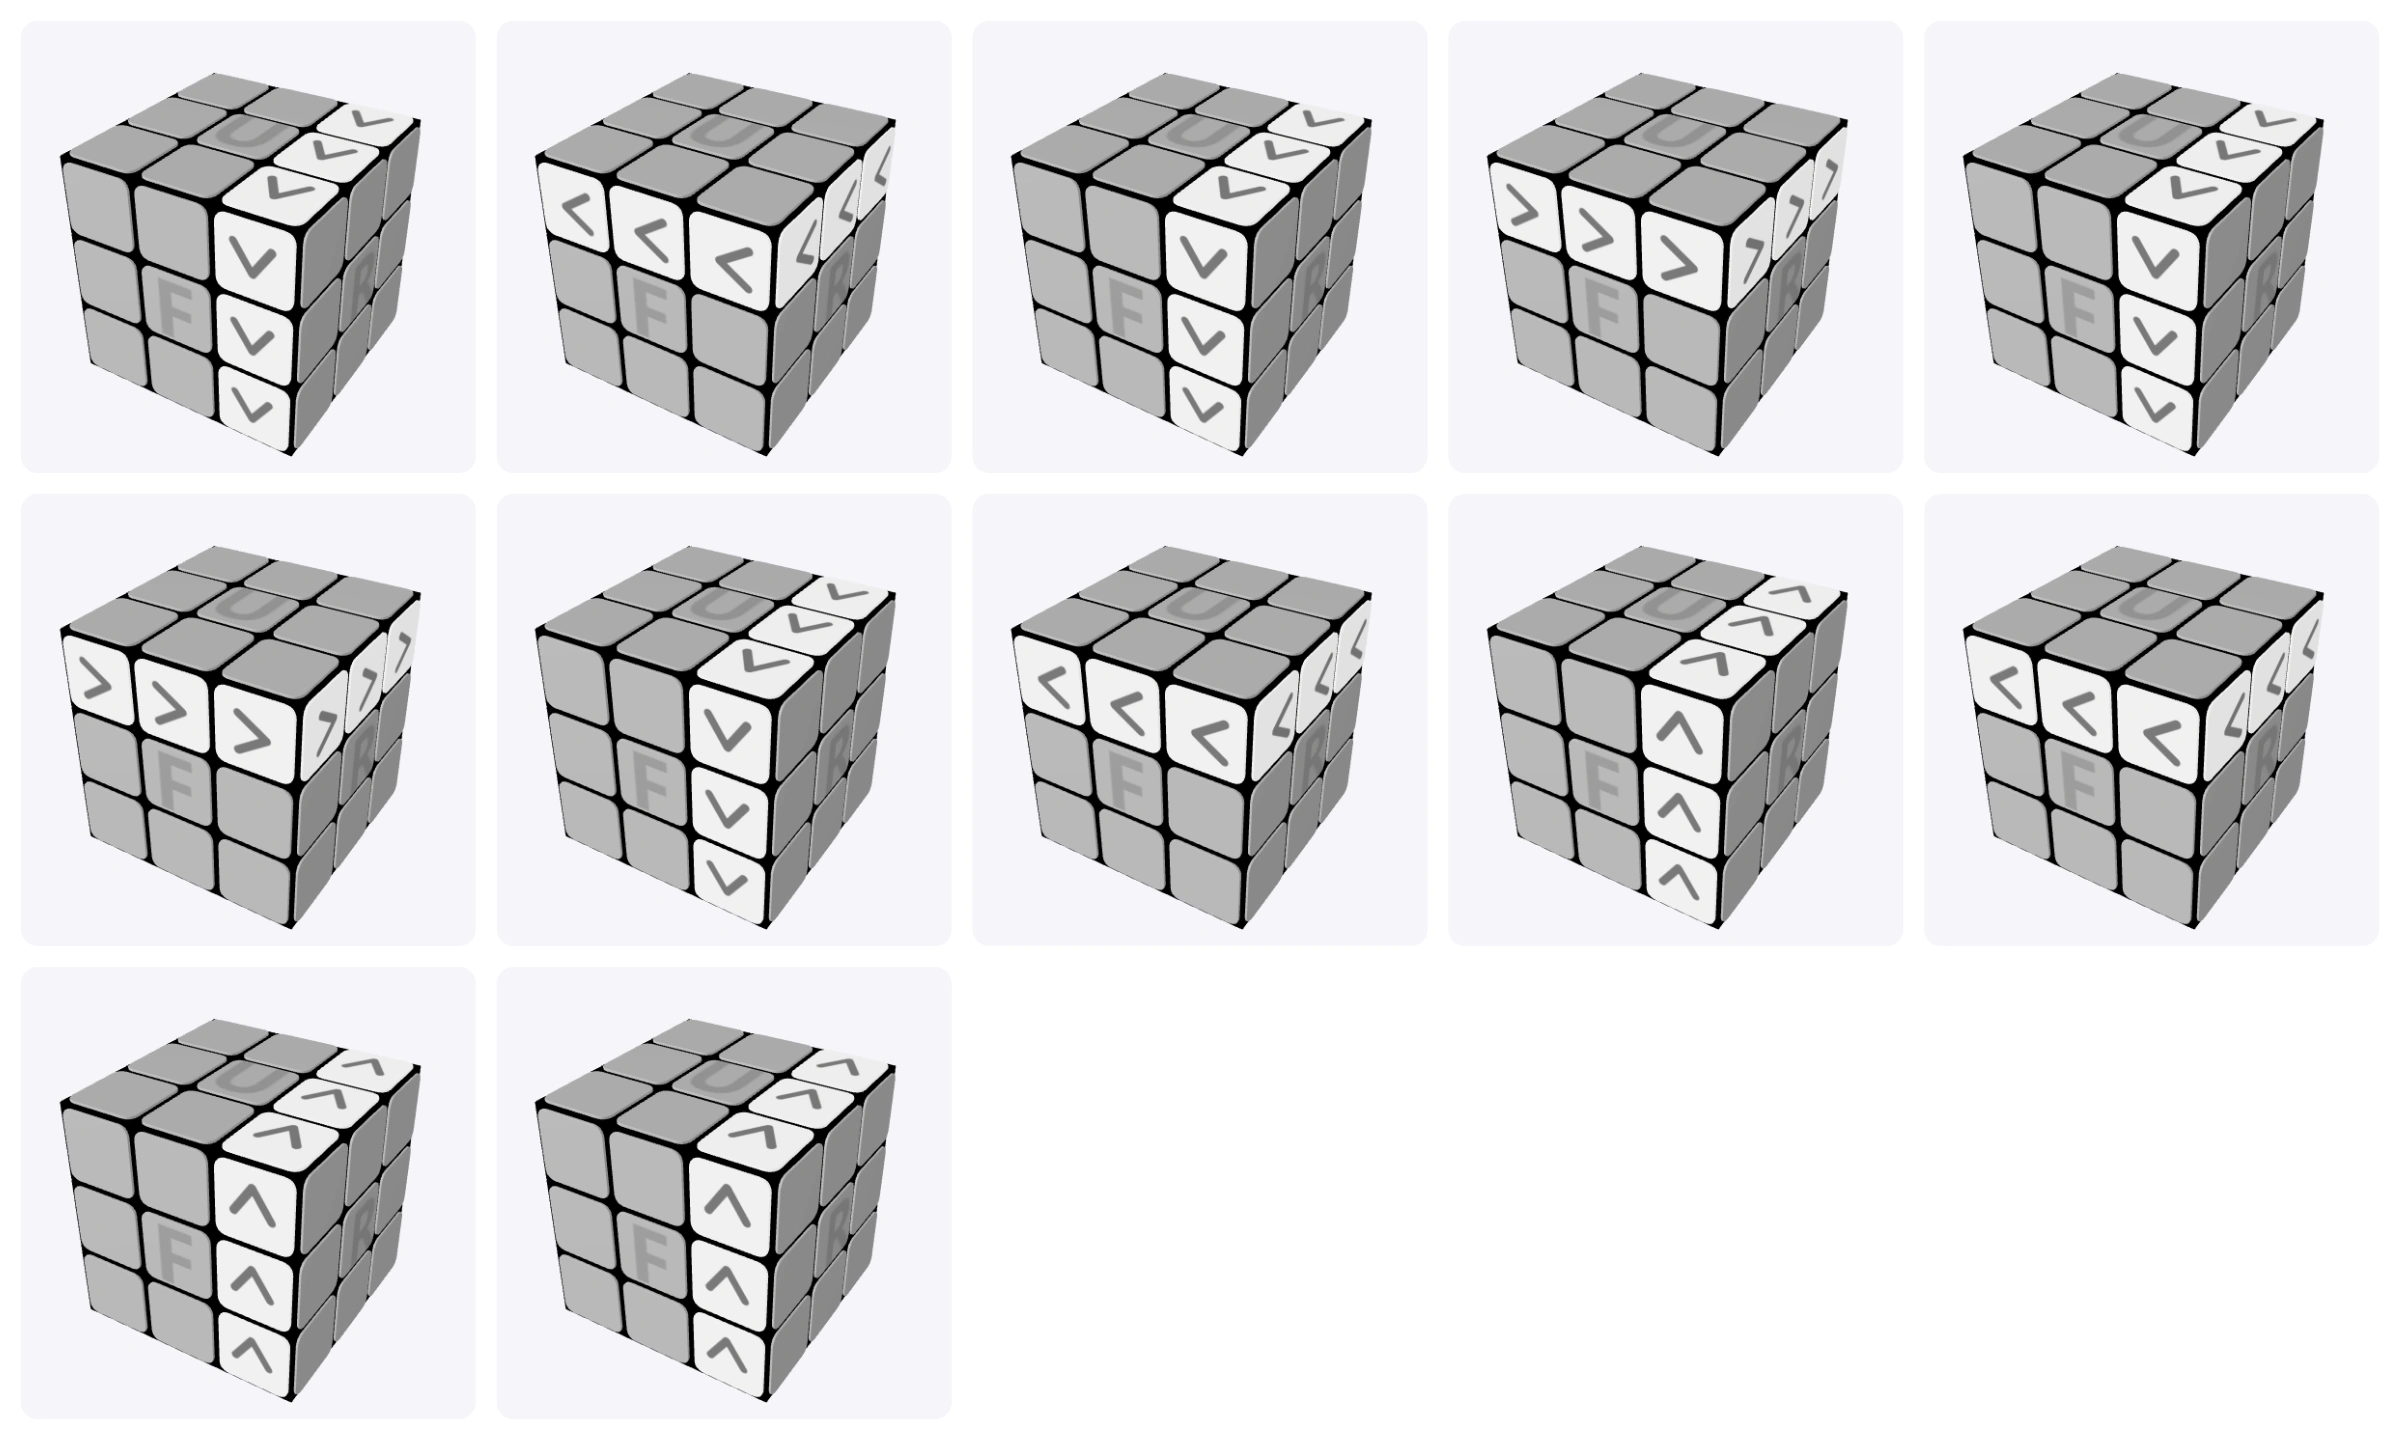
Depending on which direction the edges need to move, you may need to perform the sequence a second time. Keep the completed side at the front.
None of the Sides Is Solved
With yellow still on top, perform the algorithm once from any side. Then look for a completed side and rotate the whole cube to bring it to the front.
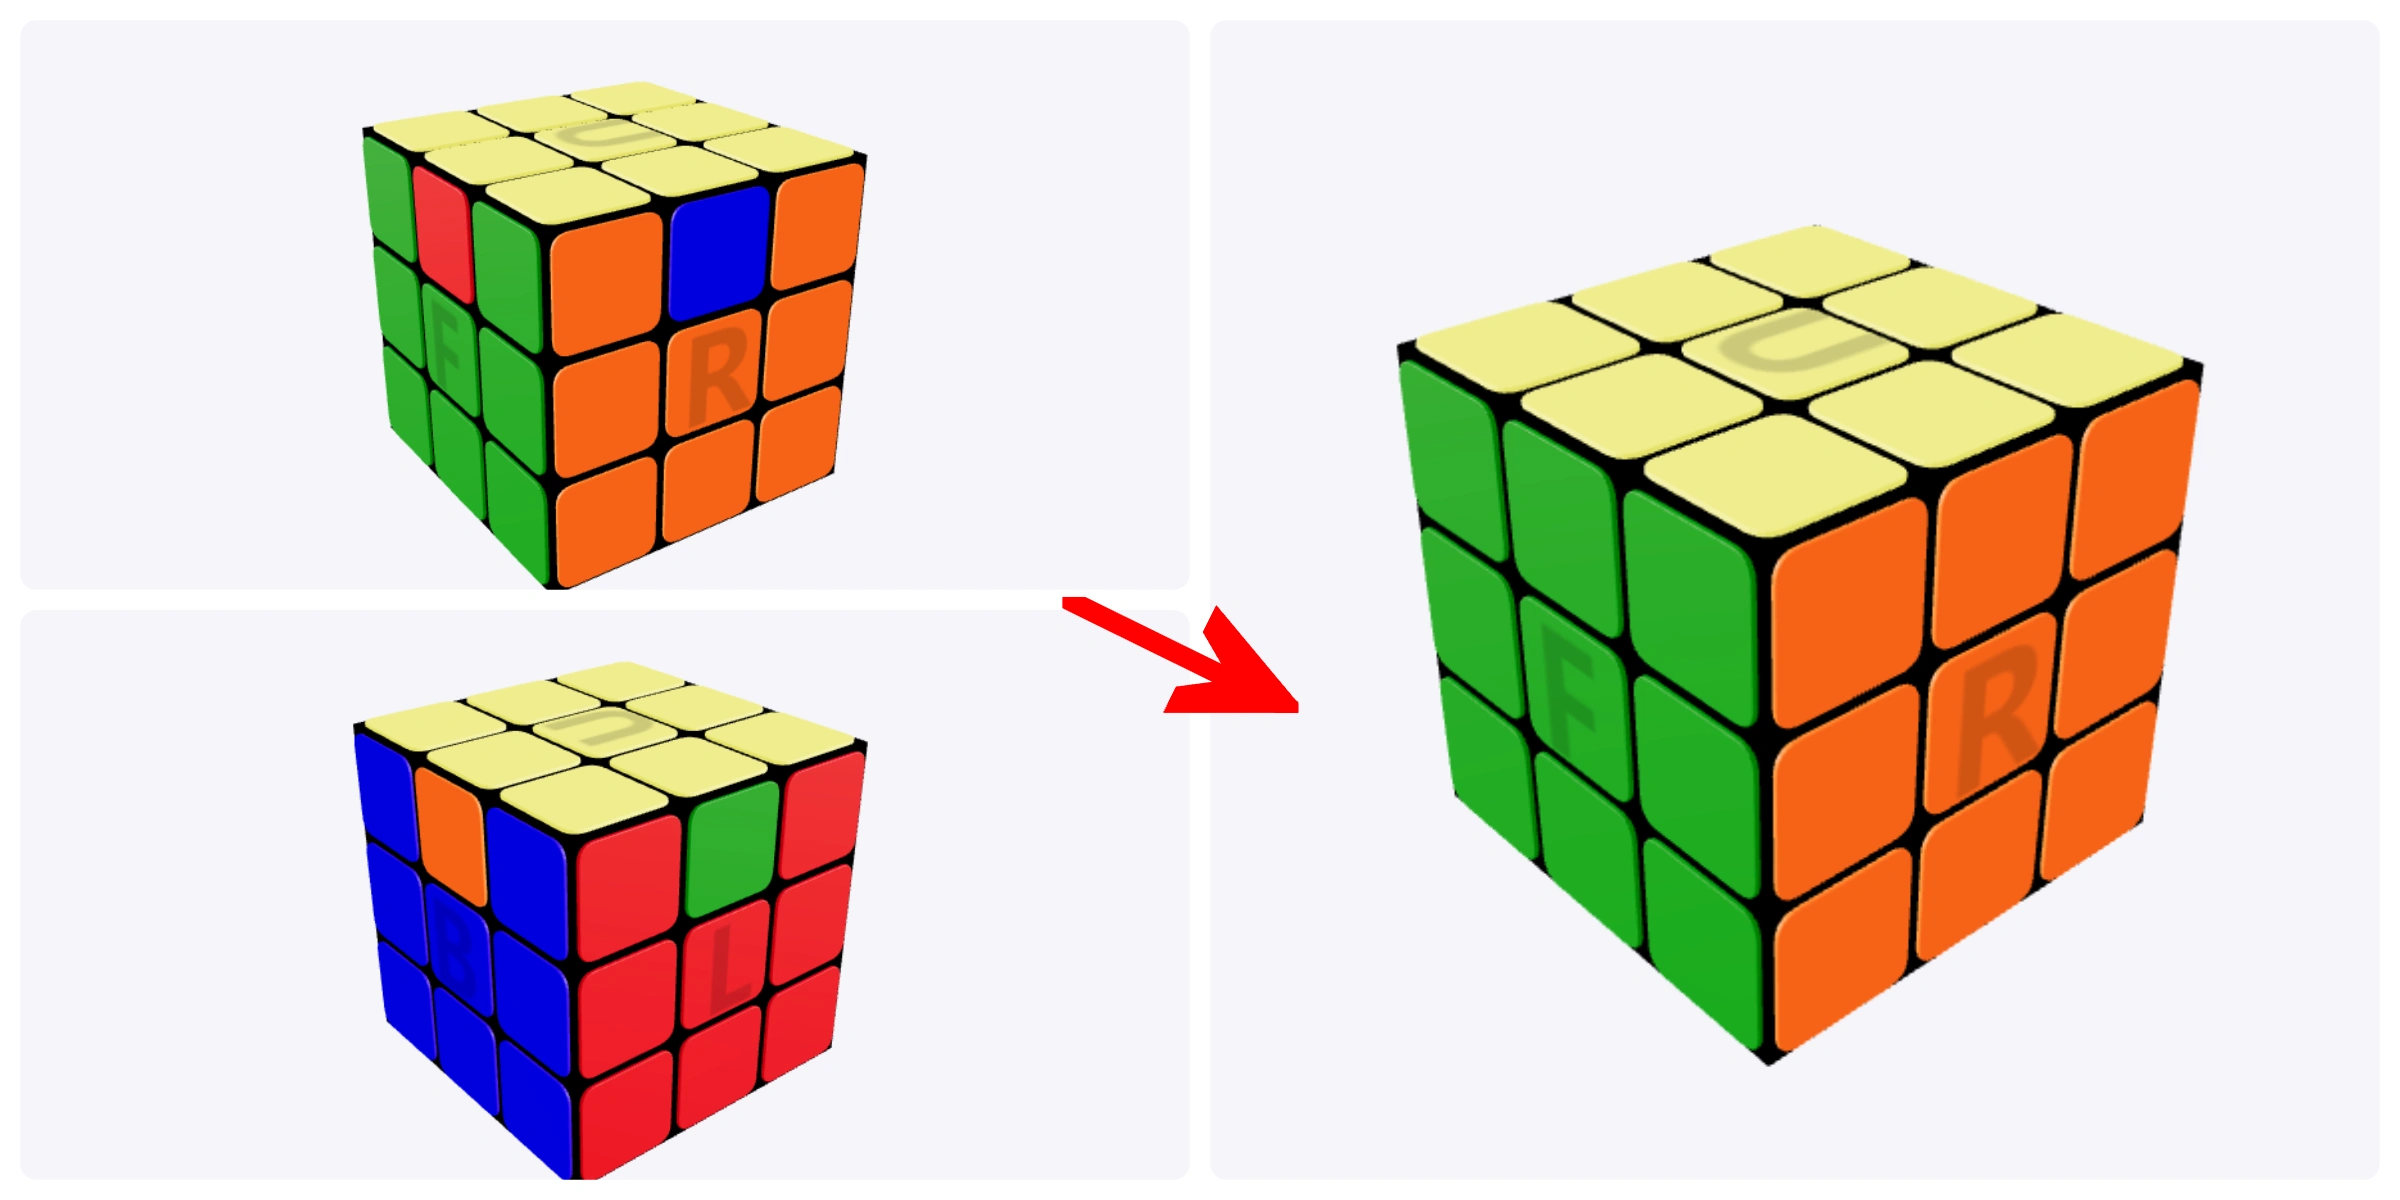
R' U R' U' R' U' R' U R U R2
Continue with the one-solved-side case. Once every side matches its center, your cube is solved.
Stuck on the last step? Double-check your setup before
repeating an algorithm. A wrong starting face, a missed apostrophe, or
rotating the whole cube halfway through a sequence can change the
result. Complete each sequence before judging what it has done.

Be the First to Comment on This Rubik’s Cube Solver